

Knowledgebase: Google Analytics
GA4 Landing Page (not set)

What the heck does landing page (not set) mean?
In most cases, landing page (not set) is nothing to worry about. However, first to understand (not set), we have to understand what a session is in GA4.
Sessions
In Google Analytics 4, sessions are created when a user “opens your app in the foreground or views a page or screen and no session is currently active (e.g. their previous session has timed out).” A Sessions default inactivity timeout is 30 minutes.
Entrances vs. Landing Pages
Entrances are the count of times the first event in a session happens on a page. Landing pages are the page paths themselves. The biggest difference is that entrances are a metric, and landing pages are a dimension. Metrics are typically quantitative, meaning they’re a number, (100 entrances) dimensions are often strings, (/contact-confirmation landing page) the most common example of a dimension is the “event_name” property.
So what about (not set)?
What (not set) is actually telling you, is that there was an event on a page that happened without a landing page dimension set. How can that happen? It can happen due to misconfigured analytics tags, user ad blockers, filters, (internal ip filter?) and a common reason we’ve seen is a simple session timeout. Sometimes users will step away or leave a tab open on their computer for an extended period of time. When that user comes back they may fire an event, such as a scroll event, before an actual page_view event. This can cause a landing page (not set) entry in your analytics reports.
GA4: How to Set Up Events (Advanced)
Certainly! Here’s a step-by-step guide to setting up advanced event tracking in GA4 using Google Tag Manager (GTM) to capture additional data:
- Ensure that you have set up the GA4 configuration in Google Tag Manager. Go to “Tags” and create a new tag. Select the GA4 Configuration tag type and enter your Measurement ID, which can be found in your Google Analytics installation under Admin > Data Streams.
- Preview the page where you have the GTM tag installed. This will allow you to develop and test the event tracking.
- Identify the event you want to track. For example, if you want to track a button click, click on the button on the page.
- Use the GTM Debug view to see the events that have been tracked. Look for the event labeled “gtm.linkClick” in the left-hand side data layer.
- Enable additional variables to capture more data. In GTM, go to “Variables” and configure the variables you want to track. Check the boxes for elements like element classes, element ID, element target, element URL, and element text.
- Define a trigger for the event. In GTM, create a new trigger and select the appropriate trigger type. For a button click, you can use the “Click – All Elements” trigger type.
- Configure the trigger conditions based on the data layer variables. Specify the relevant values for elements like click classes, page path, and click URL. This will ensure that the trigger fires only when the specified conditions are met.
- Test the trigger by clicking on the button again. Use the GTM Debug view to verify if the trigger fires and the event is captured.
- Once the trigger is working correctly, create a new GA4 tag in GTM to send the event to GA4. Configure the tag to use the event name, such as “conversion_button_click,” and associate it with the trigger you created.
- Save and publish the changes in GTM.
- Use the GTM Debug view and GA4 to verify that the event is being sent successfully. You should see the event labeled as “conversion_button_click” in the GA4 debug view.
- If desired, you can mark the event as a conversion in GA4 by creating a conversion event for the “conversion_button_click” event.
By following these steps, you can set up advanced event tracking using GA4 and GTM, capturing additional data from button clicks or other interactions on your website.
If you have any further questions, feel free to ask.
GA4: How to Set Up Events (Basic)
Here’s a step-by-step guide to setting up Google Analytics for conversion goals and custom events using the new Google Analytics and Gravity Forms, along with a thank you page for your Gravity Forms:
- Make sure you have a thank you page set up for your form. Open the thank you page and note its URL.
- After setting up Google Analytics and confirming that it’s connected, go to the Events section in Google Analytics.
- Click on “Create Event” and provide a custom event name. Use a descriptive name in lowercase letters with underscores to represent the event you want to track. For example, “contact_page_view” for the contact thank you page view.
- In the “Event conditions” section, select “Page view” as the event name. This means that when a user views the specified page, the event will be triggered.
- In the “Event conditions” section, set the “Page location” to “contains” and enter the unique path of the contact thank you page. This ensures that the event is tracked only when a user lands on that specific page.
- Create the event, and it will appear in the custom events list. Note that the event may not show up until it has occurred, typically after the site has received some traffic.
- Once the event appears in the custom events list, there will be a toggle on the right side. Click on “Mark as conversion” to indicate that it is a conversion event.
- The conversion event will then be listed in the conversions section of Google Analytics.
By following these steps, you can track conversions and custom events for your forms using Google Analytics and Gravity Forms, specifically targeting the contact thank you page. This method allows you to monitor analytics and gather insights on form submissions and conversions.
If you have any further questions, feel free to ask.
GA4: How to Set Up Events (Intermediate)
Here’s a step-by-step guide to setting up advanced event tracking in GA4 and Google Tag Manager, including tracking intra-site movement between pages using GA4 and creating a custom event:
- Start by setting up Google Analytics 4 (GA4) and Google Tag Manager (GTM) for your website.
- Open the debug view in GA4 to test and monitor events. Go to “Configure” and select “Debug View.” This view allows you to see the events triggered on your site.
- Install the Google Analytics Debugger extension from the Chrome Web Store. This extension provides detailed information about the events triggered on your site.
- Refresh the page to see the events in the debug view. You should see the events being triggered by conversion events.
- Set up the intra-site movement tracking using GA4. Create a new event in GA4 and name it something like “analytics_test_conversion.”
- Define the event conditions for the intra-site movement tracking. Set the event name to “Page view” and add another condition for “Page referrer” with the value of the original page link.
- Create the event and go back to the debug view. Navigate from the original page to another page and check if the event is triggered in the debug view.
- Next, set up button click tracking using Google Tag Manager (GTM) for more granular tracking. Create a new trigger in GTM to track the button clicks.
- Set the trigger type to “Click” and define the specific button element or CSS class that you want to track.
- Create a new GA4 tag in GTM to send the button click event to GA4. Configure the tag to send the event data to GA4 when the trigger is activated.
- Save and publish the changes in GTM.
- Test the button click tracking by clicking on the specified button. Use the debug view and Google Analytics Debugger extension to verify if the event is triggered and sent to GA4.
- Once the events are working correctly, you can mark the conversion event as a conversion in GA4. Go to the conversions section in GA4 and mark the event as a conversion event.
By following these steps, you can set up advanced event tracking in GA4 and GTM, including tracking intra-site movement between pages and button clicks. Debugging with the debug view and the Google Analytics Debugger extension will help ensure that the events are triggered correctly.
If you have any further questions, feel free to ask.
How to Set up Google Search Console
The Google Search Console is a free tool that will become your primary communication with Google. Not only this, but the Google Search Console also helps optimize your visibility on Google Search and gives you statistics on your rankings. It can also help monitor potential penalties or identify errors that could affect your rankings. You only need to set it up once per domain. However, you need to do it every time you create a subdomain or add a new protocol. (For example: migrating to https://)
To sign up for the Google Search console, you first need to go to https://search.google.com/search-console/ and log in with your Google Account. Next, Google will ask you to “Select a property type” and you want to select “URL prefix.” It is important to note that your URL is exactly as it appears in the URL bar. Once you submit this information, you’ll be prompted to authenticate your account.
You’ll want to choose the HTML Tag method of verifying ownership of your domain.

You will then go to your site’s customizer, section, and copy and paste that code onto your site.
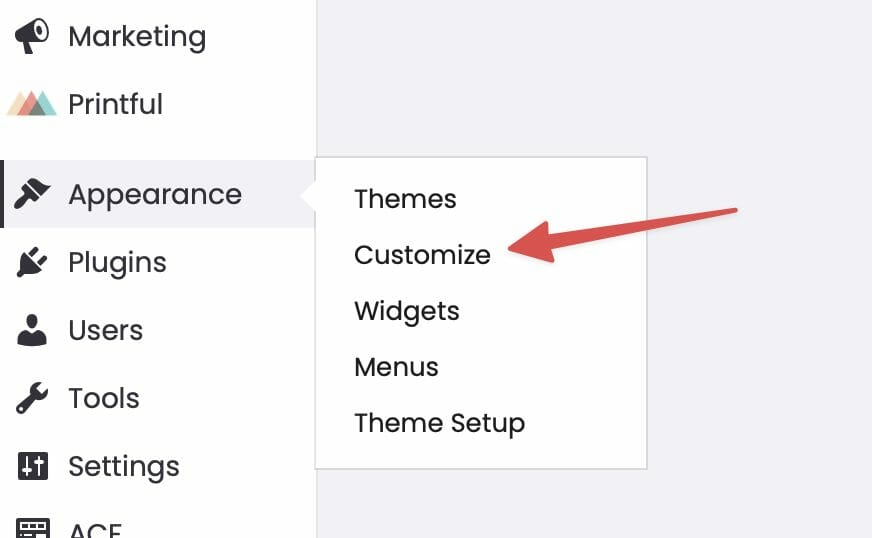
Go to Appearance > Customize > Settings > Embeds:
And paste the meta tag in the <head> Embed field:
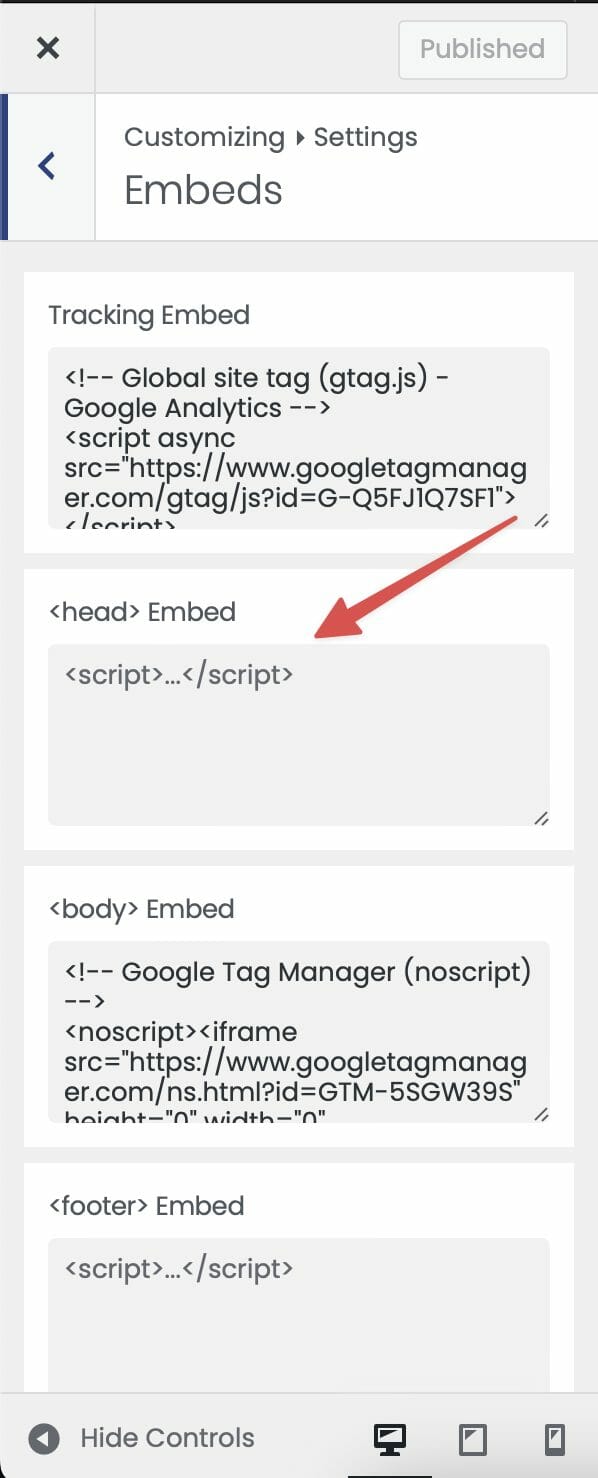
You may need to allow your site’s cache to refresh before that tag will show up on your site, so allow up to 24 hours if your site doesn’t verify immediately!
Initial Setup for GA4
Hello and welcome! Today, I’m going to show you how to set up your first GA4 property and install your analytics tag. Let’s get started:
- Go to analytics.google.com and sign in to Google Analytics.
- You might need to do some minor beginner setup tasks, but what we want to do is create a new account.
- Create an account for your personal website. You can leave the default settings as they are.
- This will lead you to create your first property, which will be your first GA4 property.
- Name your property and set the time zone to Central (e.g., Chicago) and the currency to USD.
- The category can be “Arts and Entertainment,” and you can provide additional information about your website.
- Accept the terms and conditions.
- Google has improved the setup process, so we will follow the instructions provided.
- We are setting up a new web platform, so enter your website URL (e.g., oopsjkc.com).
- Check the “Website” box for enhanced measurement. GA4 captures a lot of information automatically, including page views, scrolls, outbound clicks, search queries, video engagement, and file downloads.
- Click “Create Stream” to proceed.
- At this point, Google will inform you that no information has been received yet.
- To continue tracking, click the “Copy” button to copy the global site tag.
- Go to the back end of your website and access the customizer.
- Navigate to settings > embeds and paste the global site tag in the tracking embed area.
- Publish the changes.
- To verify if everything is set up properly, go to “Configure” and then “Debug View.”
- Open Google Chrome and visit your website. In the debug area, you can see the events happening.
- If needed, install the Google Analytics Debugger extension for Chrome to monitor events and ensure proper tracking.
- The debug view will show the page views and other interactions on your site.
- You can use this data to set up events and conversions, allowing you to track how users navigate through your website.
- For more detailed instructions, you can refer to the official Google support documentation on setting up debug mode and installing your Google GA4 tag.
Thank you, and goodbye!
User Management in Your Google Analytics Account
Manage who has what access to your Google Analytics account. You can add users, edit the type of access existing users have, and delete users. Sharing your Analytics account by granting access allows you to share information about your site’s performance. But you want to make sure the right people have access. It is important to note that only an admin account can add or edit users.
If you’re a Dirigible Studio client, be sure to add support@dirigiblestudio.com to your analytics account!
How do I add users:
- When in your Google Analytics account, click Admin.
- Under the Account or Property column (depends on where you want to add a user) , click Access Management.
- Click on the + in the Account/Properties permissions list, then click on Add users.
- Enter the Google Account or Google Workspace Account email address for the user(s) you are adding.
- Check the Notify new users by email box to notify the user(s) of their access.
- Select the permissions you want to grant the user(s). To learn more about Google Analytics permissions go here.
- Lastly, click Add.
How do I edit users’ permissions:
- When in your Google Analytics account, click Admin.
- Under the Account or Property column (depends on where you want to edit a user), click Access Management.
- Using search at the top of the list, type in the email address of the user you are looking to make changes to.
- After navigating to the user, click on their name and adjust their permissions. To learn more about Google Analytics permissions go here.
How do I delete users:
- When in your Google Analytics account, click Admin.
- Under the Account or Property column (depends on where you want to delete a user), click Access Management.
- Using search at the top of the list, type in the email address of the user you are looking to delete access from.
- If you are looking to delete multiple users, you can select the checkbox next to the users and click Remove.
- After navigating to the user, click on their name and click Remove. Another window will pop-up asking to confirm, where you will click Remove again.