

Knowledge Base
Adding social media links
You can define your social handles in the Customizer. By defining them here, you can easily display them in your Header, Footer, Utility Bar, or anywhere on your site using our Socials block. When you update your social media here, your social links will update any place they are displayed.
You’ll find the social media settings under Appearance → Customize → Settings → Social Media. All you have to do is enter your handle, the link will be populated automatically.
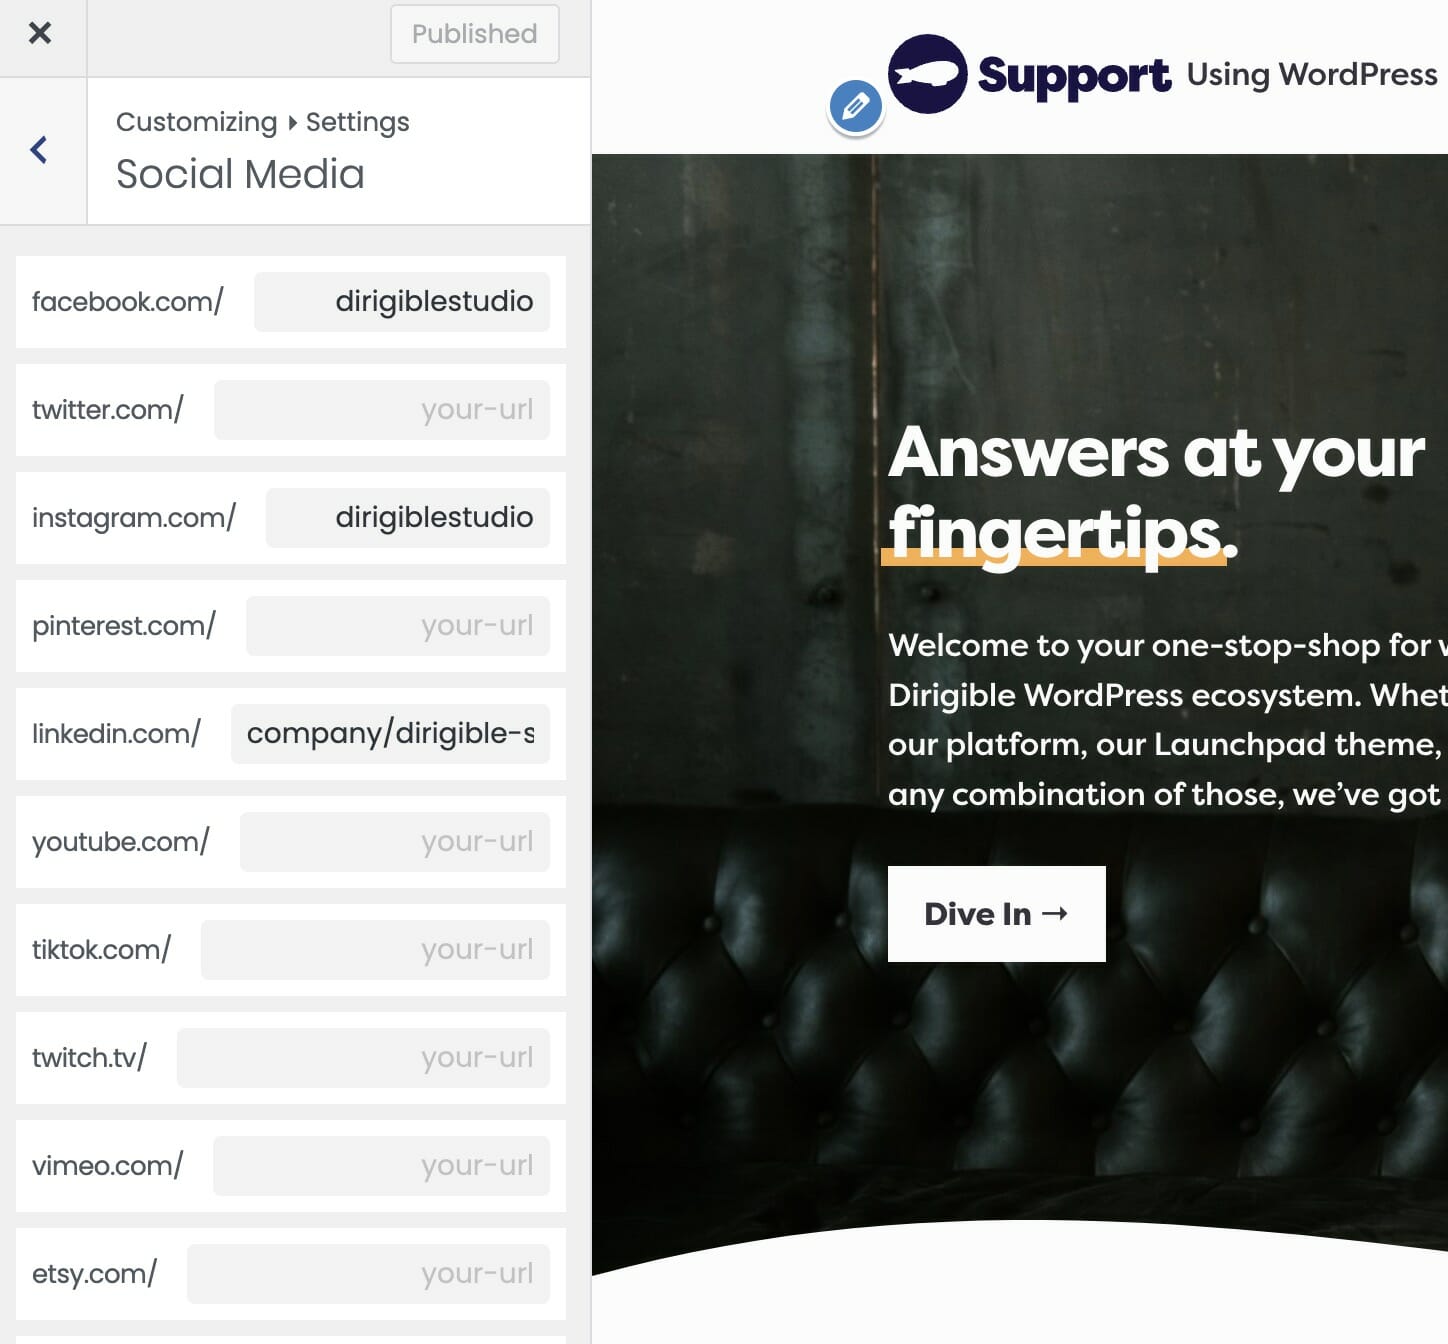
In order to display your social media, you’ll have to enable the respective setting in the Customizer. The settings can be found at the following places:
Header: Appearance → Customize → Header & Menus → Desktop → Show Socials
Footer: Always Shown
Utility Nav: Appearance → Customize → Header & Menus → Utility Nav → Social Media
To display your social media on a page, you can use the Socials block. From there, you can change the alignment, size, and color of the icons. Happy editing!

Are changes to your website not showing up when you visit your site?
Caches might be the culprit

So, you made changes to your website, but they don’t show up for you or your users when visiting the site. The solution– Try visiting your website in a Private or Incognito Window.
What is an Incognito Window?
An Incognito or Private tab/window is a browsing feature of web browsers that doesn’t store things like cookies, caches, and other site data. These are things that are traditionally remembered and stored on your device when in the standard browsing mode.
Why is an incognito window useful when it comes to seeing my page edits?
Browsers cache website data to ensure a faster reload time and better user experience the next time you visit that same site. When a cache contains information from a past visit and hasn’t been refreshed or reloaded, you could see outdated information. This is when private, or incognito, windows can be helpful, because they do not rely on website data from your device’s caches, nor do they store any. When using an incognito window, you should be able to see any updates or changes you’ve made because it will be like opening your website for the first time.
How do I use a Private Window in:
- Chrome
- For desktop, open Google Chrome and in the top right corner of the browser, click the three vertically arranged dots. In the dropdown menu select, New Incognito Window.
- For mobile, open Google Chrome and in the bottom right of the page, click the three horizontally arranged dots. A menu screen will pop-up and you’ll want to select New Incognito Tab.
- Edge
- For desktop, open Microsoft Edge and in the top right corner of the browser, click the three horizontally arranged dots. In the dropdown menu select, New InPrivate Window.
- For mobile, open Edge and in the bottom center of the page, tap on the horizontally arranged dots that are encircled in an oval. A menu will pop-up and you will click on the New InPrivate tab option.
- Firefox
- For desktop, open Firefox and in the top right corner of the browser, click on the three horizontal lines. In the dropdown menu select, New Private Window.
- For mobile, open Firefox and in the bottom right, tap on the number encased in a box that lets you know how many tabs you currently have open. Then at the top of the page, select the middle mask icon. Lastly, tap on the + in the bottom right corner of the page.
- Safari
- For desktop, open Safari and on the top left side of your Menu Bar, click File > New Private Window.
- For mobile, open Safari and tap on the tabs icon in the lower left corner of the page. All of your opened tabs will show up and you’ll click the Tab Groups menu in the bottom center of the tab bar. A menu will pop up and you should click Private.
If you can’t see the changes to your site, no need to stress! Just try viewing it in a Private Window.
Best Practices for Website Headlines
Your headlines guide your visitors and search engines
Your headlines not only structure your content and guide your visitors, but also help search engines understand exactly what your site and its pages are about. Let’s walk through how to use headings properly on your Dirigible site so your content stays SEO-friendly.
Use Headings to Organize Your Content
Headings (H1 through H6) create a clear hierarchy that breaks your page into digestible sections. That helps both your readers and search engines scan your content quickly.
Here’s how to structure them:
H1: The Page Title
- Every page should have exactly one H1, and it should describe what the page is about.
- Example: If the page is about your photography services, a good H1 might be:
“Professional Wedding Photography in Madison”
H2: Main Content Section
- Use one H2 to introduce the main content area of your page.
- This creates a clean break between your title (H1) and the rest of the content.
H3–H6: Subsections
- Use H3s for key points under your H2.
- H4s go under H3s, and so on. However, most pages only need H1–H3.
- Don’t skip heading levels (e.g., avoid jumping from H2 straight to H4).
If you want a heading to look different but stay in the correct hierarchy, just use the “Mimic” style in the editor. This way, search engines still read the structure correctly.
Why Headings Matter for SEO and Readability
Proper heading hierarchy helps:
- Search engines to index your pages accurately
- Visitors skim your content more easily
A Quick Checklist Before You Publish
Before hitting “Publish,” run through this quick check:
- One H1 per page
- One H2 to introduce the main section
- H3–H6 are used in correct order (no skipping levels)
- If applicable, the Editor’s “Mimic” style is used appropriately to maintain the hierarchy
Getting this right improves user experience and gives your pages a solid SEO foundation.
Block Editor Has Disappeared
Does your page editor look unfamiliar? If the Gutenberg block editor has disappeared, check your list of plugins to see if there is a plugin called “Classic Editor”. If there is, deactivate the plugin.

Need help finding your plugins?
Click the button below for more information on how to find which plugins you have installed.
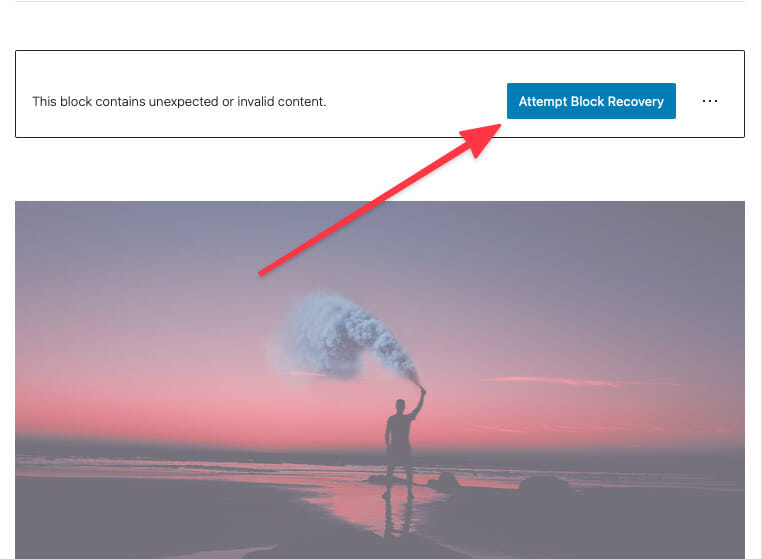
Block Recovery
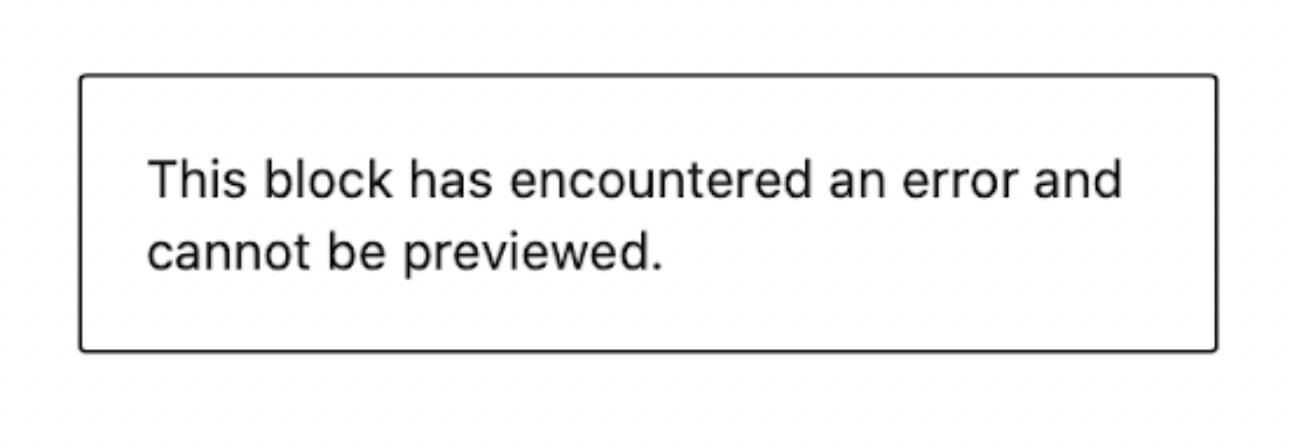
“This block contains unexpected or invalid content.”
Don’t panic! This is just a misbehaving block.
You’ve opened your editor, and a scary error message has popped up on your previously pristine page! “This block contains unexpected or invalid content.” can occur during content updates when custom HTML has been added to a block, either via block update or the Code Editor.
Another common cause of block validation errors is non-standard/poorly formatted ASCII content. We recommend not copy & pasting from editors like Microsoft Word. These editors often add sneaky characters that WordPress’ Gutenberg editor hates. If you absolutely must copy and paste– we recommend to do that from things like notepad, and other simple text editors.


Recovering a Block
Have no fear, recovering from most block errors is easy! In most cases, a block error is nothing to worry about and you’ll be able to solve it in a click.
Attempt Block Recovery
In the right hand corner of the affected block, you’ll find a block recovery button. Click it and WordPress will take care of the rest!
Really broken blocks.
In rare instances, a block might be so broken that WordPress doesn’t even give you an option to attempt block recovery. While this is worst-case scenario, remember that as long as you don’t delete this block, WordPress will never remove it from the front end of your site.
So what should I do?
Our recommendation is to use the frontend block as a reference to recreate the block in the backend. Make sure to do this before you delete the block so that you can continue to use it as a guide.
Advanced Recovery Options
There are a couple other options available when you run into a block error. However, these options are only recommended if you’re an advanced HTML and CSS user. With these options you lose much of what makes the Gutenberg editor so great!
Proceed with caution.
Convert to HTML
Block errors occur when Gutenberg is unable to make sense of the HTML that’s in your block. If you’re absolutely sure that what’s in there is supposed to be there, you can try converting the block to HTML. Once you’ve converted a block to HTML you cannot convert it back to it’s previous block type. If things don’t work out you’ll have to recreate the block from scratch!
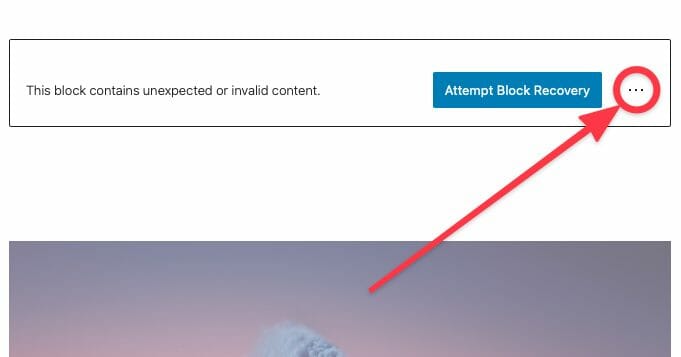
In the right hand corner of the block, you’ll find the editor options menu hidden behind a ⋮ button.
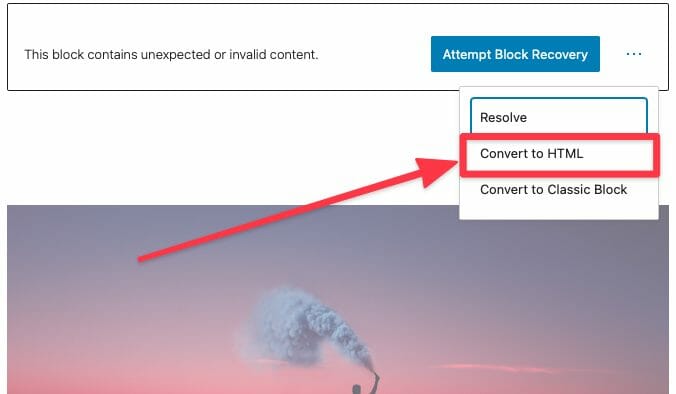
In the dropdown you’ll find the option to convert your block to HTML.
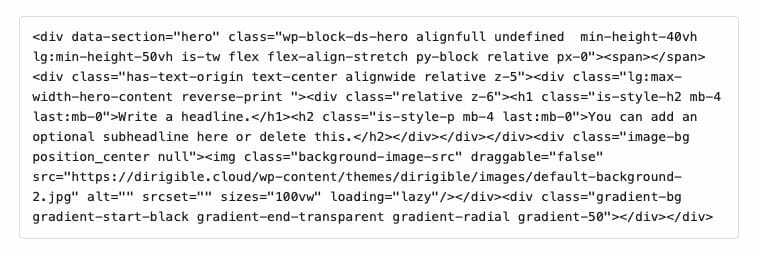
After conversion you’ll see the raw block HTML.
Creating a Mobile Menu
Dirigible has four menu locations:
- Main menu
- Footer menu
- Utility menu
- Mobile menu
If you are using the Dirigible Mega Menu plugin, or if you have a complex menu on your website, a simplified mobile menu can make your website more user-friendly on phones and tablets.
In the video below, Kindra takes you through creating a mobile menu for your website.
Hello! I’m Kindra from Dirigible, and today I’ll guide you through using and customizing the mobile menus on your website. Let’s get started:
- In the WordPress dashboard, you can access the menu editing options in two ways:
- Click on the ribbon menu under your website name and select “Menus.”
- Alternatively, go to the left-hand sidebar, open the “Appearance” menu, and choose “Menus.”
- In the “Manage Locations” section, you’ll see four available Theme Locations for your Dirigible site: Main, Mobile, Footer, and Utility.
- To customize the mobile menu, click on “Create New Menu” and give it a name, such as “Mobile.”
- Set the location of the newly created menu to “Mobile” and click “Create.”
- Now that you have the mobile menu created, you can add pages to it that will appear in the mobile version of your site. For example, you can choose “About,” “Contact Us,” and “Blog” pages.
- Once you’ve added the desired pages, click “Save” to update the mobile menu.
- If you go to your mobile window and refresh the page, you’ll see that the mobile menu has been updated with the selected pages.
- Remember that maintaining the mobile menu requires manual updates when you make changes to your main menu. If the main menu and mobile menu have similarities, you must update both menus accordingly. This means adding, deleting, or modifying menu items in both menus.
That’s it! You’ve learned how to create and customize the mobile menu for your Dirigible site. If you have any further questions, feel free to get in touch with us or visit support.mydirigible.com for more information.
I hope this tutorial was helpful to you. Have a great day!
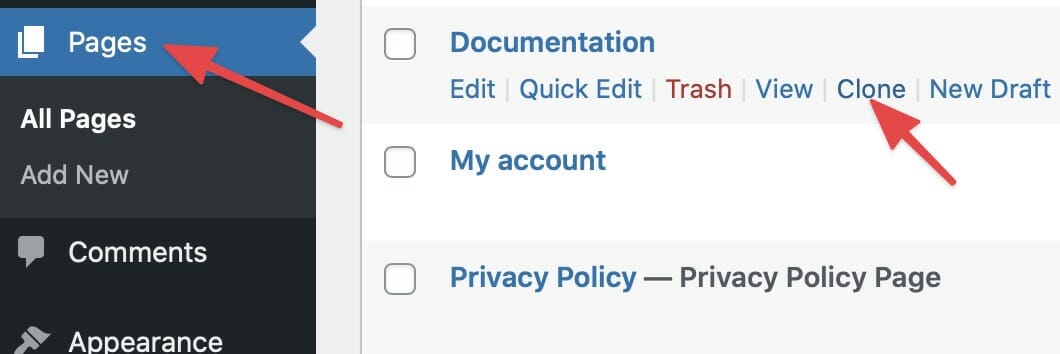
Duplicate Page to Publish Later
Need to make edits to a page but publish them at a later date? Easy, clone it.
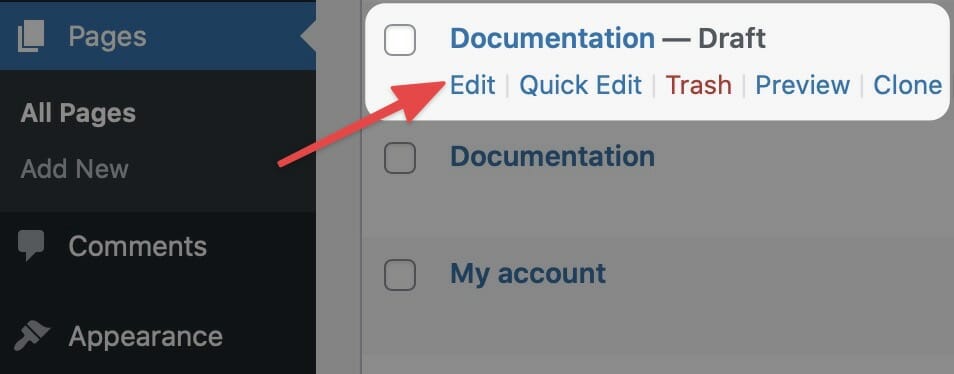
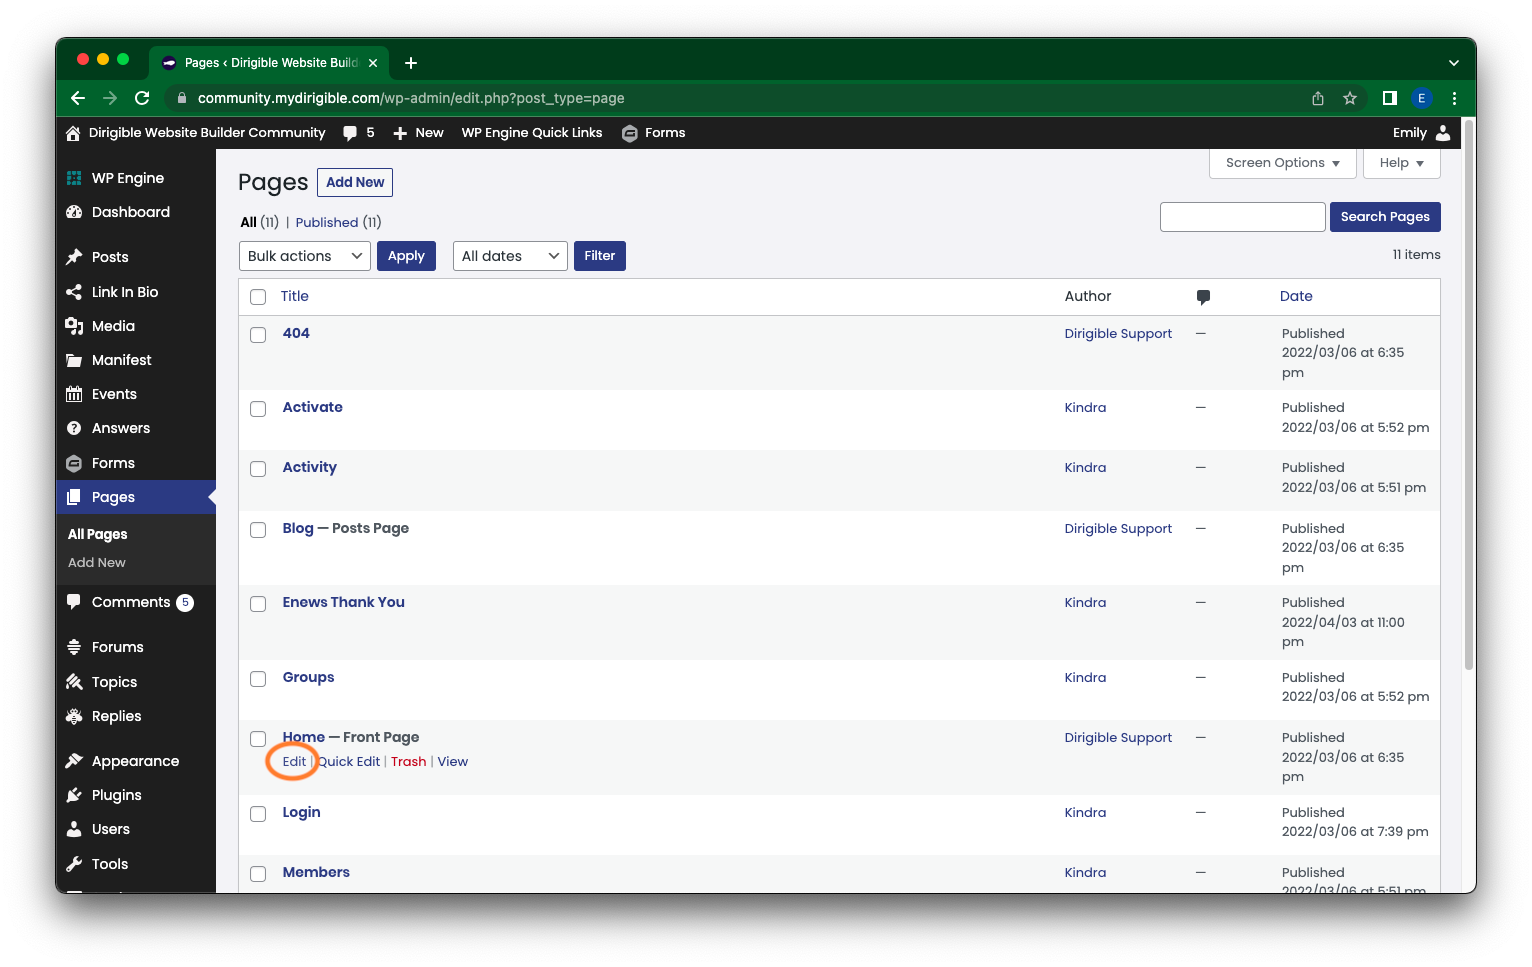
To create a duplicate page to publish later, from your dashboard, navigate to Pages and select Clone under the page you wish to copy. Your cloned page will appear as a draft.
Until you are ready to publish your new page, make your changes and continue to save the cloned page as a draft.
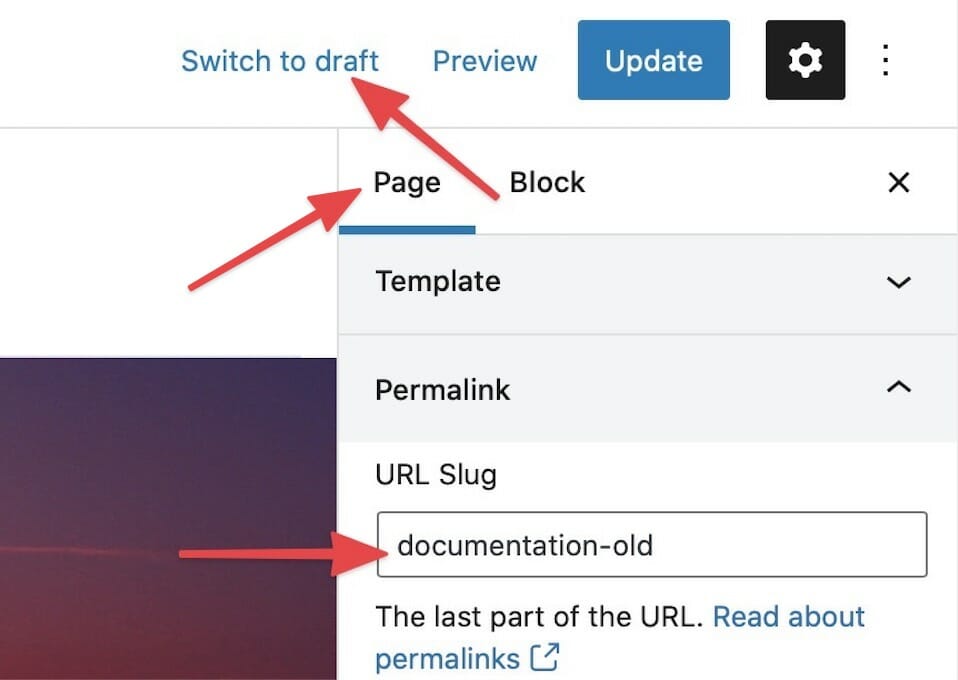
When you are ready to publish…
When you are ready to launch your new page, you’ll want to make some changes to the original page first.
From the settings menu in the page editor, change the original page’s permalink by adding -old to the end of the URL slug. Then, save the change and switch the page to a draft by clicking Switch to draft.
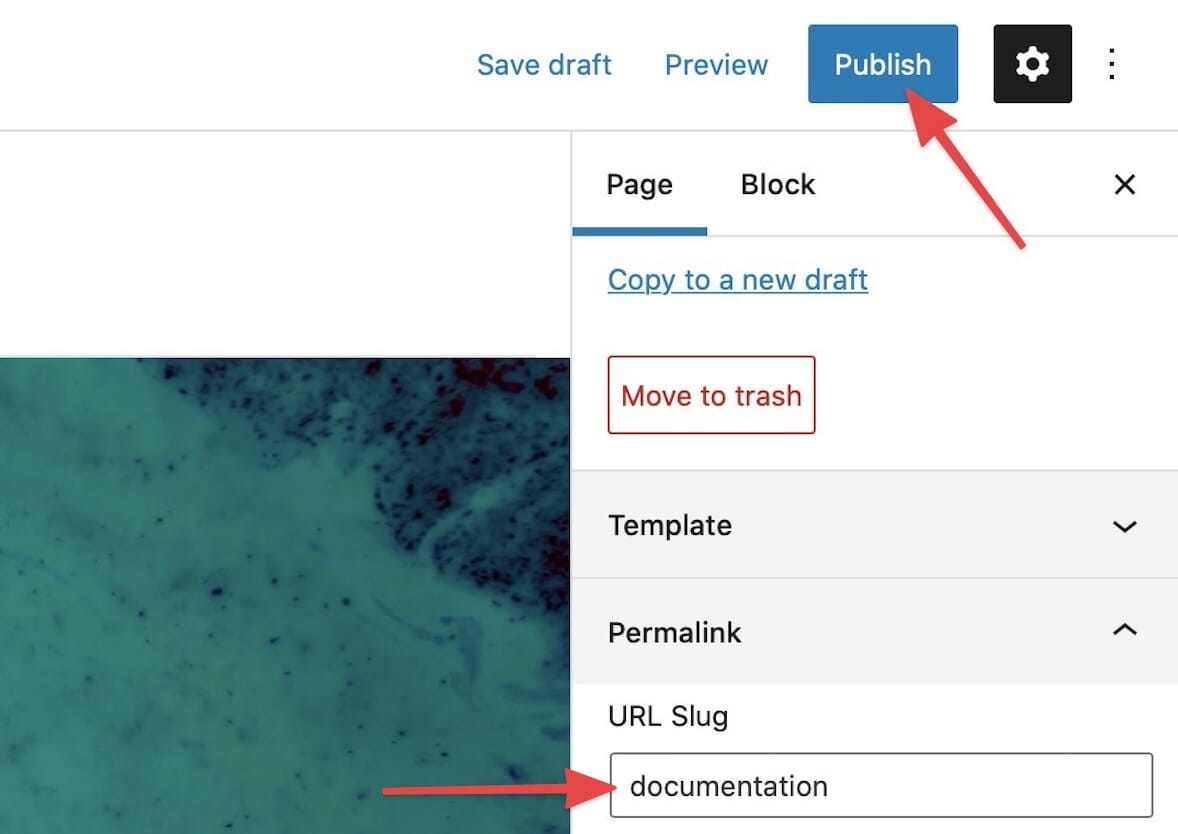
After updating the original page, you’ll want to change the URL slug of your new page to match the old page’s original permalink. Then, save your change and launch the new page by clicking the Publish button.
GA4 Landing Page (not set)

What the heck does landing page (not set) mean?
In most cases, landing page (not set) is nothing to worry about. However, first to understand (not set), we have to understand what a session is in GA4.
Sessions
In Google Analytics 4, sessions are created when a user “opens your app in the foreground or views a page or screen and no session is currently active (e.g. their previous session has timed out).” A Sessions default inactivity timeout is 30 minutes.
Entrances vs. Landing Pages
Entrances are the count of times the first event in a session happens on a page. Landing pages are the page paths themselves. The biggest difference is that entrances are a metric, and landing pages are a dimension. Metrics are typically quantitative, meaning they’re a number, (100 entrances) dimensions are often strings, (/contact-confirmation landing page) the most common example of a dimension is the “event_name” property.
So what about (not set)?
What (not set) is actually telling you, is that there was an event on a page that happened without a landing page dimension set. How can that happen? It can happen due to misconfigured analytics tags, user ad blockers, filters, (internal ip filter?) and a common reason we’ve seen is a simple session timeout. Sometimes users will step away or leave a tab open on their computer for an extended period of time. When that user comes back they may fire an event, such as a scroll event, before an actual page_view event. This can cause a landing page (not set) entry in your analytics reports.
GA4: How to Set Up Events (Advanced)
Certainly! Here’s a step-by-step guide to setting up advanced event tracking in GA4 using Google Tag Manager (GTM) to capture additional data:
- Ensure that you have set up the GA4 configuration in Google Tag Manager. Go to “Tags” and create a new tag. Select the GA4 Configuration tag type and enter your Measurement ID, which can be found in your Google Analytics installation under Admin > Data Streams.
- Preview the page where you have the GTM tag installed. This will allow you to develop and test the event tracking.
- Identify the event you want to track. For example, if you want to track a button click, click on the button on the page.
- Use the GTM Debug view to see the events that have been tracked. Look for the event labeled “gtm.linkClick” in the left-hand side data layer.
- Enable additional variables to capture more data. In GTM, go to “Variables” and configure the variables you want to track. Check the boxes for elements like element classes, element ID, element target, element URL, and element text.
- Define a trigger for the event. In GTM, create a new trigger and select the appropriate trigger type. For a button click, you can use the “Click – All Elements” trigger type.
- Configure the trigger conditions based on the data layer variables. Specify the relevant values for elements like click classes, page path, and click URL. This will ensure that the trigger fires only when the specified conditions are met.
- Test the trigger by clicking on the button again. Use the GTM Debug view to verify if the trigger fires and the event is captured.
- Once the trigger is working correctly, create a new GA4 tag in GTM to send the event to GA4. Configure the tag to use the event name, such as “conversion_button_click,” and associate it with the trigger you created.
- Save and publish the changes in GTM.
- Use the GTM Debug view and GA4 to verify that the event is being sent successfully. You should see the event labeled as “conversion_button_click” in the GA4 debug view.
- If desired, you can mark the event as a conversion in GA4 by creating a conversion event for the “conversion_button_click” event.
By following these steps, you can set up advanced event tracking using GA4 and GTM, capturing additional data from button clicks or other interactions on your website.
If you have any further questions, feel free to ask.
GA4: How to Set Up Events (Basic)
Here’s a step-by-step guide to setting up Google Analytics for conversion goals and custom events using the new Google Analytics and Gravity Forms, along with a thank you page for your Gravity Forms:
- Make sure you have a thank you page set up for your form. Open the thank you page and note its URL.
- After setting up Google Analytics and confirming that it’s connected, go to the Events section in Google Analytics.
- Click on “Create Event” and provide a custom event name. Use a descriptive name in lowercase letters with underscores to represent the event you want to track. For example, “contact_page_view” for the contact thank you page view.
- In the “Event conditions” section, select “Page view” as the event name. This means that when a user views the specified page, the event will be triggered.
- In the “Event conditions” section, set the “Page location” to “contains” and enter the unique path of the contact thank you page. This ensures that the event is tracked only when a user lands on that specific page.
- Create the event, and it will appear in the custom events list. Note that the event may not show up until it has occurred, typically after the site has received some traffic.
- Once the event appears in the custom events list, there will be a toggle on the right side. Click on “Mark as conversion” to indicate that it is a conversion event.
- The conversion event will then be listed in the conversions section of Google Analytics.
By following these steps, you can track conversions and custom events for your forms using Google Analytics and Gravity Forms, specifically targeting the contact thank you page. This method allows you to monitor analytics and gather insights on form submissions and conversions.
If you have any further questions, feel free to ask.
GA4: How to Set Up Events (Intermediate)
Here’s a step-by-step guide to setting up advanced event tracking in GA4 and Google Tag Manager, including tracking intra-site movement between pages using GA4 and creating a custom event:
- Start by setting up Google Analytics 4 (GA4) and Google Tag Manager (GTM) for your website.
- Open the debug view in GA4 to test and monitor events. Go to “Configure” and select “Debug View.” This view allows you to see the events triggered on your site.
- Install the Google Analytics Debugger extension from the Chrome Web Store. This extension provides detailed information about the events triggered on your site.
- Refresh the page to see the events in the debug view. You should see the events being triggered by conversion events.
- Set up the intra-site movement tracking using GA4. Create a new event in GA4 and name it something like “analytics_test_conversion.”
- Define the event conditions for the intra-site movement tracking. Set the event name to “Page view” and add another condition for “Page referrer” with the value of the original page link.
- Create the event and go back to the debug view. Navigate from the original page to another page and check if the event is triggered in the debug view.
- Next, set up button click tracking using Google Tag Manager (GTM) for more granular tracking. Create a new trigger in GTM to track the button clicks.
- Set the trigger type to “Click” and define the specific button element or CSS class that you want to track.
- Create a new GA4 tag in GTM to send the button click event to GA4. Configure the tag to send the event data to GA4 when the trigger is activated.
- Save and publish the changes in GTM.
- Test the button click tracking by clicking on the specified button. Use the debug view and Google Analytics Debugger extension to verify if the event is triggered and sent to GA4.
- Once the events are working correctly, you can mark the conversion event as a conversion in GA4. Go to the conversions section in GA4 and mark the event as a conversion event.
By following these steps, you can set up advanced event tracking in GA4 and GTM, including tracking intra-site movement between pages and button clicks. Debugging with the debug view and the Google Analytics Debugger extension will help ensure that the events are triggered correctly.
If you have any further questions, feel free to ask.
Get a Google Maps Key
So your maps aren’t working? Chances are you need an API Key.
In the good old days, you could use Google Maps pretty much anywhere, anytime. That recently changed, and in order to show a Google Map on your site, you’re going to need to get an API Key. This can be a little daunting, so we’ve made a video explaining exactly how to do it.
Hello, everyone! My name is Jake from Dirigible Studio, and today I’ll guide you through the process of acquiring a Google Maps API key. This process can be a bit technical, as Google made changes in 2018 regarding how maps are displayed on websites. However, if you provide us with the necessary credentials or billing information, we can handle the account setup for you, making it the easiest and fastest option. If you prefer to maintain control and set everything up yourself, I’ll walk you through the process step by step.
- Sign up for a Google Maps API account by visiting the Google Maps API website.
- Click on “Get started for free” to create an account and set up billing information.
- Access your console by logging into your Google Maps API account.
- In the console, click on “New project” in the top left corner.
- Provide a name for your project, such as “API Key Demo,” and create the project.
- Go to the “APIs & Services” section in the console and select “Library.”
- Enable the “Maps JavaScript API” by searching for it in the library and clicking on the “Enable” button.
- Return to the library and enable the “Geocoding API” using the same process.
- Navigate to the “Credentials” section in the console.
- Create a new API key by clicking on the “Create credentials” button.
- Give the API key a name, such as “Demo Key,” and click “Create.”
- Once the API key is generated, copy it to your clipboard.
- Restrict the API key by going to the “HTTP referrers” section and specifying the allowed website(s) or URL(s) that can use the key.
- Save the API key and make sure to select the Maps JavaScript API and Geocoding API for the key’s restrictions.
- Copy the API key to use it in your website’s installation or launchpad installation.
- If you encounter any issues or see a different-looking Google Maps area, consider reaching out to us for assistance.
- To resolve common issues, go to the general dashboard, access the billing section, and create a billing account for the project.
- Enable billing for the project to ensure the maps display correctly.
- Insert the copied API key into your website’s code or designated section to integrate Google Maps.
- Test the functionality by entering an address or location to see the map display on your website.
- If you have any questions or difficulties, feel free to contact us for further assistance.
I highly recommend letting us handle this process for you as it is much easier. The Google dashboard can be confusing and not very user-friendly. However, if you have any questions or run into any troubles, don’t hesitate to reach out to us. Thank you very much!
Gravity Forms Looks Weird
The forms on Dirigible are created using Gravity Forms, a powerful WordPress plugin.
A major update in 2021 can cause a conflict with the way the forms appear. If your forms look a bit off, just navigate to the form settings and make sure that “Enable Legacy Markup” is unchecked. Please note, this setting is a form setting. This means that you’ll have to change this for each form that looks off.
For more information on Gravity Forms, check out their site.
Help! I’m getting spam!
Hello everyone, my name is Jake, and I’m a partner and developer at Dirigible Studio. Today, I want to discuss a necessary but unfortunate aspect of conducting business online: spam. You may have started receiving spam notifications in your email inbox through Gravity Forms, and that’s what I’ll be addressing today.
To begin, let me explain some of the technologies we use and how we mitigate spam. We utilize a WordPress plugin called Gravity Forms, which you likely have on your contact us page or other pages with forms. These forms incorporate Google reCAPTCHA, a method used to deter automated or spam form submissions.
You’re probably familiar with reCAPTCHA—it usually appears at the bottom of the form and requires you to click a button or checkbox and select specific images, such as all the airplanes. This is one of the methods we use to deter spam. Additionally, Gravity Forms often includes hidden fields that, if filled out by an automated robot, would be discarded by the form.
By explaining these technologies, I want to emphasize that we are already doing our best to prevent spam from reaching your inbox. Unfortunately, spam is an ongoing issue when you have an online presence that accepts form submissions. There are some types of spam that we cannot eliminate, such as someone manually typing nonsense and completing the reCAPTCHA themselves. There are services available worldwide where people are paid to do this.
It’s important to understand that technology and spammers are in an ongoing race to outsmart each other. While we strive to keep everything up to date, spam remains a part of the game. There are additional steps we can take, but they usually involve paid methods or subscriptions, which require extra investment. Personally, I wouldn’t necessarily recommend these options.
That’s why we have things set up the way we do. The stricter you become in restricting spam, the more it can impact legitimate inquiries and form responses from your customers. Making it more difficult for spammers can inadvertently make it more challenging for genuine people who want to get in touch with you. At Dirigible Studio, we actually recommend allowing some spam to come through to minimize any harm to your legitimate customers.
I understand that it doesn’t feel good, but it’s about prioritizing your customers over spammers. I hope this clarifies some aspects of spam for you. If you have any questions or if you’re interested in exploring more advanced methods of spam restriction, please feel free to contact us. Thank you for your time, and have a great day!
Spam and Web Accessibility
Hello and welcome back! My name is Jake, and I’m a partner and developer at Dirigible Studio. In the previous video, we discussed how to combat spam. Today, I want to draw attention to another crucial aspect: web accessibility.
Web accessibility may not be a term you’re familiar with, and that’s okay. We take care of as much of it as possible on your behalf. Essentially, web accessibility is about making websites usable for people with different abilities. Some individuals may have vision or hearing impairments, and they use various tools to navigate the internet.
Now, how does web accessibility tie in with spam? Well, the tools we use, such as the reCAPTCHA tool mentioned in the previous video, are accessible. They provide both audio and visual components, and you can switch between them. These tools are compliant with screen readers and other accessibility features. By utilizing them, we aim to prevent spam in a manner that doesn’t hinder or challenge people with different abilities. It’s important to ensure that their experience on your website remains positive.
When implementing these tools, we also need to keep in mind certain rules and guidelines, such as ADA requirements and WCAG (Web Content Accessibility Guidelines). As a website owner, it’s essential to follow these regulations and make your website accessible to as many people as possible.
These considerations are crucial, especially when you’re striving to minimize spam. It’s not just about avoiding unwanted emails. There are broader implications at play, and ensuring web accessibility is part of doing the right thing.
I wanted to emphasize this point because it’s a vital aspect of your website. Thank you for taking the time to understand its importance. If you have any questions or need further assistance, please feel free to reach out. Thank you!
How do I change my colors?
Need to change your color palette? Look no further! For more details on the customizer visit Customizing Styles.
Hello everyone! My name is Jake, and I’m a partner and developer at Dirigible Studio. Today, I’ll show you how to make simple color changes using the Customizer in Dirigible. Let’s get started:
- Go to the Customizer by clicking on “Customize” in the WordPress admin bar or by navigating to “Appearance” and selecting “Customize.”
- In the Customizer, find the “Styles” section and click on it.
- Within the “Styles” section, locate and click on “Palette.” This is where you can change various colors on your site.
- Scroll down to view the different color options available in the palette.
- For example, let’s change the “Secondary” color, which is often used for buttons on your site.
- Adjust the sliders or color pickers to select a different shade or hue for the secondary color. You can make it more vibrant or less pastel, depending on your preference.
- As you make changes, you’ll notice that the colors on your site update in real-time, allowing you to preview the changes.
- Continue making adjustments until you’re satisfied with the new color.
- Next, you can modify the “Accent” color, which is used in various elements throughout your site.
- Similarly, use the color picker or sliders to select a different shade or hue for the accent color.
- Preview the changes on your site to see how they look.
- Once you’re happy with the new colors, click on the “Publish” button to make the changes live on your site.
- Until you publish the changes, they will only be visible to you, allowing you to experiment and make adjustments without affecting the live site.
- That’s it! You’ve successfully changed the colors on your site using the Customizer’s palette menu.
- Remember, you can modify other colors as well to ensure a consistent and cohesive look throughout your site.
I hope this guide helps you customize your site’s colors easily. If you have any further questions, feel free to ask. Thank you!
How Do I Change My Font Sizes in WordPress?
3 Ways to Change Your Text Size
On your Dirigible site, you are able to control every aspect of your design and layout – so your site can truly reflect your brand identity. You can customize your website by adding photos, arranging the layout, and setting your colors, to name a few. One of the simplest and most powerful changes you can make is setting the size of your text. Making sure that your site’s type is legible is important for accessibility and usability.
There are three main ways to adjust your text size.
- In the customizer – this will make global changes to your text sizes
- In the block settings – this will change your text size in that particular block
- Using paragraph and headers in the block editor – this will change your text size for a specific piece of text
How to Change Font Sizes in the Customizer:
- In your Dashboard, on the left hand-side, scroll down and click on Appearances. Then select Customize.
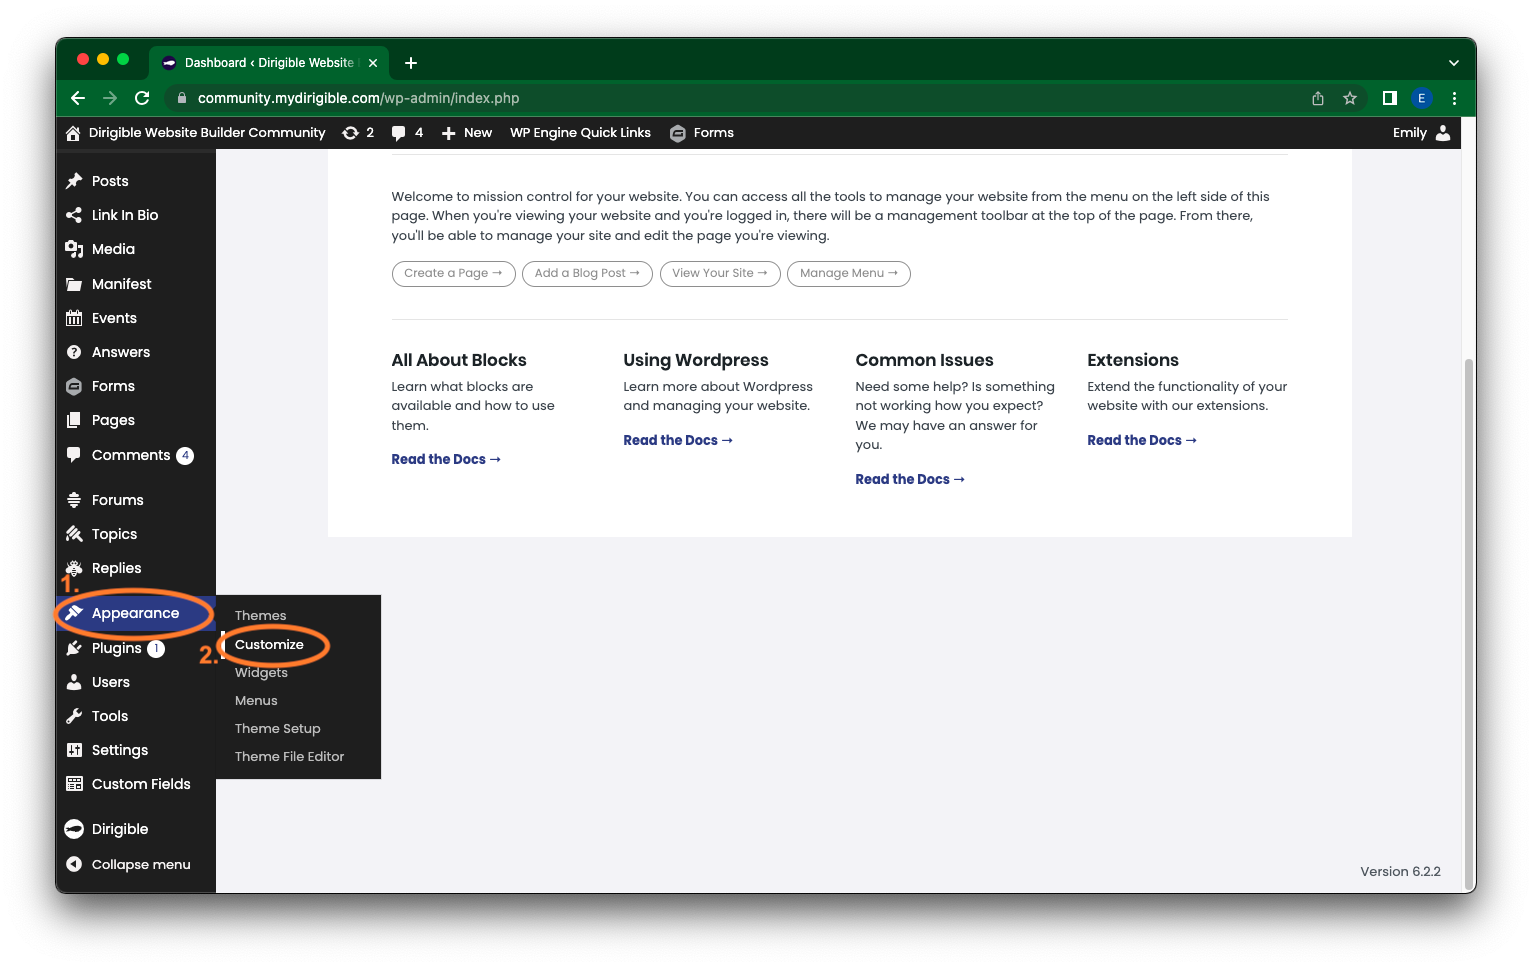
- In the side menu, select Styles.
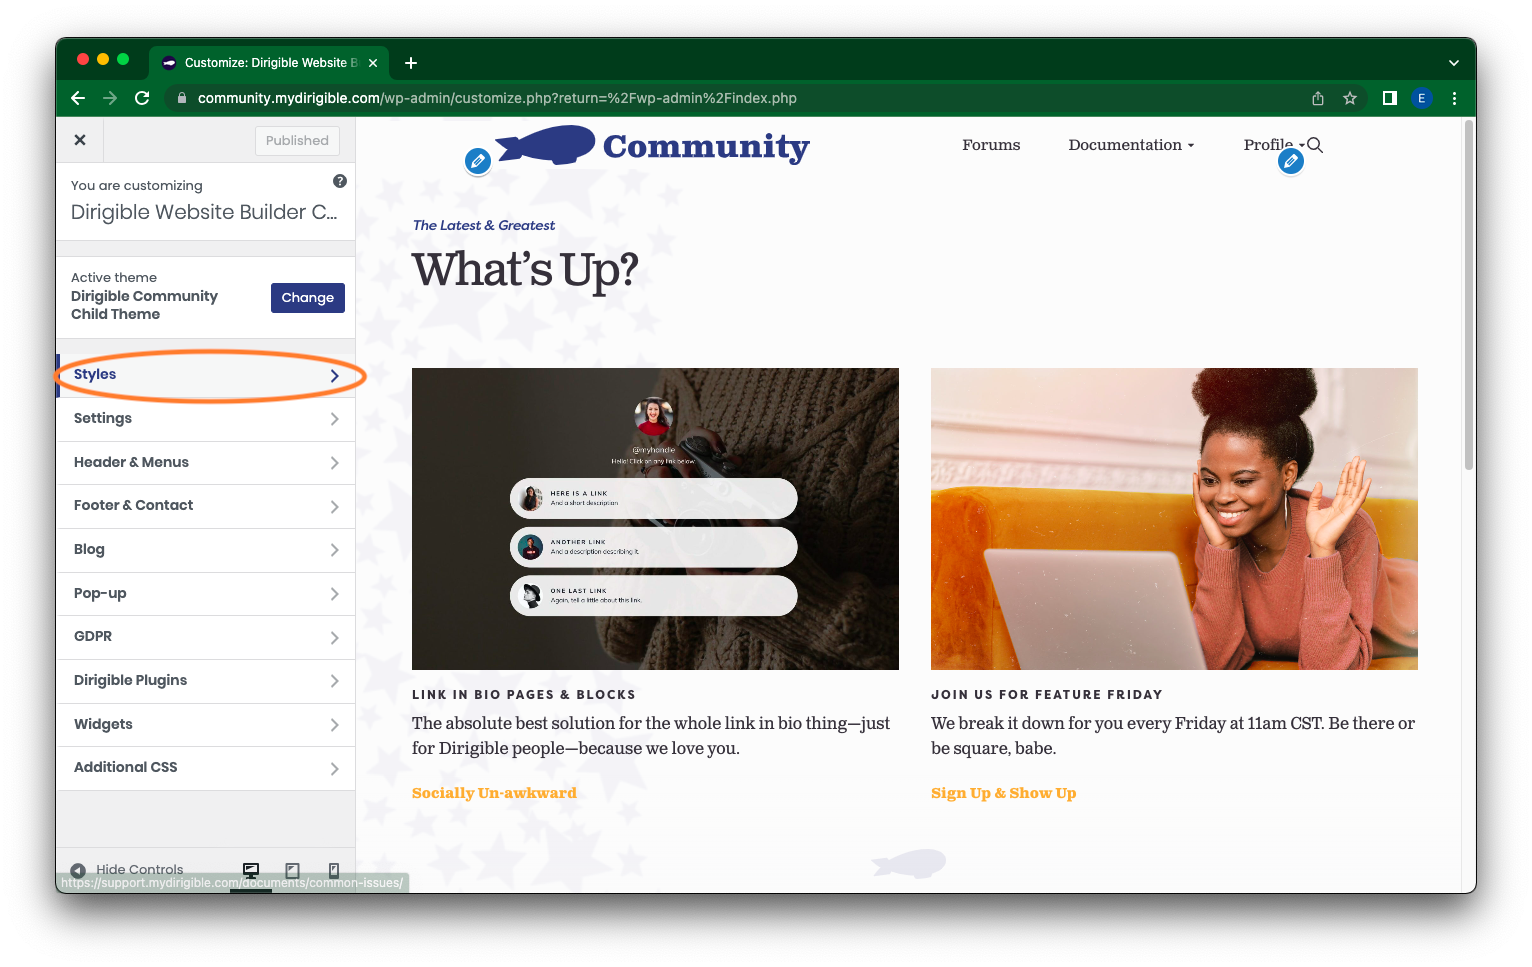
- From here you can now edit your Headers and Paragraphs by clicking on which you want to adjust or change in the left menu. This is effectively setting presets for your website’s text.
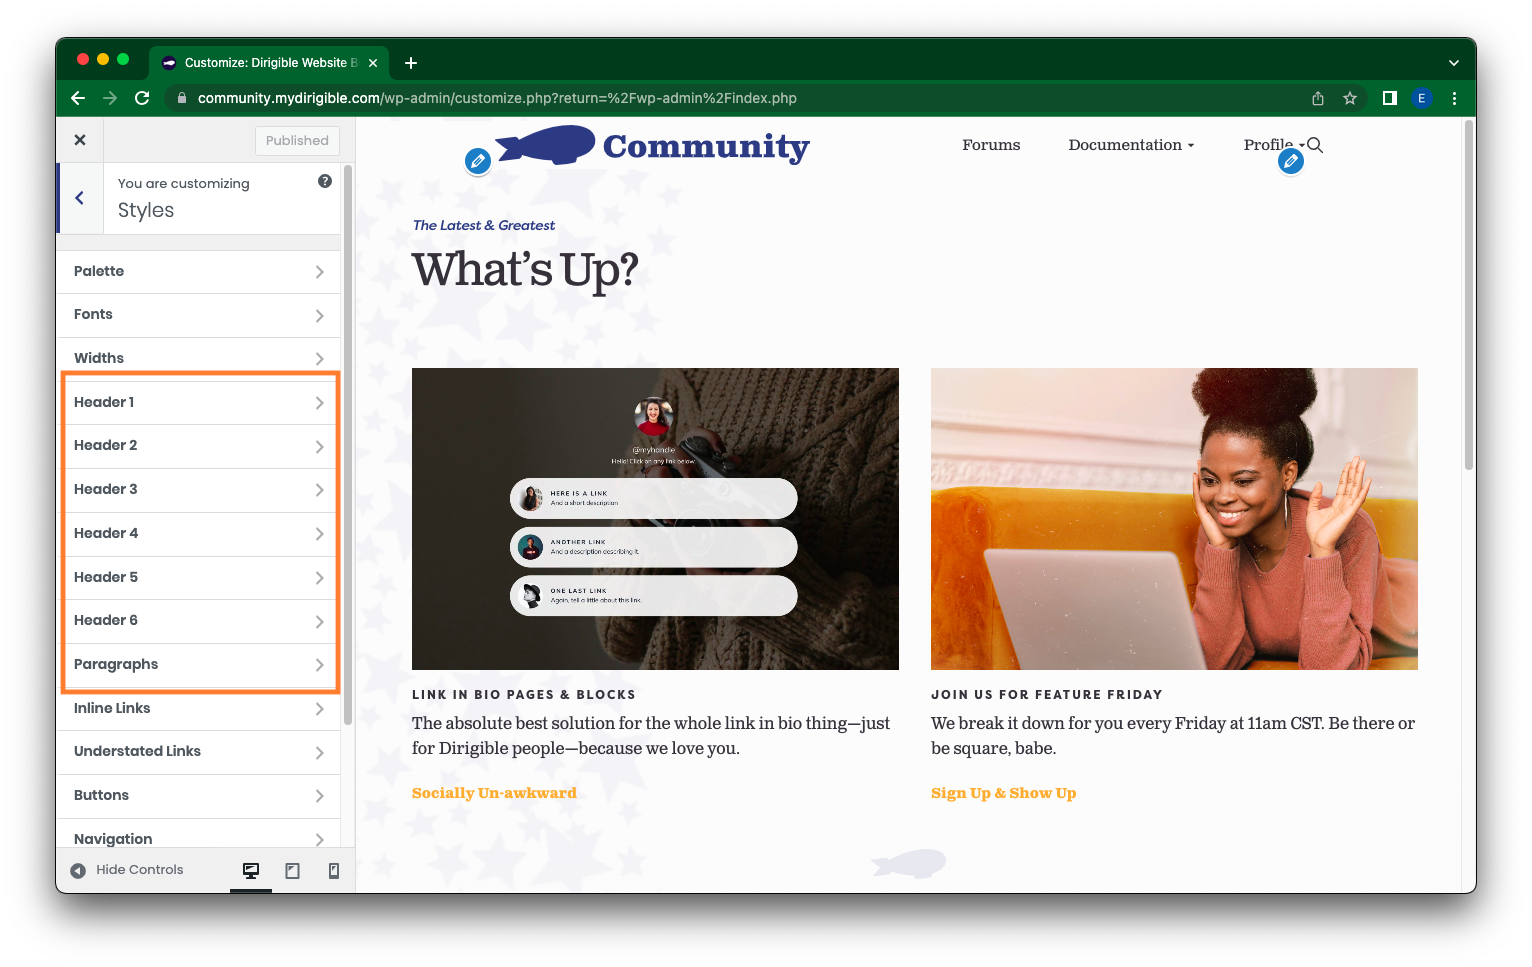
- Once you have made your selection, on the left-hand side navigate to the Size category to make your adjustments either by typing in a value or using the up and down arrows on the side. You can also customize your Paragraphs and Headers presets here in other ways like Color and Weight if you so wish.

How to Change Font Size in Block Settings:
- Select the paragraph block where you want to adjust the font size.
- Then on the right-hand side under Block, there is a category labeled Typography with a size selection bar underneath. The options are Small, Medium, Large, Extra Large, and Extra Extra Large. Select your preferred font size.
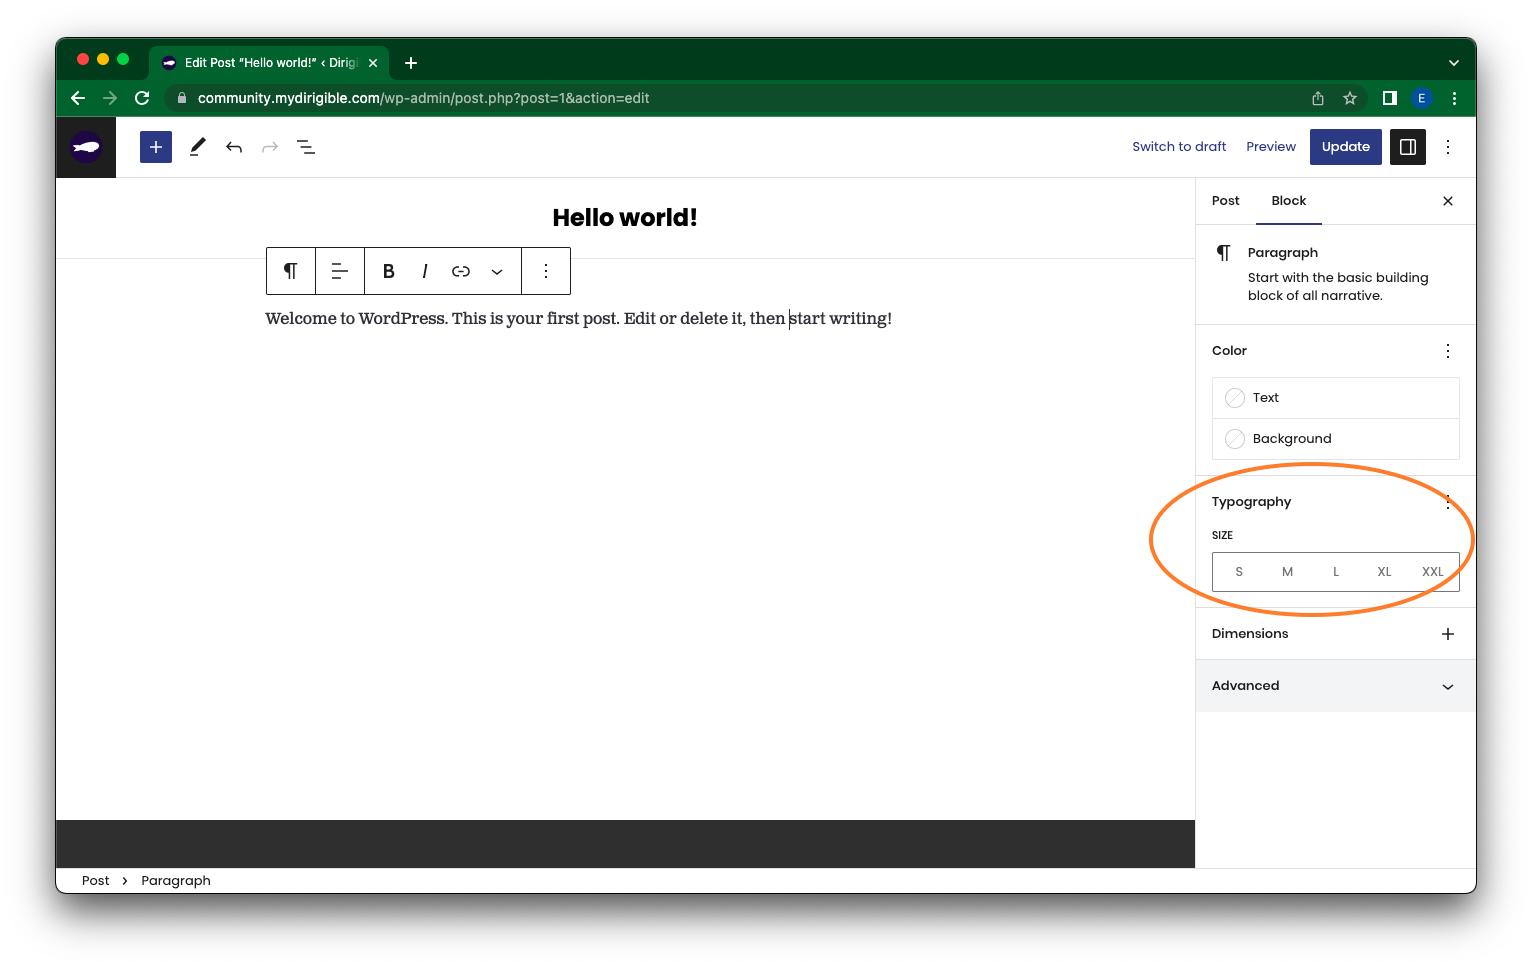
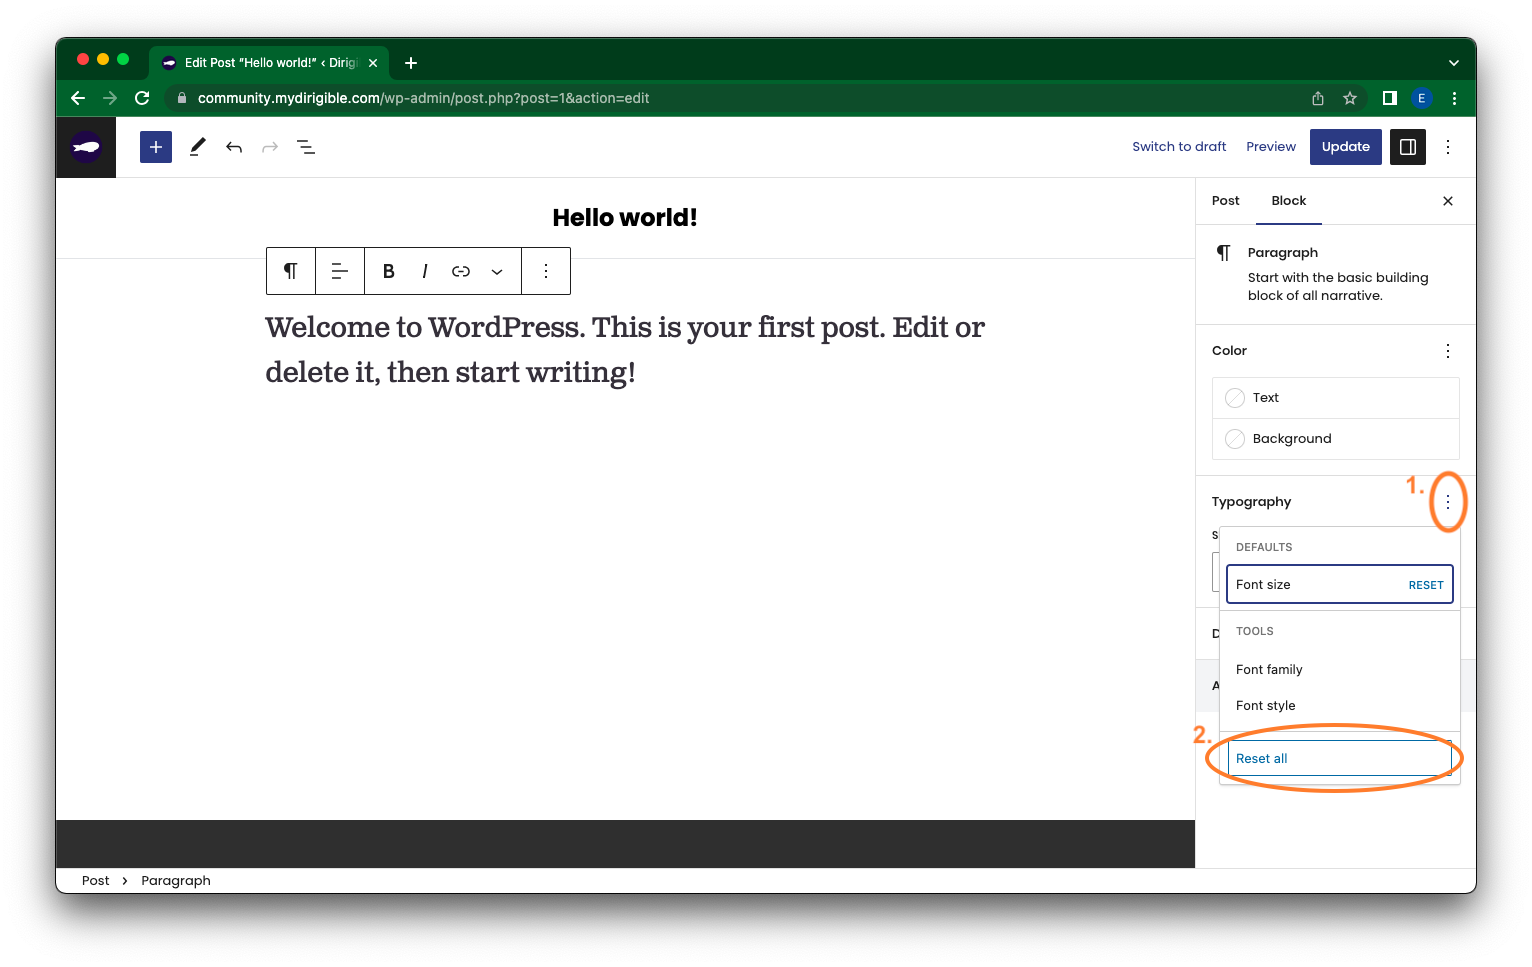
- If for whatever reason you change your mind, just select a different size or you can rest by clicking on the three vertically arranged dots next to Typography and select Reset all at the bottom of the drop down menu.
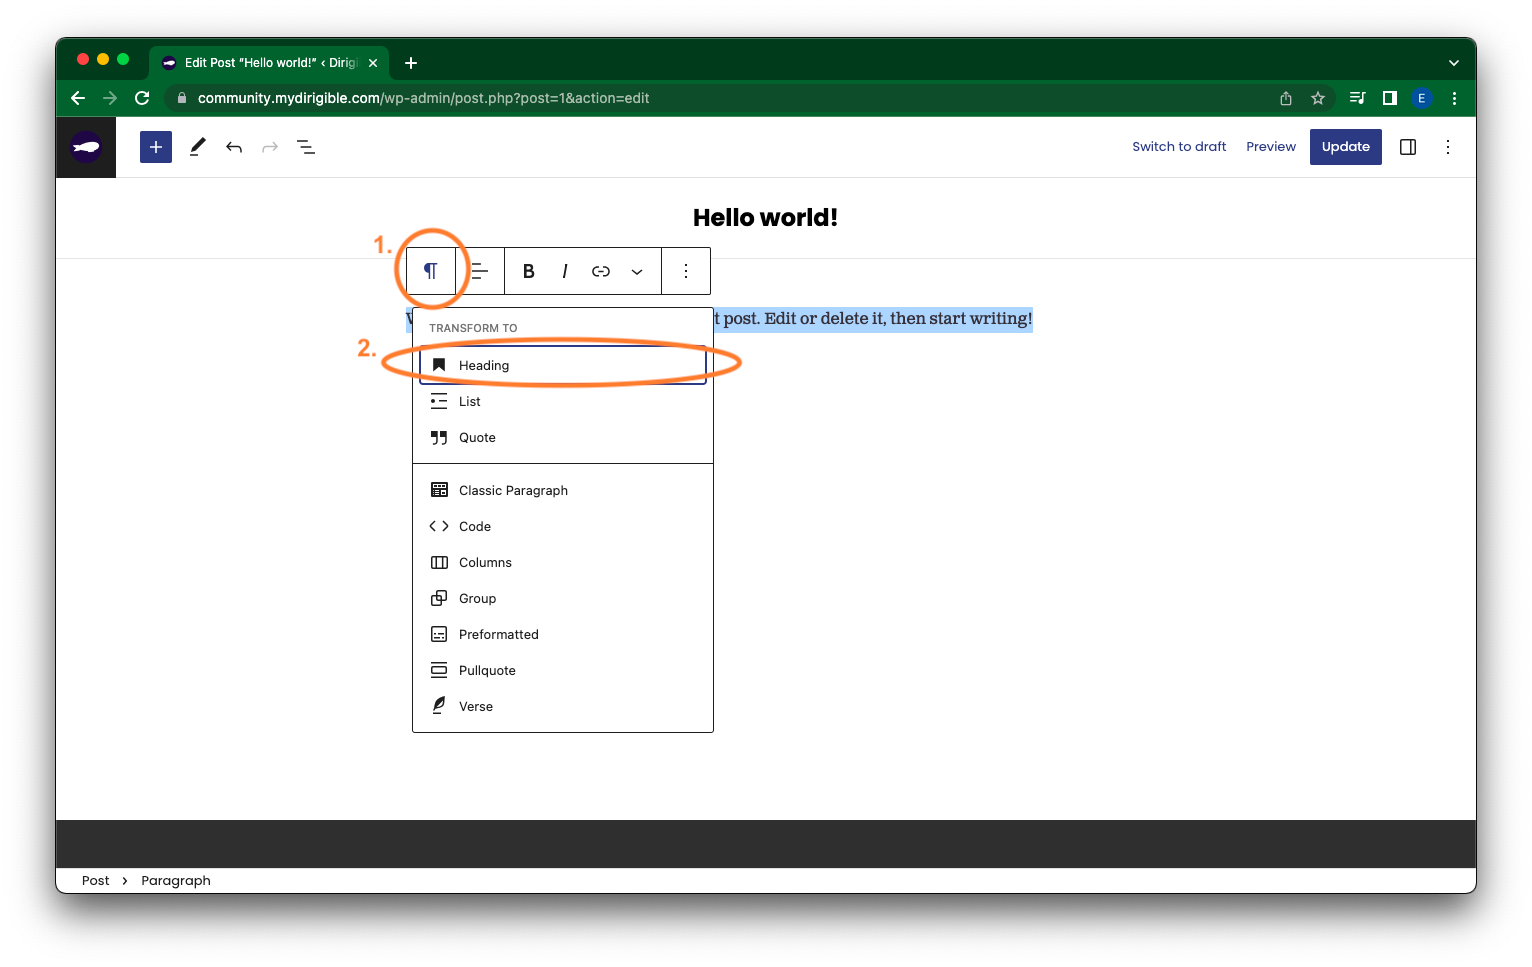
How to Change Font Size Using Paragraph Headings:
- Highlight the section of text and/or select the block you want to adjust. In the Customizer click on the paragraph icon on the right of the menu.
- Select Header in the drop down menu.
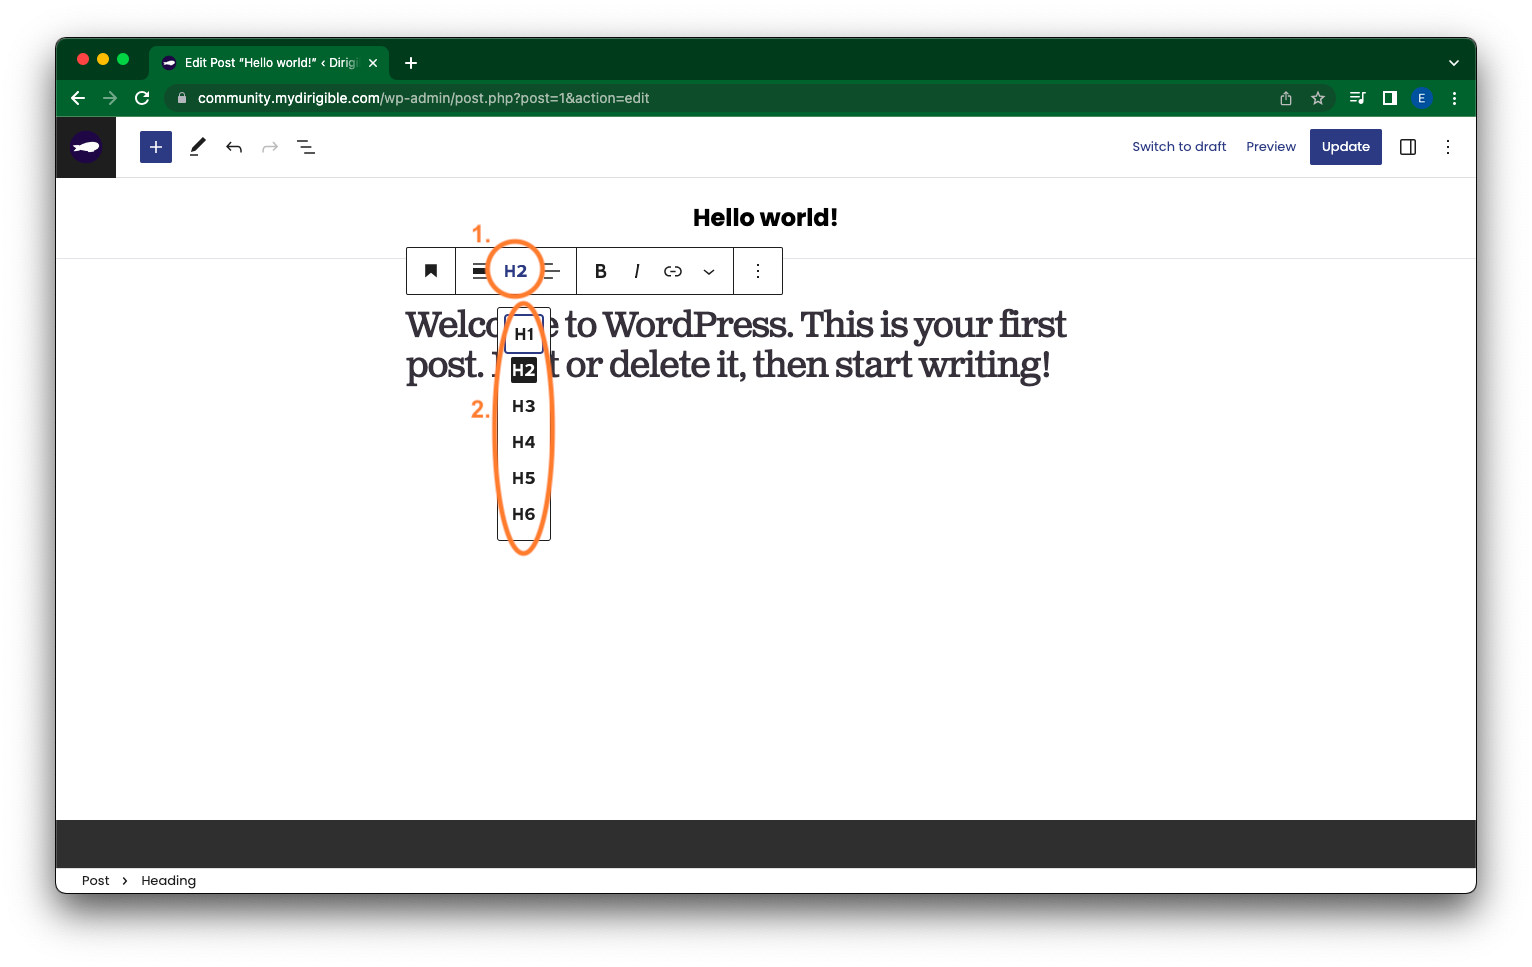
- Now, in the customizer you can adjust the preset heading by selecting H1, H2, H3, H4, H5, or H6.
Hopefully these methods help and get you one step closer to getting your site looking the way you want it to!
If you found this helpful and want to learn more about using your website and how to market your brand – sign up for our Website Building 101 course with Dirigible!
How do I use Large Quote Blocks?
Learning how to use large quote blocks is as simple as 1, 2, 3! Adding large quotes into your website design makes it more intuitive and easy to read, allowing you to communicate effectively with your users.
Take a minute to read this short tutorial about how to use Large Quote Blocks in the Dirigible Platform website builder.
Which Quote Block is right for you?
In this case, let’s say you’re adding a page to your website about a famous artist. You would want to choose a large quote block to display your favorite line from a song so it can stand out and everyone can read it!
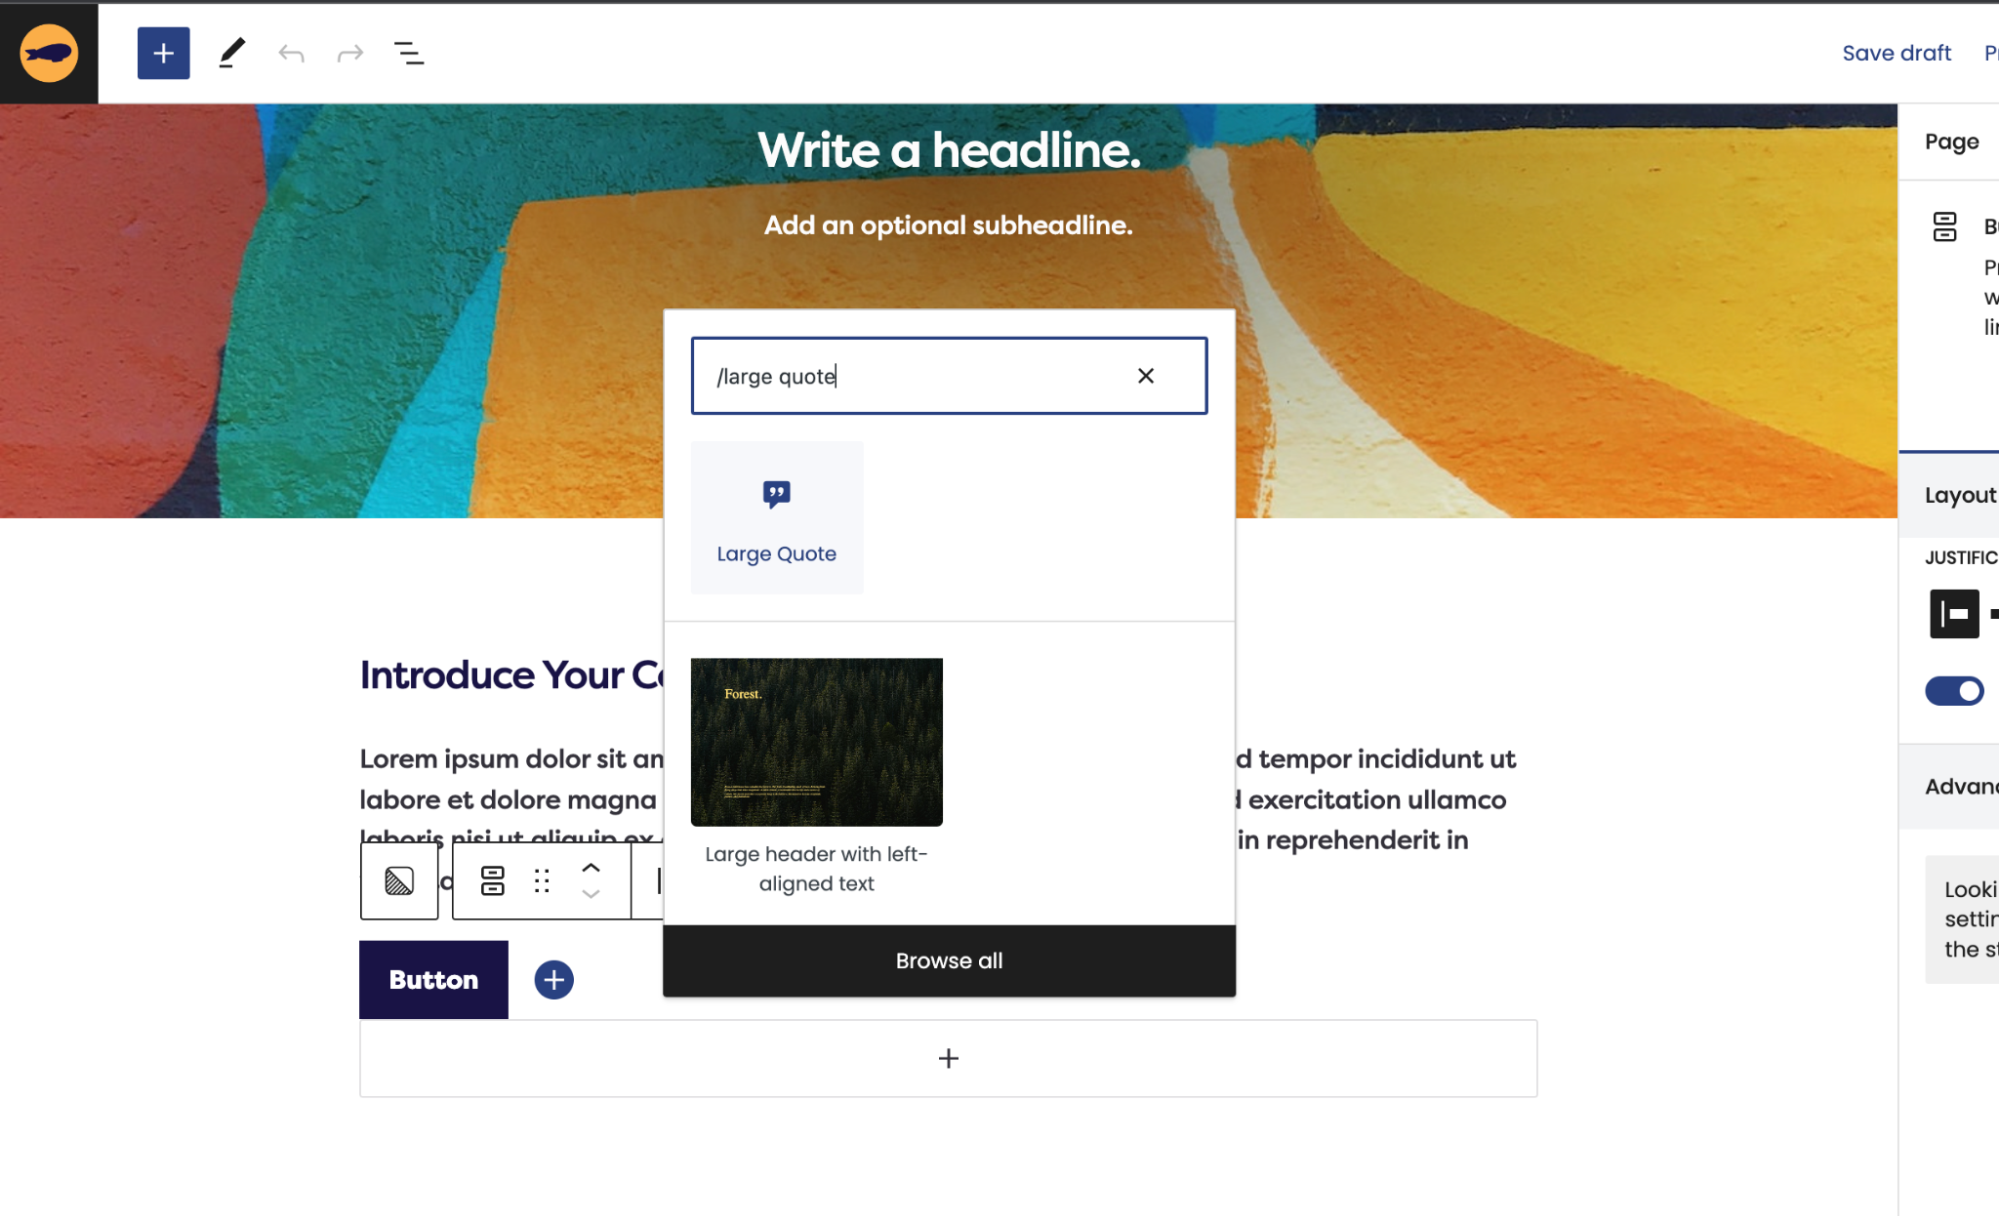
Steps to adding a Large Quote Block:
- Click on the + sign to add a new block to your page
- Type in “/Large Quote” to find the quote style you want to add
- Select Large Quote
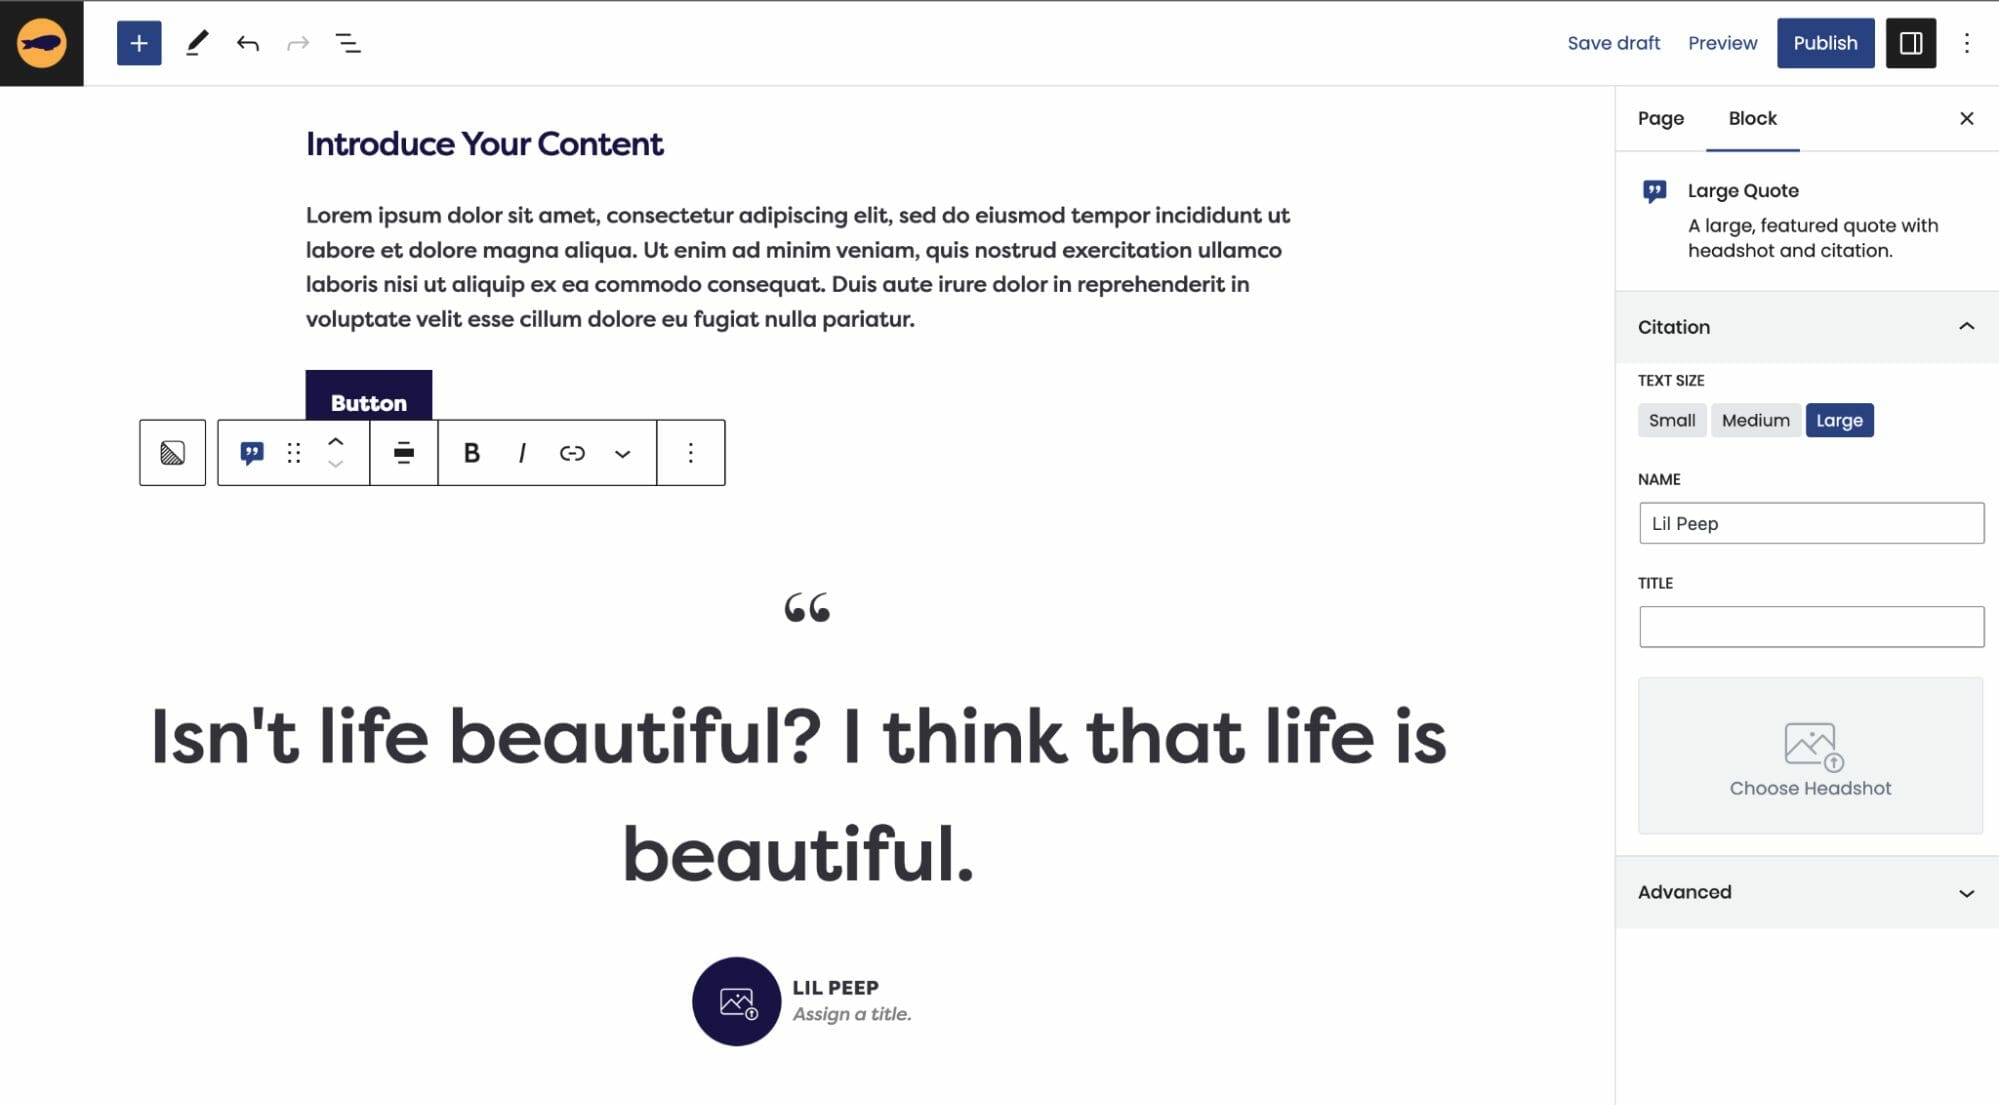
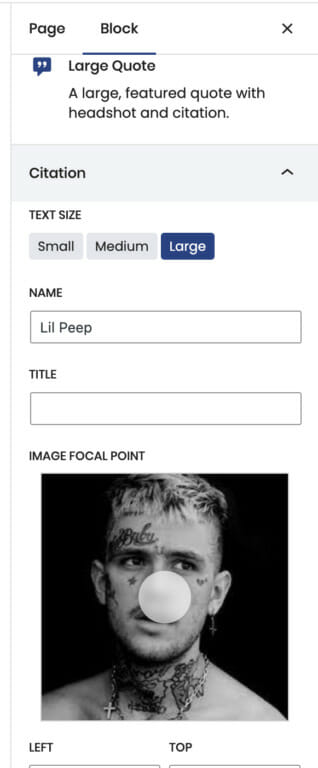
You can also edit the text size from the following text size options from the block editor sidebar on the right.
Small
The small text size is the same size as the Small Quote block, which is the same size as your paragraphs. You can change this in the customizer.
Medium
Medium is the default setting. This sets font size to 2.6vw, which grows proportionally with window width.
Large
The large setting sets font size to 3.8vw, which grows proportionally with window width. When using this setting, we recommend keeping an eye on the length of the quote
Adding a Headshot:
To add a Headshot, click on the headshot icon to open your media library. If you don’t add a headshot, the Name and Title will appear centered underneath the quote on the frontend.

Cool Design Updates for Your Site to Look Like a 10
We adjusted the styling to make this block more prominent on the page, and have moved the quote marks from the sides of the quote text to a single quote on top!
Don’t Forget!
Remember that large quotes make certain content in your website stand out from the rest, so be strategic about where you want to place them!
Dirigible’s Large Quote Blocks are powerful design tools to take your website to the next level. We hope that this tutorial helps you leave a lasting impression on your users with Dirigible’s Large Quote Block 👏
How to add a clickable telephone number to your website
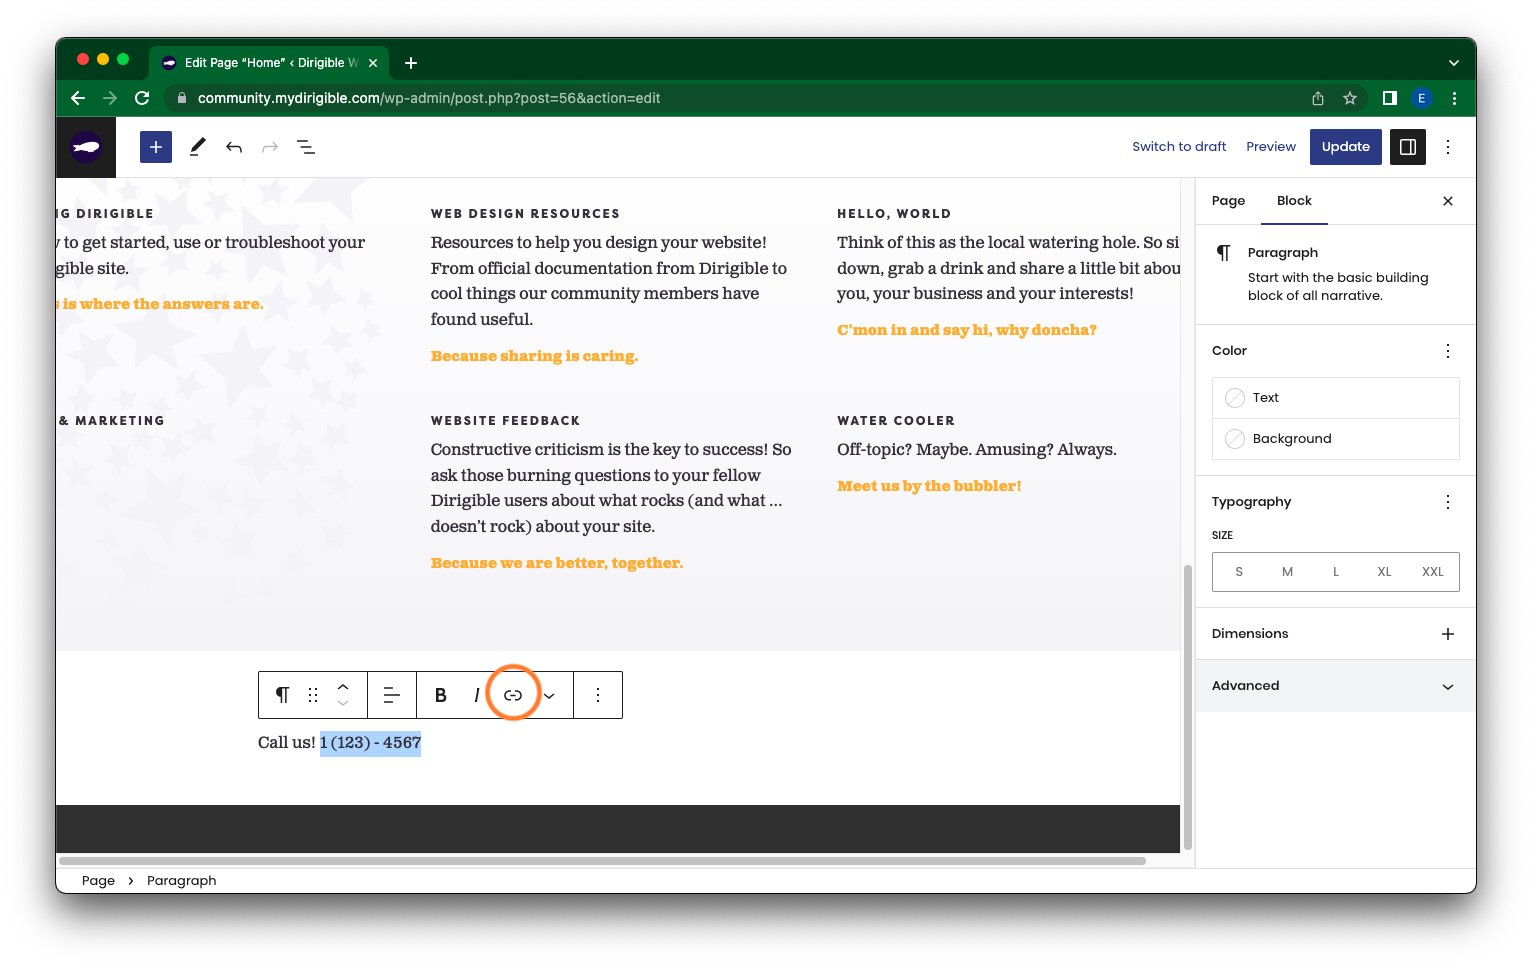
Begin by navigating to the relevant page on your website, such as a contact page where you intend to insert your phone number.
Once there, select Edit and input your phone number in the appropriate section. Feel free to personalize its display with emojis or abbreviations like “tel:” or “t:” to signify its function!
Next, highlight the phone number and click on the Link option from the popup menu. You can also utilize the shortcut ⌘K on a Mac or Ctrl+K on a Windows machine to achieve the same result.
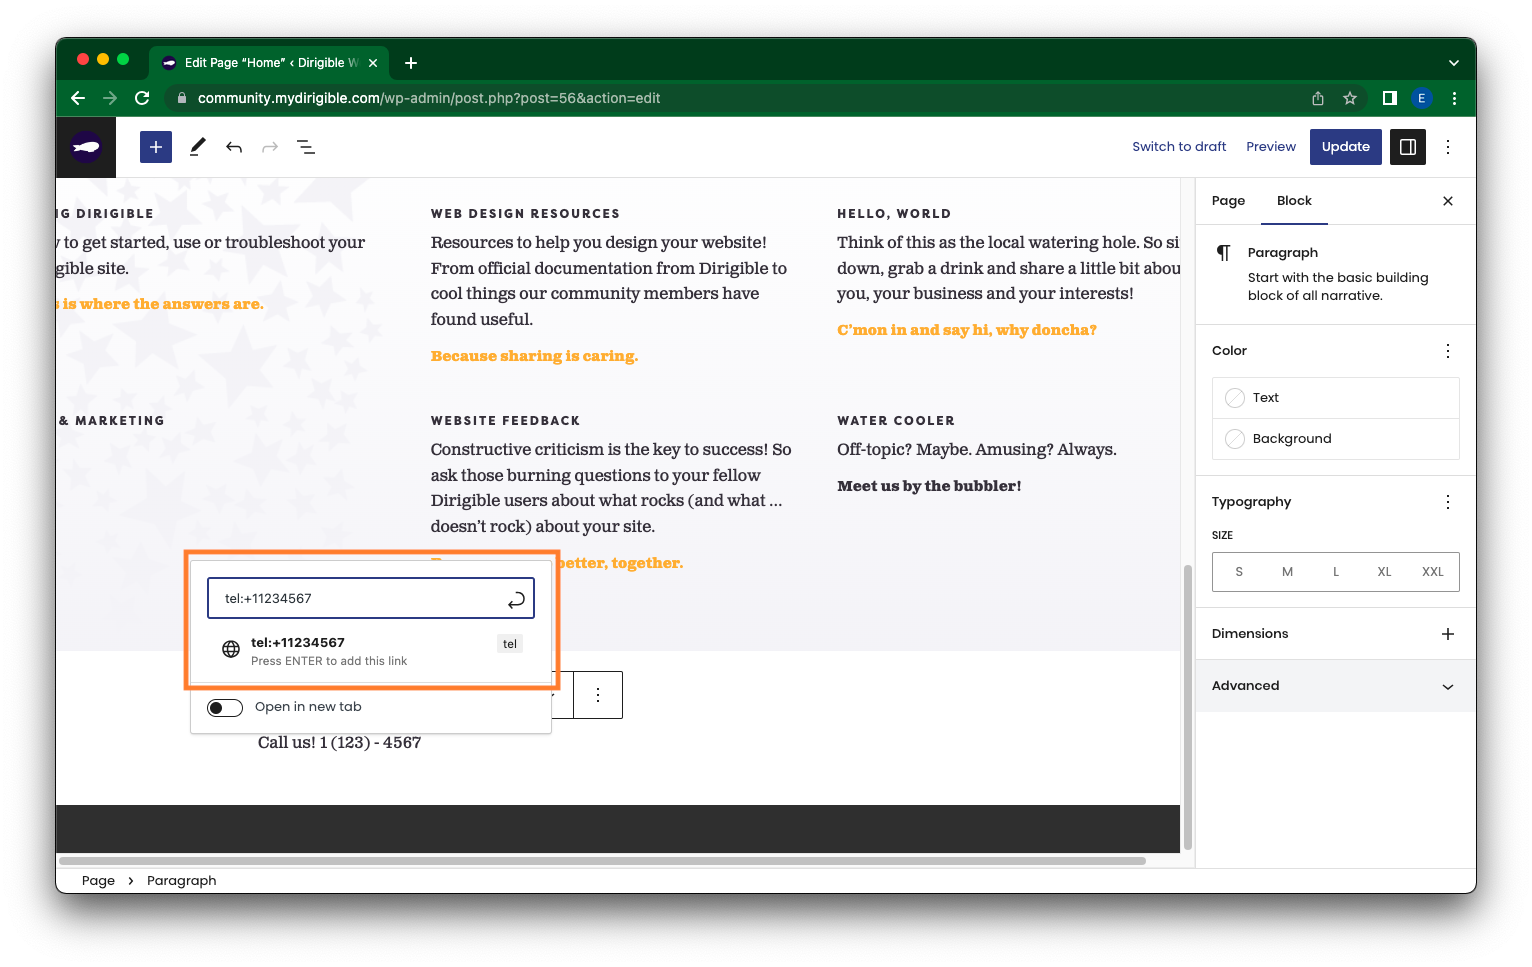
In the field to insert a link, enter “tel:+” followed by your phone number’s country code and the number itself. For instance, a phone number from the United States should appear as “tel:+11234567890,” where ‘1’ is the US country code and ‘1234567890’ is a placeholder for your number.
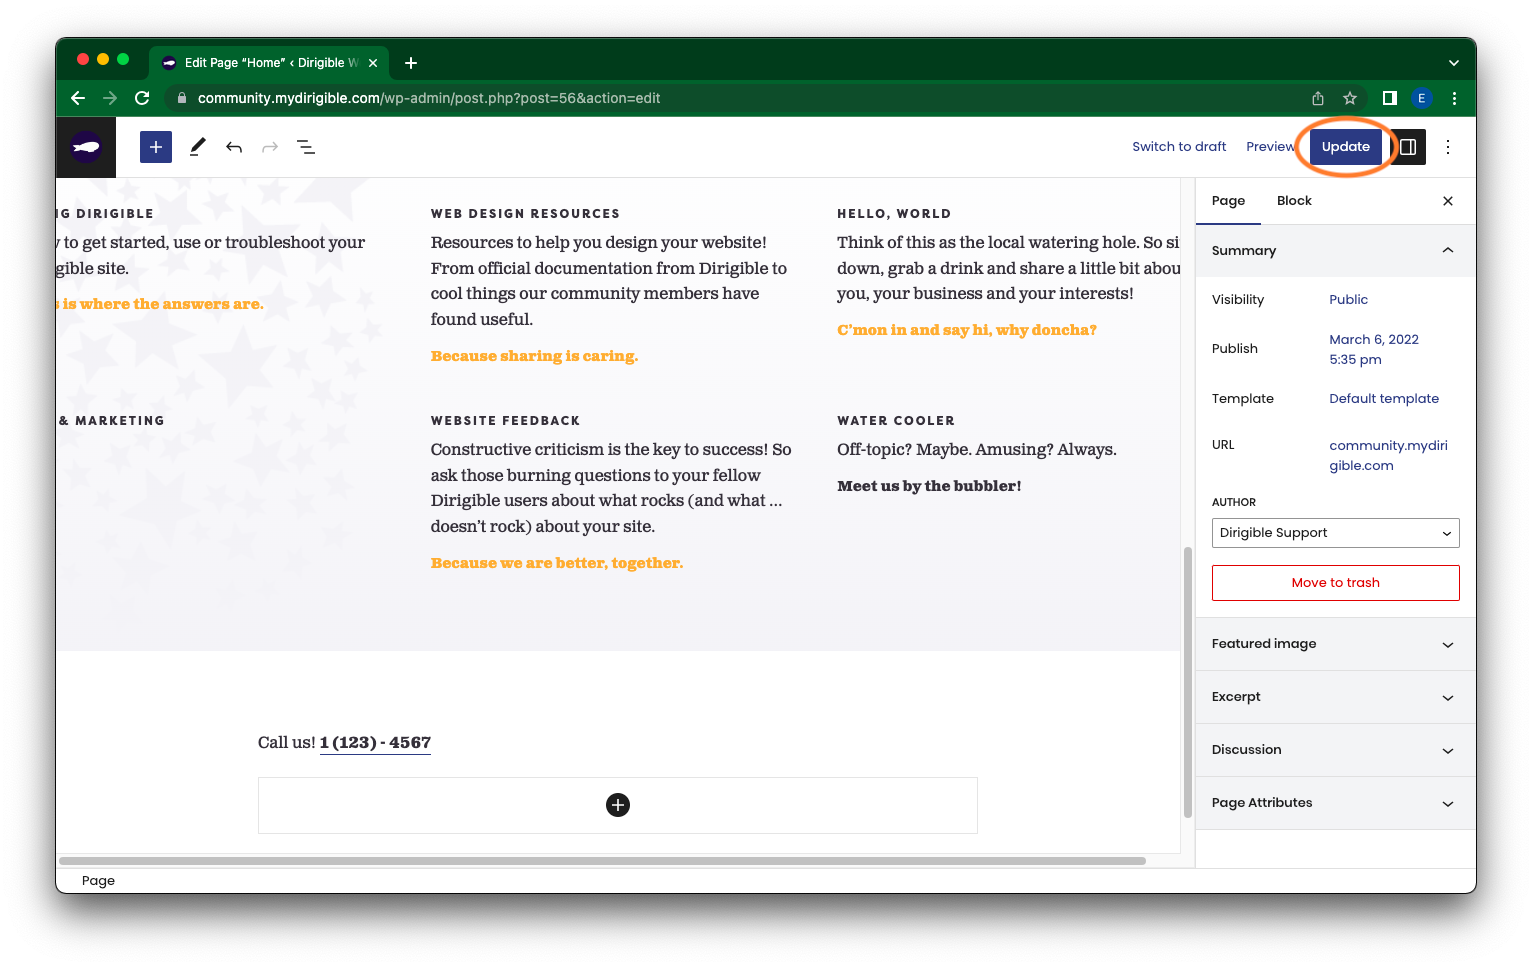
After inserting the number, press the Update (or Publish) button. The linked phone number becomes operational once you publish or update your page!
How to add UTM Parameter Tracking to Gravity Forms
Step 1: Understanding UTM Parameters
- What are UTM Parameters? UTM (Urchin Tracking Module) parameters are query parameters used to track the effectiveness of online marketing campaigns across traffic sources and publishing media. They are added to URLs to capture campaign data as visitors interact with a website.
Step 2: Setting Up a New Form in Gravity Forms
- Navigate to Gravity Forms: Access the dashboard of your WordPress site and navigate to the Gravity Forms section.
- Create a New Form: Click on “New Form” and choose to create a blank form.
- Name Your Form: Title your form, such as “UTM Testing,” and select “Create Form.”
Step 3: Configuring Form Fields
- Add Basic Fields: Insert necessary fields like “Name” and “Phone Number” which you’ll collect from users.
- Add a Hidden Field for UTM Parameters:
- Click to add a new field, selecting the “Hidden” field type.
- Name the field according to the UTM parameter you are tracking, for example, “UTM Campaign.”
- Enable Dynamic Population:
- In the field settings under “Advanced,” check the option to “Allow field to be populated dynamically.”
- Set the parameter name (key) to match the UTM parameter, such as “utm_campaign” (notice the lowercase, it must match the query parameter exactly)
Step 4: Deploy the Form on a Page
- Create a Testing Page: Go to the Pages section of WordPress, create a new page, and name it (e.g., “UTM Testing Page”).
- Insert the Form: Use the Gravity Forms block or shortcode to add your newly created form to the page.
- Publish the Page: Once the form is added, publish the page.
Step 5: Testing UTM Tracking
- Visit the Testing Page: Navigate to your UTM testing page to view the form.
- Test with UTM Parameters: Append UTM parameters to the page URL in the format:
?utm_campaign=testCampaign. - Submit the Form: Fill out the form and submit it to see if the UTM parameters are captured.
- Verify UTM Data: Go back to the Gravity Forms entries section to ensure that the UTM data is being recorded with form submissions.
Step 6: Additional UTM Parameters
- Repeat for Other Parameters: If needed, add additional hidden fields for other UTM parameters like “utm_source” and “utm_medium.”
- Customize as Needed: Depending on campaign requirements, you may also include parameters like “utm_term” and “utm_content.”
Conclusion
By following these steps, you can effectively integrate UTM tracking into any form created with Gravity Forms, enabling detailed tracking of campaign performance and visitor interactions.
How To Add/Update a Button on Your Site’s Main Menu
Adding a custom button to the top of your site is a great way to drive attention and encourage your users to take a specific action, such as contacting support, signing up, or navigating to a key page. Follow the steps below to add (or edit) a button to your site’s main menu from the Customizer.
- From your website’s dashboard, navigate to Appearance > Customize. This will open the Customizer panel.
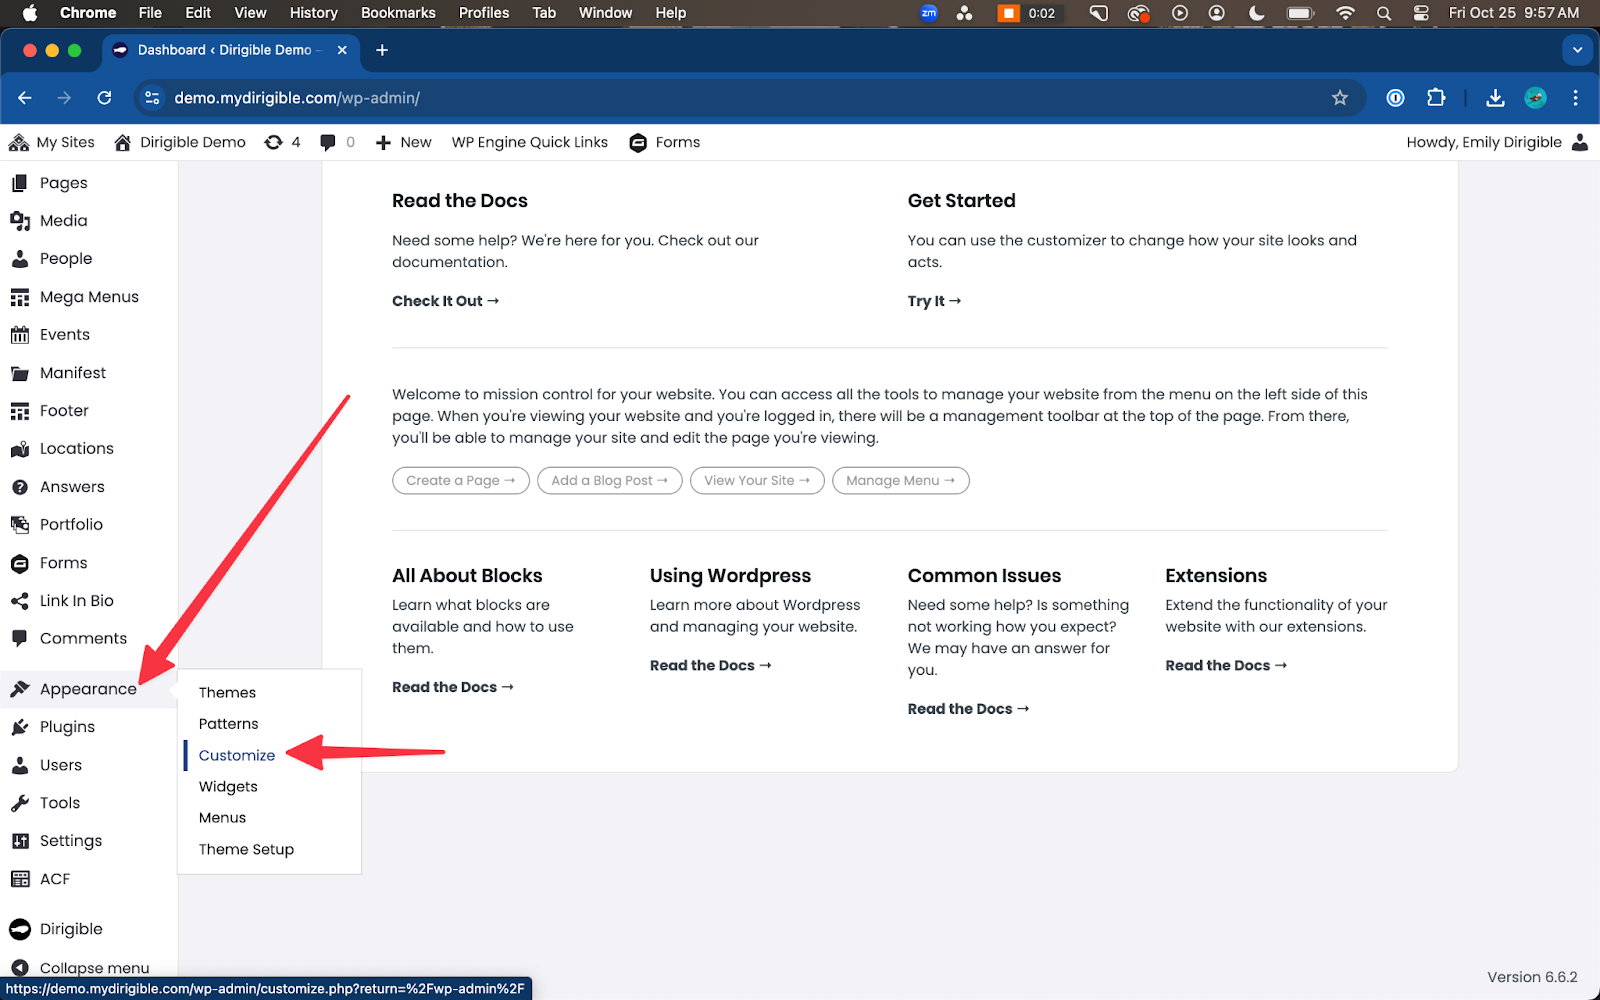
- Click on Header & Menus. This section allows you to adjust your website’s header and menu settings for both desktop and mobile views.
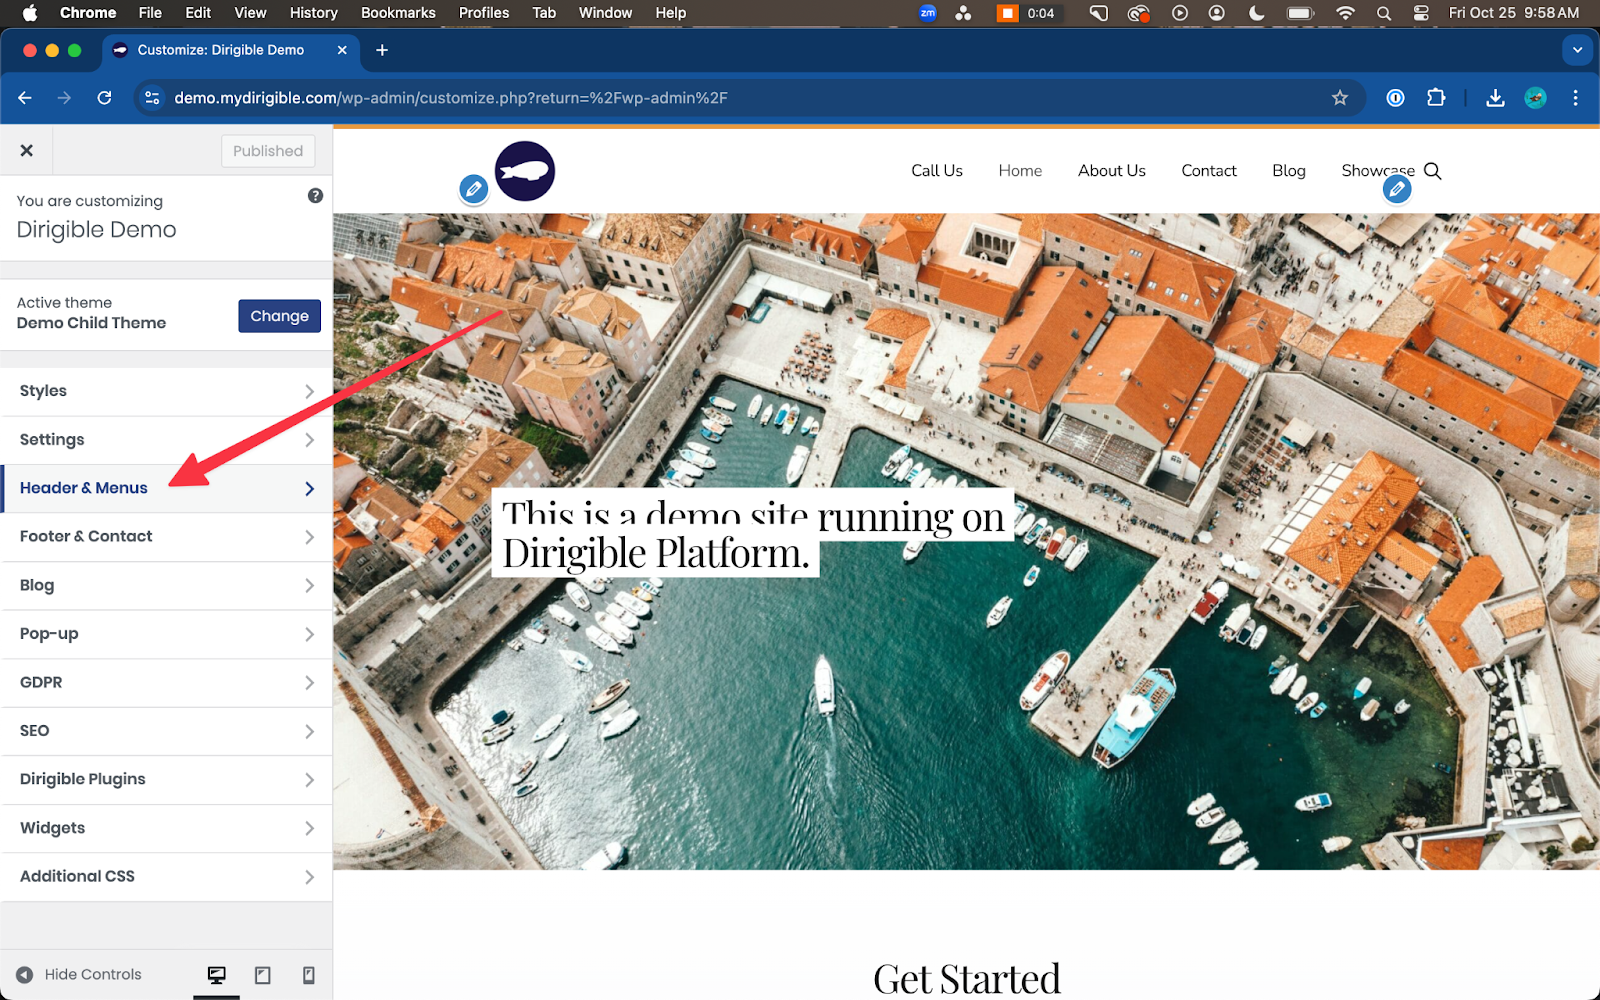
- Click on Button to open the button-specific customization options.
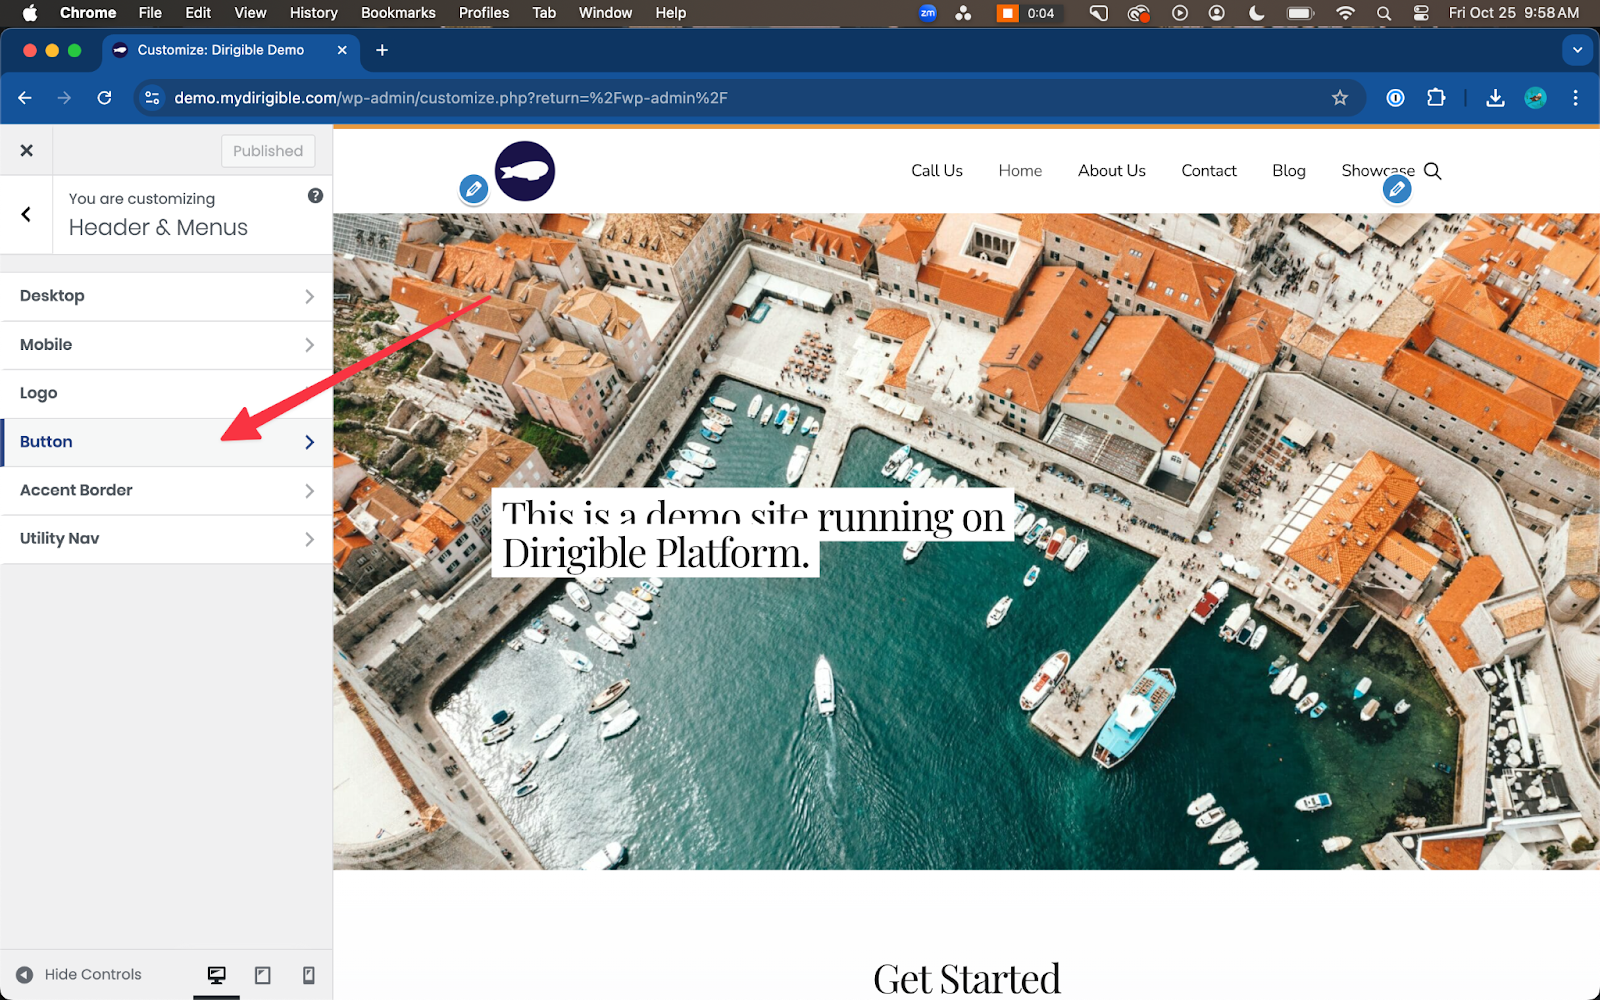
- Here is where you will find the various setting fields to customize your Main Menu’s button—adding Text and a URL as well as selecting Style. Be sure to toggle on Enable.
- After making selections and hitting Publish/Update, be sure to visit your site on mobile and desktop to confirm the button works and looks how you want it to.
How to bust the cache on your site using query parameters
Introduction
Web caching is a crucial aspect of modern web development, designed to enhance website performance and reduce server load. However, it can sometimes lead to frustrating situations where users don’t see the latest updates to your site. That’s where our handy little trick comes in – query parameters!
In this article, we’re diving into the world of cache busting using query parameters. We’ll explore why it’s important, how it works, and most importantly, how YOU can implement it to ensure your audience always sees the freshest content. Whether you’re a seasoned developer or just dipping your toes into the web world, we’ve got you covered!
So, why should you care about query parameters and cache busting? Well, imagine spending hours perfecting your website’s design or content, only to have your users stuck viewing an outdated version. Not cool, right? By the end of this guide, you’ll have the power to break through those pesky caches and showcase your latest and greatest work. Let’s get started!
Understanding Web Caching
Let’s dive into the nitty-gritty of web caching, shall we? It’s a key player in the web performance game, but it can sometimes throw a wrench in our plans for fresh content. Here’s what you need to know:
What exactly is web caching? Think of it as your browser’s personal assistant, storing copies of web pages, images, and other resources. When you revisit a site, instead of downloading everything again, your browser can serve up these saved copies. It’s like having a cheat sheet for the internet!
The benefits? Oh, they’re pretty sweet:
- Lightning-fast load times ⚡
- Reduced bandwidth usage (your data plan will thank you)
- Less strain on web servers (they need a break too!)
But here’s where things get a bit… spooky. Caching can sometimes mean your users aren’t seeing your latest and greatest updates. Imagine launching a killer new feature or fixing that embarrassing typo, only to have your audience stuck in a time warp, viewing the old version. Not ideal, right?
This caching conundrum can lead to some head-scratching moments for both users and developers. Users might wonder why that announced update isn’t showing up, while developers might pull their hair out trying to figure out why their changes aren’t live.
But don’t worry, folks! We’re about to show you how to become the master of your caching destiny. Up next, we’ll explore how query parameters can be your secret weapon in the battle against outdated content. Stay tuned!
Query Parameters and Cache Busting
Alright, let’s dive into the good stuff! Query parameters are about to become your new best friends in the fight against stubborn caches. But first, let’s break down what they are and how they work their magic.
What are query parameters, you ask? Think of them as the special sauce in your URL recipe. They’re those extra bits of info you see after a question mark in a web address. For example:
https://www.awesomesite.com/page?param1=value1&m2=value2
See those bits after the “?”? Those are our query parameters in action! They’re super handy for passing information to web servers and, as we’re about to discover, tricking caches into serving fresh content.
Now, here’s where things get interesting. When it comes to caching, most systems treat URLs with different query parameters as unique pages. It’s like having a secret handshake with the cache – change the handshake, and you get a brand new page!
This quirk of caching behavior is the key to our cache-busting strategy. By adding or modifying query parameters, we can force the browser to request a fresh copy of the page from the server. It’s like telling your browser, “Hey, this might look like the same old page, but trust me, it’s totally new and exciting!”
Some popular cache-busting techniques include:
- Adding a timestamp parameter
- Using a version number
- Generating a random string
Each of these methods has its own flavor, and we’ll be diving into the pros and cons of each in the next section. Get ready to become a cache-busting pro!
Stay tuned, because up next, we’re rolling up our sleeves and getting into the nitty-gritty of implementing these techniques. Get ready to kiss those outdated caches goodbye!
Implementing Query Parameters for Cache Busting
Ready to become a cache-busting wizard? Let’s roll up our sleeves and dive into the nitty-gritty of using query parameters to check your site’s content!
A. Adding a timestamp parameter
First up, we’ve got the classic timestamp method. It’s like giving your URL a tiny digital wristwatch! Here’s how it works:
- Syntax: Append “?t=[current timestamp]” to your URL
- Example: https://www.yoursite.com/page?t=1621234567
Pros: Super easy to implement and guarantees uniqueness.
Cons: Can make URLs look a bit messy and might cause unnecessary cache misses.
B. Using a version number parameter
Next up, we’ve got the version number approach. Think of it as giving your content a fancy new outfit every time you make changes!
- Syntax: Add “?v=[version number]” to your URL
- Example: https://www.yoursite.com/styles.css?v=1.2.3
Pro tip: Tie your version numbers to your deployment process for seamless updates. It’s like having your cake and eating it too!
C. Random string parameter
Last but not least, we’ve got the wild card of cache busting – the random string method. It’s like playing URL roulette, but you always win!
- Step 1: Generate a random string (get creative here!)
- Step 2: Add it to your URL like this: “?r=[random string]”
- Example: https://www.yoursite.com/script.js?r=a1b2c3d4
Keep in mind: While this method is effective, it can make tracking specific versions a bit tricky. Use with caution, cache-busters!
There you have it, folks! Three powerful weapons in your cache-busting arsenal. Choose wisely, and may your content always be fresh and your users always happy! 🚀
How to Clear Your Caches
Are different users seeing different things when visiting your website? Caches might be storing old data
Have you ever been out with your mom and she starts showing random strangers your website, but you notice the way it looks on her phone is different than when the waiter just opened it up on their phone? Confusing and frustrating, we know. If your website looks different for different users, it is probably due to caches.
What is a cache?
A cache is essentially a subset of data that is being saved or stored. Caching is a common practice used by web browsers to ensure a faster reload time the next time you visit that same site. You can kind of think of a cache like the information you remember about an acquaintance; You do not remember everything about them, but there is some information that you will always have stored like their name, their job, etc. If we did not have caches, it would be like meeting a person all over again for the first time, every time.
However, because web browsers are relying on caches, you might be seeing outdated information. It’s like running into an old friend and asking how their job is. You are relying on stored information–a cache–and they tell you they shifted careers. You have outdated information, just like a cache can sometimes have. But don’t worry, caches can be cleared to make room for new information.
How to clear your cache on:
- Chrome
- For desktop, open Google Chrome and in the top right corner of the browser, click the three vertically arranged dots. In the dropdown menu, select More Tools > Clear Browsing Data… You’ll then be given a menu page to select a time range and make sure all of those boxes below are checked. Lastly, click Clear data in the bottom right corner.
- For mobile, open Google Chrome and in the bottom right of the page, click the three horizontally arranged dots. A menu screen will pop-up and you’ll want to select Clear Browsing Data. You should make sure that Cookies, Site Data and Cached Images and Files are checked. Lastly, tap Clear Browsing Data at the bottom.
- Edge
- For desktop, open Microsoft Edge and in the top right corner of the browser, click the three horizontally arranged dots. In the dropdown menu select, History. From the new menu that pops up, click the three horizontally arranged dots in the top right corner. And then click Clear browsing data. On the new page, select your time range and make sure there is a check mark next to Cookies and other site data as well as Cached images and files. Lastly, click Clear now in the bottom left.
- For mobile, open Edge and in the bottom center of the page, tap on the horizontally arranged dots that are encircled in an oval. A menu will pop up and tap on History. In the top right, tap the trash can icon. Select your time and make sure there is a check mark next to Cookies and other site data and Cached images and files. Lastly, click Clear now at the bottom.
- Firefox
- For desktop, open Firefox and in the top right corner of the browser, click on the three horizontal lines. In the dropdown menu, click History > Clear Recent History… Select your time range and make sure Cache is selected in the items list. Lastly, click OK.
- For mobile, open Firefox and in the bottom right corner, tap on the three horizontally arranged lines. In that pop-up menu, tap History. Then in the bottom left corner, tap on the trash can icon. Lastly, select your time range.
- Safari
- For desktop, open Safari and in the top Menu Bar, click History > Clear History… at the bottom. Select a time range and then click Clear History in the bottom right corner.
- For mobile, open Safari and tap on the opened book icon in the lower left of the page. Select the clock icon on the left and in the lower right tap Clear. Lastly, select your time range.
If your site is looking different for different users, tell them to clear their cache history as old data is being saved.
How to connect Gravity Forms to Mailchimp
Collecting newsletter signups is one of the most powerful ways to use your website: learn how to wire up Gravity Forms to your Mailchimp account.
Hello everyone! Today, I’ll show you how to connect your Gravity Forms to your Mailchimp account so you can add subscribers from Gravity Forms and your dirigible site to your Mailchimp mailing list. Let’s get started:
- Go to the Forms Settings page. If you’re a dirigible studio client, make sure the Mailchimp option is visible. If it’s not, it means we haven’t activated the Mailchimp add-on for Gravity Forms yet. Let us know, and we’ll take care of it for you. Mailchimp makes the process easy.
- Click on “Connect to Mailchimp” and sign in to your Mailchimp account.
- If prompted, select your personal account and complete any necessary authentication steps.
- Once connected, the next step is to set up a simple Gravity Form that sends user information to Mailchimp.
- Create a new form for Mailchimp sign-up.
- With Mailchimp activated, you should be able to find an email field and optionally a name field. Adjust the form layout as desired.
- Save the form and go to the form settings.
- Navigate to the Mailchimp tab and add a new feed.
- Name the feed according to your preference. If you have multiple audiences, you can create different forms to route people to their respective feeds.
- Select the audience you want to connect to and save the settings.
- Map the fields in your form to the corresponding Mailchimp fields. Skip any fields you don’t collect (e.g., birthday or phone number).
- If you have groups in Mailchimp, you can reassign them using the options provided.
- Consider enabling double opt-in for better subscriber verification.
- Save the field mappings and feed settings.
- Now that the feed is set up, you can add the form to your pages.
- Create a new page and add the Gravity Form block.
- Select the Mailchimp signup form you created earlier.
- Customize the form layout as desired.
- Publish the page and view it to see the form in action.
- When users submit the form, their email addresses will be added to your Mailchimp email list, allowing you to contact them using Mailchimp’s automated tools.
That’s it! Thank you very much for following along.
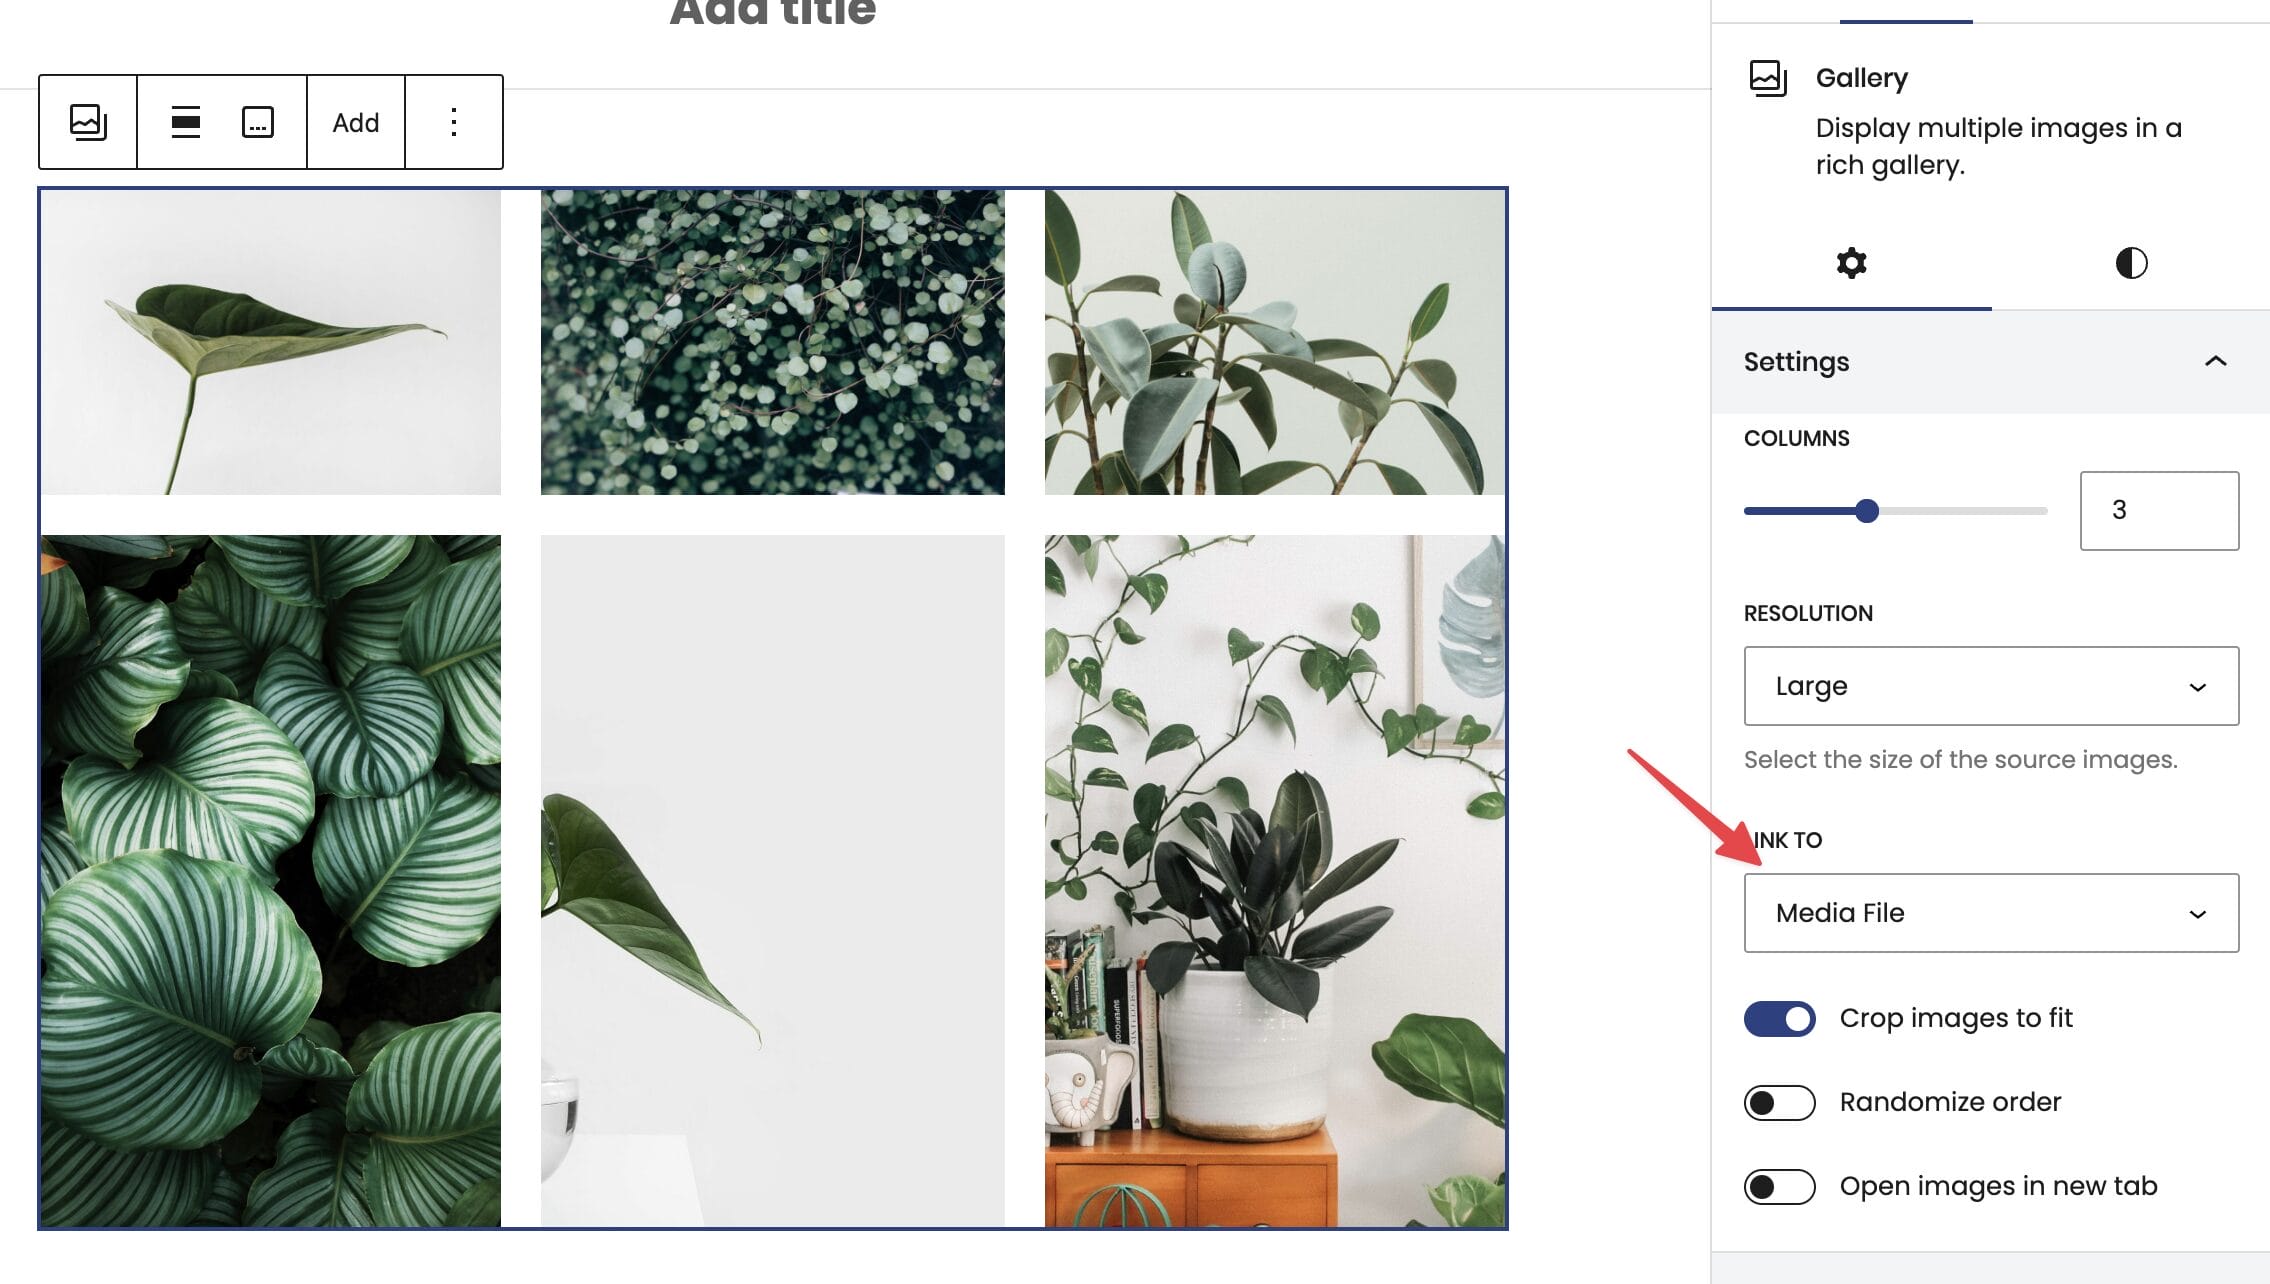
How to create a lightbox gallery?
A lightbox gallery is a super handy feature you’ll often see on websites where images are a big deal, like portfolios or online stores. When you click on a small photo or a link that’s part of a gallery, the lightbox kicks in. It dims the rest of the website and pops up a larger version of the image right in the center of your screen. You can usually click through to other photos without closing the window, which is pretty neat for checking out details. It’s a cool way to get a closer look at images without any hassle.
Steps to Adding a Lightbox Gallery Block:
- Click on the + icon to add a new block to your page/
- Type in “Gallery” to find the Gallery
- Select the Gallery to add it to your page
- Add images to your gallery
- Select the parent gallery block
- Select the link to “Media file” option.


Additional Resources
How To Export Gravity Forms Entries
Need help exporting form entries in Gravity Forms from your site’s dashboard? Here are the steps:
- Navigate to the side menu and click on “Forms.”
- From the dropdown menu, select “Import/Export.”
- By default, the “Export Entries” option will be selected. You can proceed with that.
- Choose the form from which you want to export entries.
- There are sorting options available. You can select specific fields to export. In this case, we will choose to export all fields.
- If you scroll down, you’ll find additional options like conditional logic and date range settings. These can help you further refine your export.
- Once you’re satisfied with the settings, scroll down to the “Download Export File” button.
- Clicking on that button will generate a CSV file. You can open this file in Google Sheets, Excel, or any other spreadsheet program you prefer.
How to set up Dirigible Analytics using a Google Cloud Service Account
GA4 Service Account Setup Guide
This guide covers three tasks needed to give an application read-only programmatic access to a Google Analytics 4 (GA4) property:
- Creating a service account in Google Cloud
- Generating the service account's JSON key
- Retrieving the GA4 property number The work spans two separate consoles: the Google Cloud Console (where the service account and key live) and Google Analytics (where you grant the account access and find the property number).
Before you begin
You will need:
- A Google account that can administer a Google Cloud project (create one if you don't have it).
- Admin-level access on the GA4 property you want to read — or someone who has it and can complete the access-granting step.
- About 10 minutes. One prerequisite that isn't covered in the three numbered sections but is required for any of this to work: the Google Analytics Data API must be enabled on your Cloud project. To enable it, go to the Cloud Console, open APIs & Services → Library, search for "Google Analytics Data API", and click Enable. (If you also plan to programmatically list which properties the account can see, enable "Google Analytics Admin API" as well.)
1. Creating a service account
A service account is a non-human identity — an email address your application authenticates as. It lives inside a Google Cloud project.
Steps
- Go to the Google Cloud Console: https://console.cloud.google.com
- Using the project dropdown in the top bar, select an existing project or click New Project, give it a name (for example,
ga4-dashboards), and click Create. A single project can serve multiple GA4 properties, so you don't need one project per client. - Open the navigation menu (☰) → APIs & Services → Credentials.
- Click + Create Credentials at the top, then choose Service account.
- Under Service account details, enter a descriptive name such as
ga4-reader. Google automatically generates an email address for the account in the form:ga4-reader@your-project-id.iam.gserviceaccount.com - Click Create and Continue.
- You will reach an optional step titled "Grant this service account access to the project." Leave the role field blank and continue. A Google Cloud (IAM) role does not grant any Google Analytics access — that comes solely from the access grant you make inside Analytics. Leaving it blank keeps the account at least privilege: it can do nothing in your Cloud project, which is exactly what you want for an identity that only reads analytics data.
- If the wizard won't let you proceed with an empty field, you can still click Continue / Done without selecting anything; the role really is optional. Do not grant a project-level "Viewer" or any other role out of caution — it wouldn't help and would only add unnecessary access.
- Skip the final optional step (granting users access to the service account) and click Done.
Result
You now have a service account with no permissions anywhere yet. It can't touch your Cloud project, and it can't read any analytics data until you explicitly grant it access in Google Analytics (covered alongside Section 3).
2. Creating the service account JSON key
The JSON key is the credential your application uses to authenticate as the service account. It is a long-lived secret — treat it like a password.
Steps
- In the Cloud Console, go to APIs & Services → Credentials (or IAM & Admin → Service Accounts).
- Find the service account you created and click its name to open it.
- Open the Keys tab.
- Click Add Key → Create new key.
- Choose JSON as the key type and click Create.
A
.jsonfile downloads automatically to your computer. This file is the credential.Critical security notes
You cannot re-download this file. If you lose it, delete the key and create a new one. There is no recovery.
- Store it outside your web root. It must never be in a publicly fetchable location. For a server application, place it somewhere like
/home/youruser/private/ga-key.jsonand reference it by an absolute path in your configuration. - Never commit it to version control. Add its path to
.gitignore. Leaked keys in public repositories are a common breach vector. - Do not paste it into a database field or settings page that could be read back through your application's UI if avoidable. Referencing a file path stored in a server-side config constant is safer than storing the key body in a database.
- Rotate and delete unused keys. Service account keys do not expire on their own. Establish a cadence (for example, rotate annually) and delete any key that is no longer in use.
What the key can and cannot do
Because the service account has no Cloud IAM roles and (after Section 3) only Viewer access to one property, a leaked key's worst case is read-only access to that single property's data — it cannot modify Analytics, cannot reach your Cloud resources, cannot create additional keys for itself, and cannot escalate its own access. Keeping the scope this tight is what makes the key's blast radius small, so the main discipline this setup requires is good key hygiene.
3. Retrieving the property number from GA4
The property number (also called the Property ID) is the numeric identifier that goes into every Data API request as properties/123456789. This is the same step where you grant the service account access, since both happen in the Google Analytics admin area.
Grant the service account access (required first)
The property number is only useful once the service account can read the property. To grant access:
- Go to Google Analytics: https://analytics.google.com
- Click Admin (the gear icon, bottom-left).
- Choose the scope of access:
- Property Access Management — grants access to a single property. Recommended for least privilege.
- Account Access Management — grants access to every property under the account. Broader; use only if you intentionally want the account to see all current and future properties.
- Click the + button, then Add users.
- Paste the service account email (from Section 1, step 5).
- Set the role to Viewer (read-only). Do not grant a higher role for a reporting integration.
- Optionally, apply data restrictions — No Cost Metrics and/or No Revenue Metrics — to withhold spend or revenue figures even from this read-only account.
- Untick "Notify new users by email" — there is no inbox behind a service account.
Click Add.
Find the property number
Still in Admin, make sure the correct property is selected in the property column.
- Click Property details (in some versions this is Property Settings).
- The Property ID is the numeric value displayed near the top, for example:
123456789 - Use it in API calls as:
properties/123456789
Important: do not confuse it with the Measurement ID
| Identifier | Looks like | Used for |
|---|---|---|
| Property ID (what you need) | 123456789 (numeric) |
Data API requests (properties/123456789) |
| Measurement ID | G-XXXXXXXXXX |
The on-page tracking tag; not used for API access |
If your API calls fail with an error about the property not being found, the most common cause is using the G- Measurement ID instead of the numeric Property ID.
Putting it together
After completing all three sections you will have:
- A service account email:
ga4-reader@your-project-id.iam.gserviceaccount.com - A JSON key file stored securely outside your web root
- A numeric Property ID, for example
123456789 - The service account granted Viewer access on that property
To confirm the chain works end to end, make a
runReportcall to the Data API using the JSON key and the property ID. If rows come back, everything is wired correctly. If you get a permission error, re-check that the service account email was added as a Viewer on the exact property whose ID you are querying.
Quick verification checklist
- [ ] Google Analytics Data API enabled on the Cloud project
- [ ] Service account created with no Cloud IAM role
- [ ] JSON key downloaded and stored outside the web root (and in
.gitignore) - [ ] Service account email added as Viewer on the target property
- [ ] Numeric Property ID recorded (not the
G-Measurement ID) - [ ] Test
runReportcall returns data
How to Set up Google Search Console
The Google Search Console is a free tool that will become your primary communication with Google. Not only this, but the Google Search Console also helps optimize your visibility on Google Search and gives you statistics on your rankings. It can also help monitor potential penalties or identify errors that could affect your rankings. You only need to set it up once per domain. However, you need to do it every time you create a subdomain or add a new protocol. (For example: migrating to https://)
To sign up for the Google Search console, you first need to go to https://search.google.com/search-console/ and log in with your Google Account. Next, Google will ask you to “Select a property type” and you want to select “URL prefix.” It is important to note that your URL is exactly as it appears in the URL bar. Once you submit this information, you’ll be prompted to authenticate your account.
You’ll want to choose the HTML Tag method of verifying ownership of your domain.

You will then go to your site’s customizer, section, and copy and paste that code onto your site.
Go to Appearance > Customize > Settings > Embeds:
And paste the meta tag in the <head> Embed field:
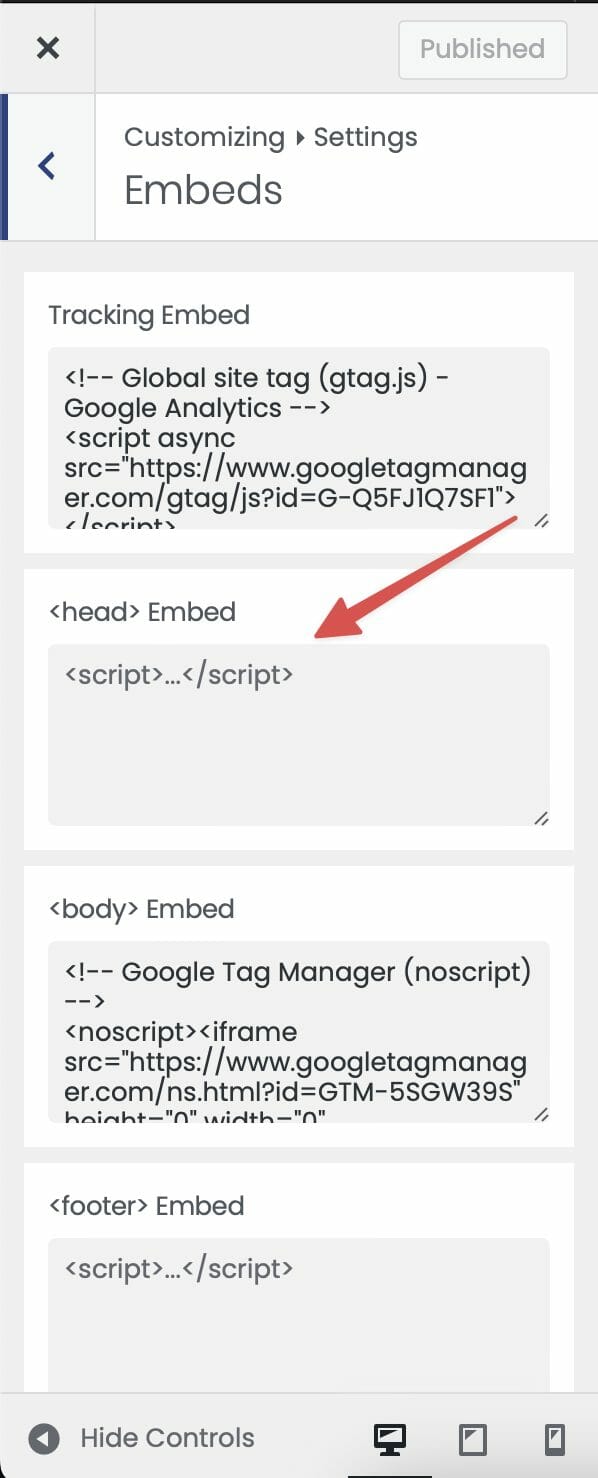
You may need to allow your site’s cache to refresh before that tag will show up on your site, so allow up to 24 hours if your site doesn’t verify immediately!
How to Set-Up an Email Alias in Google Workspace
Email aliases (or alternate email addresses) allow you to have multiple emails without creating multiple accounts. Let’s say you already have an email setup, mybusiness@example.com–you can add aliases like support@mybusiness.com or feedback@mybusiness.com to professionalize your business and emails without having to worry about monitoring multiple inboxes as they will all funnel into your primary account’s inbox. Email aliases are additionally helpful in forwarding emails from a previous employee that is no longer with your company and have them sent to someone else’s inbox. It is important to note that only an admin account can add or edit email aliases.
How do I add an email alias?
- Then click Menu > Directory > Users.
- Sign into your Google Admin Console here.
- Click on a user’s name to open their user settings page.
- Under the user’s name, click on Add Alternate Emails.
- Alternate email is where you enter a name for the alias, which is the part of the email address that comes before the “@”.
- Hit Save.
How do I delete an email alias?
- Sign into your Google Admin Console here.
- Then click Menu > Directory > Users.
- Click on a user’s name to open their user settings page.
- Under the user’s name, click on Add Alternate Emails.
- Next to existing email aliases, there is an “X” icon you can select to Remove.
- Hit Save.
Here’s more information from Google Workspace Admin Help on aliases and how to add or remove them.
How to upload and display PDFs
Here are the steps to upload a PDF file and place a link to it on your Dirigible website:
- Access the backend of your website and navigate to “Pages” -> “Add New”.
- Create a new page by giving it a title, such as “PDF Sample”. Customize the page content as desired, such as adding a description or button.
- Publish the page to make it live on your website.
- Next, go to “Media” -> “Add New” to upload the PDF file. Click the “Select Files” button and choose the PDF file from your computer. Alternatively, you can drag and drop the PDF file into the media library.
- Once the PDF file is uploaded, you can obtain its URL by clicking on the “Copy URL” link in the media library. This URL can be used to access the PDF directly.
- Return to the page where you want to place the link to the PDF. Edit the page and locate the section where you want to insert the link.
- To create a link using a button, use the block editor or a page builder to insert a button element. Add the text for the button, such as “View PDF”. In the link settings for the button, enter the URL of the PDF file or choose it from the media library.
- Alternatively, to create a link using text, highlight the text that you want to turn into a link. Click the “Link” button in the editor toolbar, enter the URL of the PDF file or choose it from the media library, and save the changes.
- Update or publish the page to apply the changes.
- View the page on the front end of your website. You should now see the link or button that leads to the PDF file.
By following these steps, you can upload a PDF file to your Dirigible site and create a link or button that allows visitors to access and view the PDF.
If you have any further questions, feel free to ask.
How to use a private browser window
Use incognito mode or a private window in your browser to see changes to your website
Using a Private Window in Google Chrome:
Desktop:
- Open the Google Chrome application on your desktop.
- Locate the three vertically arranged dots in the top right corner of the browser.
- Click on these dots to open a dropdown menu.
- In the dropdown menu, select the option that says “New Incognito Window”.
Mobile:
- Open the Google Chrome application on your mobile device.
- Look for the three horizontally arranged dots in the bottom right corner of the page.
- Tap these dots to open a menu screen.
- In the menu screen, select “New Incognito Tab.”
Using a Private Window in Microsoft Edge:
Desktop:
- Open the Microsoft Edge application on your desktop.
- In the top right corner of the browser, find the three horizontally arranged dots.
- Click on these dots to open a dropdown menu.
- In the dropdown menu, select “New InPrivate Window”.
Mobile:
- Open the Microsoft Edge application on your mobile device.
- In the bottom center of the page, tap on the horizontally arranged dots that are encircled in an oval.
- A menu will pop up, click on the “New InPrivate Tab” option.
Using a Private Window in Firefox:
Desktop:
- Open the Firefox application on your desktop.
- In the top right corner of the browser, locate the three horizontal lines.
- Click on these lines to open a dropdown menu.
- In the dropdown menu, select “New Private Window”.
Mobile:
- Open the Firefox application on your mobile device.
- In the bottom right, tap on the number encased in a box (this indicates the number of tabs you currently have open).
- At the top of the page, select the mask icon in the middle.
- Lastly, tap on the “+” icon in the bottom right corner of the page.
Using a Private Window in Safari:
Desktop:
- Open the Safari application on your desktop.
- On the top left side of your Menu Bar, click “File”.
- A menu will drop down, click “New Private Window” from this menu.
Mobile:
- Open the Safari application on your mobile device.
- Tap on the tabs icon (it looks like two overlapped squares) in the lower-left corner of the page.
- All your opened tabs will appear, click the “Tab Groups” menu at the bottom of the tab bar.
- A menu will pop up, click “Private” from this menu.
How to Use Price Lists
Learn how to present your products and services with their respective prices to keep your customers coming back for more! Our Price List Block is an essential design tool created to help you communicate your business information to your customers in a clear, concise way.
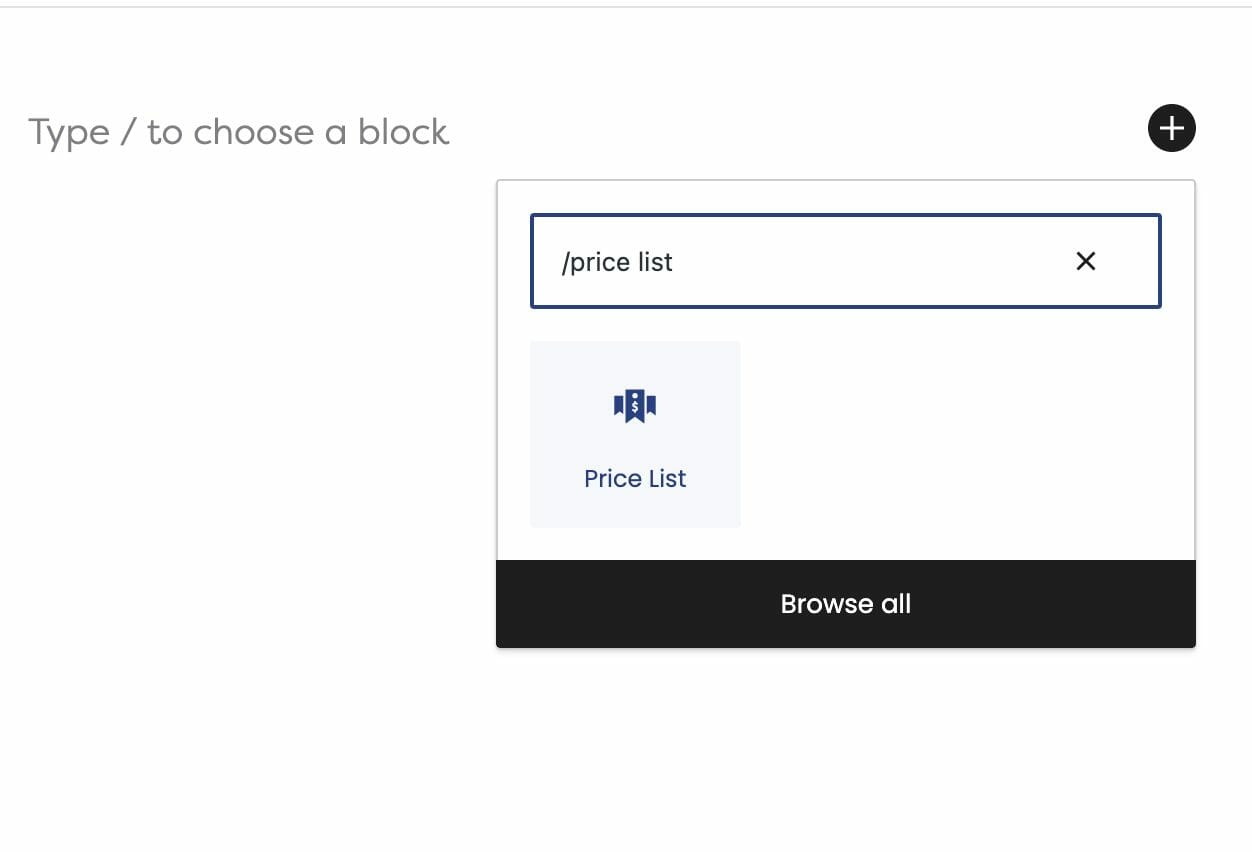
Steps to Adding a Price List Block:
- Click on the + icon to add a new block to your page
- Type in “Price List” to find the Price List Block
- Select Price List
Need to add more services to your list? Just click on the + icon for more!
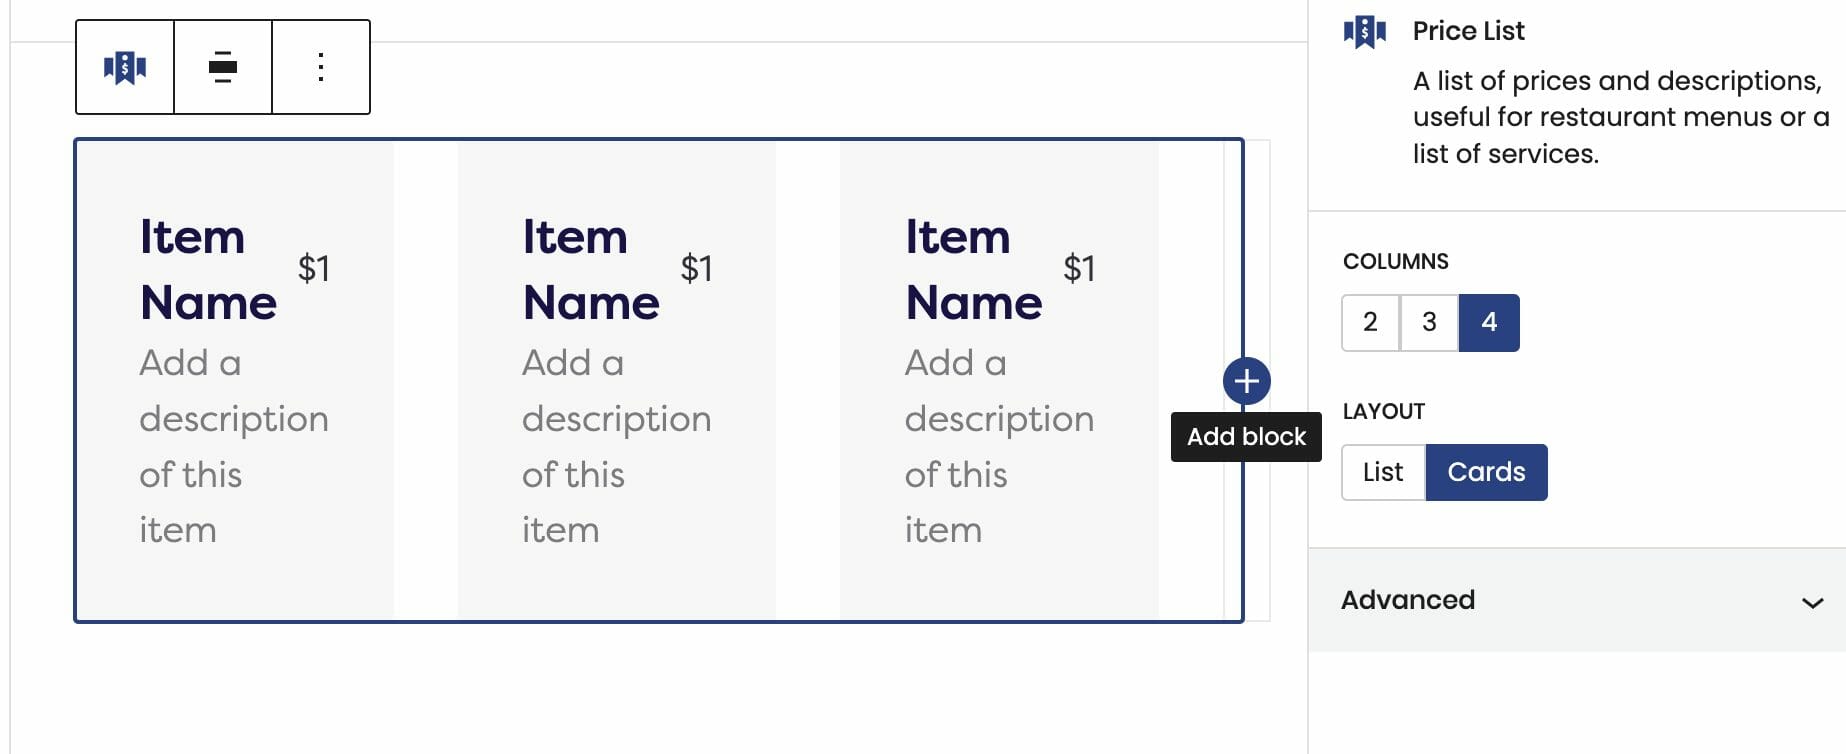
You’re in Control
Use the block editor on the right side to customize your list of offerings – you can format your services with a Card format or keep it as a List!
In addition, the price field is completely flexible to your design goals. When adding a new Price List, the cards will showcase prices that have the USD ($) currency symbol. This doesn’t have to stay there. Feel free to format your prices however you’d like!
Visit our Support Site to learn more about editing your Price List.
It’s important to be transparent about your business information. Users are more inclined to trust you and continue to engage with your products if your information is well presented and organized. We hope that this tutorial will make a difference in enhancing your website’s accessibility, design, and gain more traffic!
How to Use the Hero Block
introducing your website pages just got easier! The Hero is the first element that users set their eyes on once they land on your page. Think of this special block as the “first impression” section of your website!
Dirigible’s Hero Block is a versatile and seamless addition to your website building goals. It allows you to display eye-catching imagery with text. There’s also plenty of options to display the Hero Block vertically and horizontally – you can edit these features any way you want!
Learn how to build a captivating website using our Hero Block.
Steps to Adding a Hero Block:
- Click on the + icon to add a new block to your page
- Type in “Hero” to find the Hero
- Select Hero
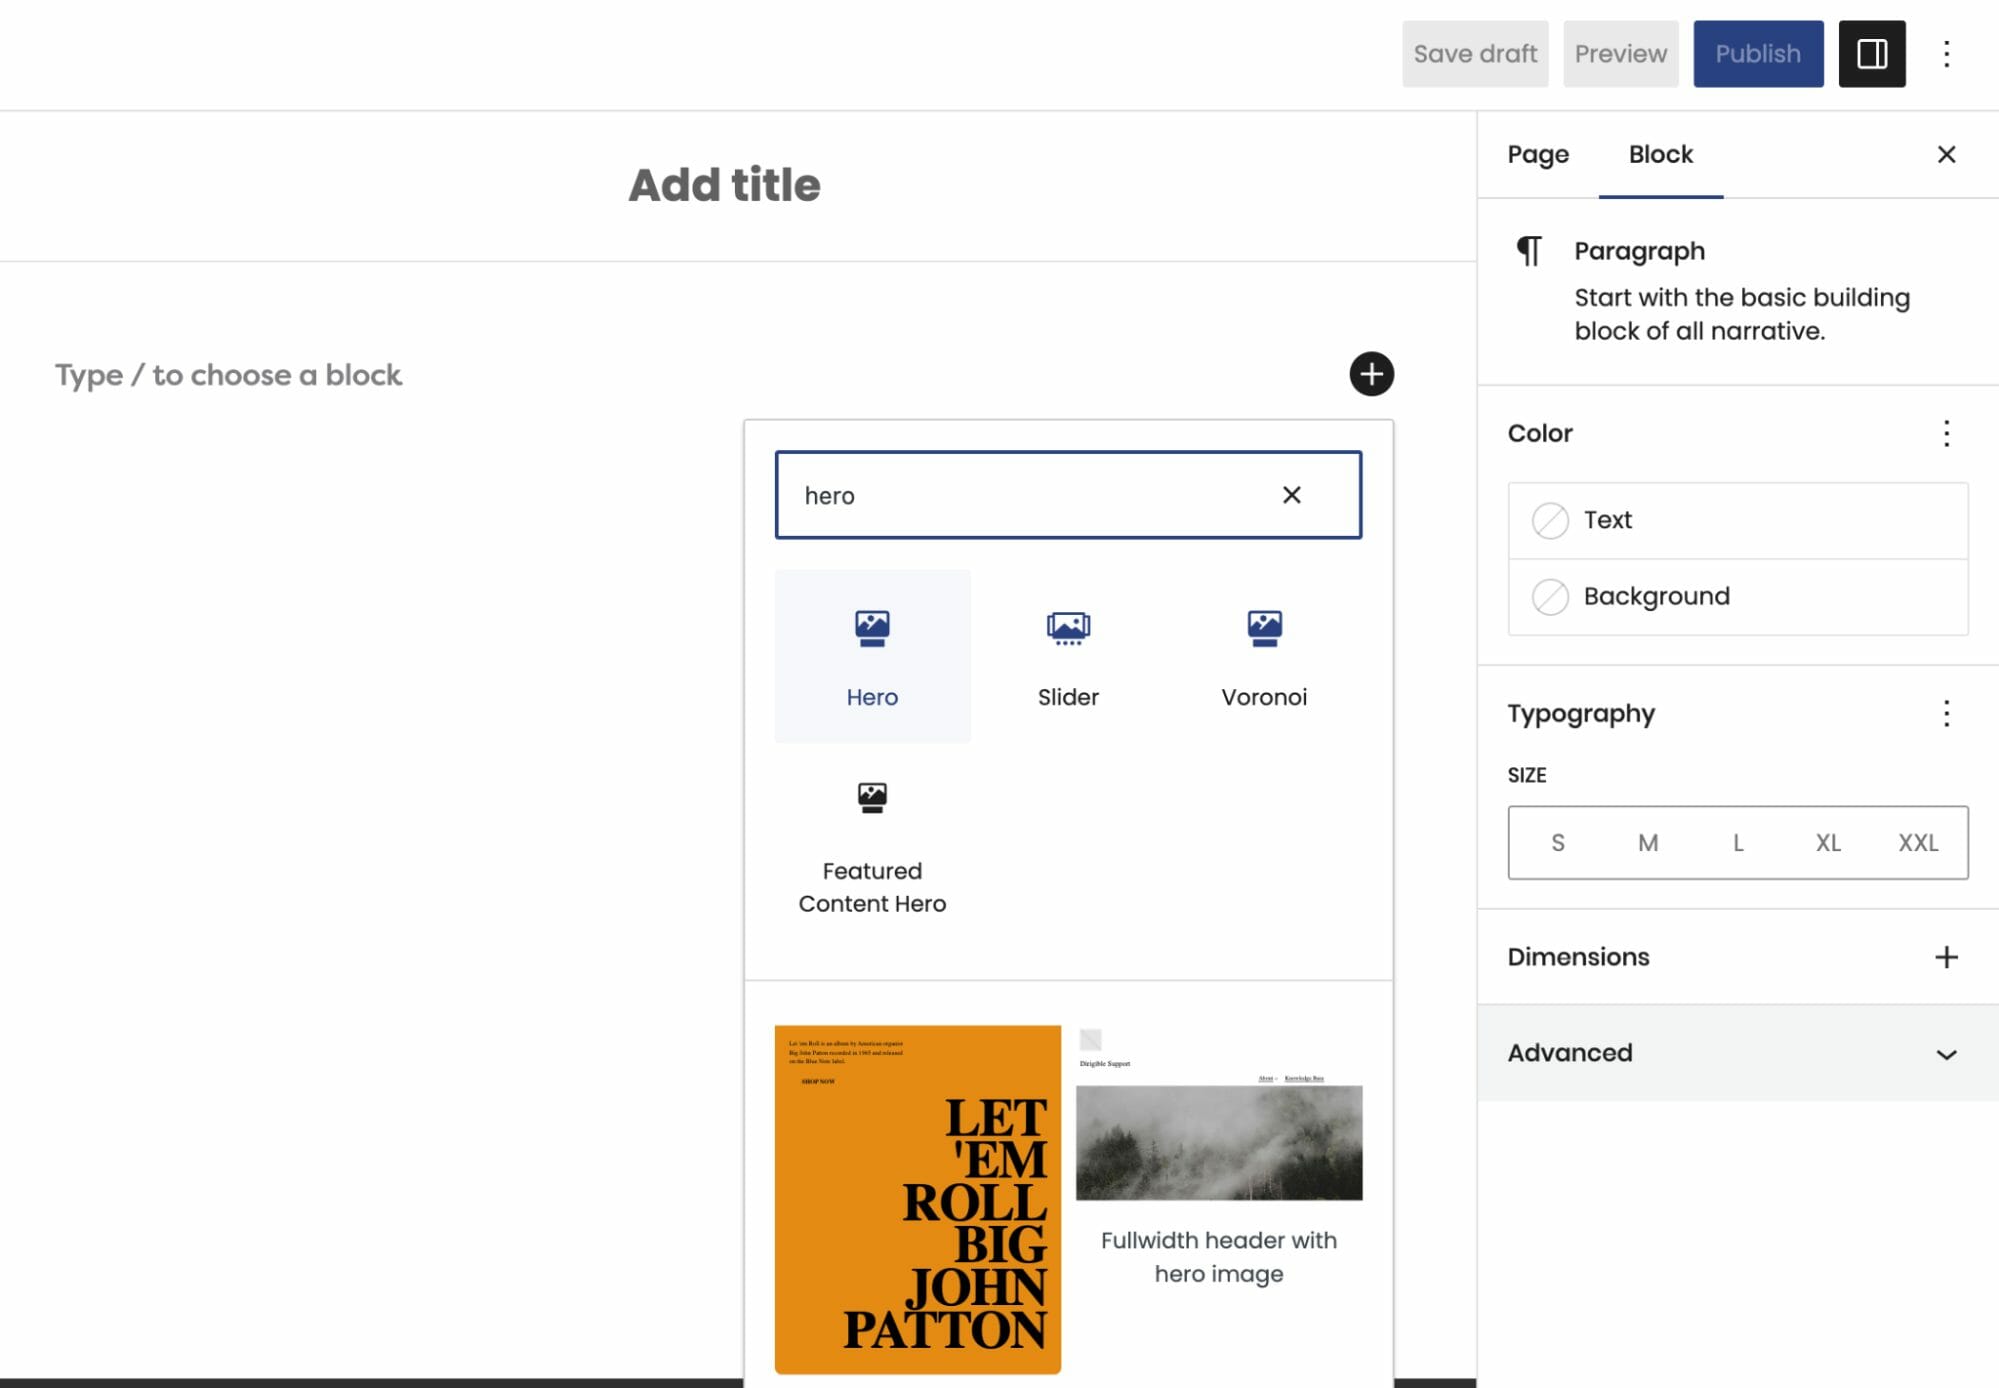
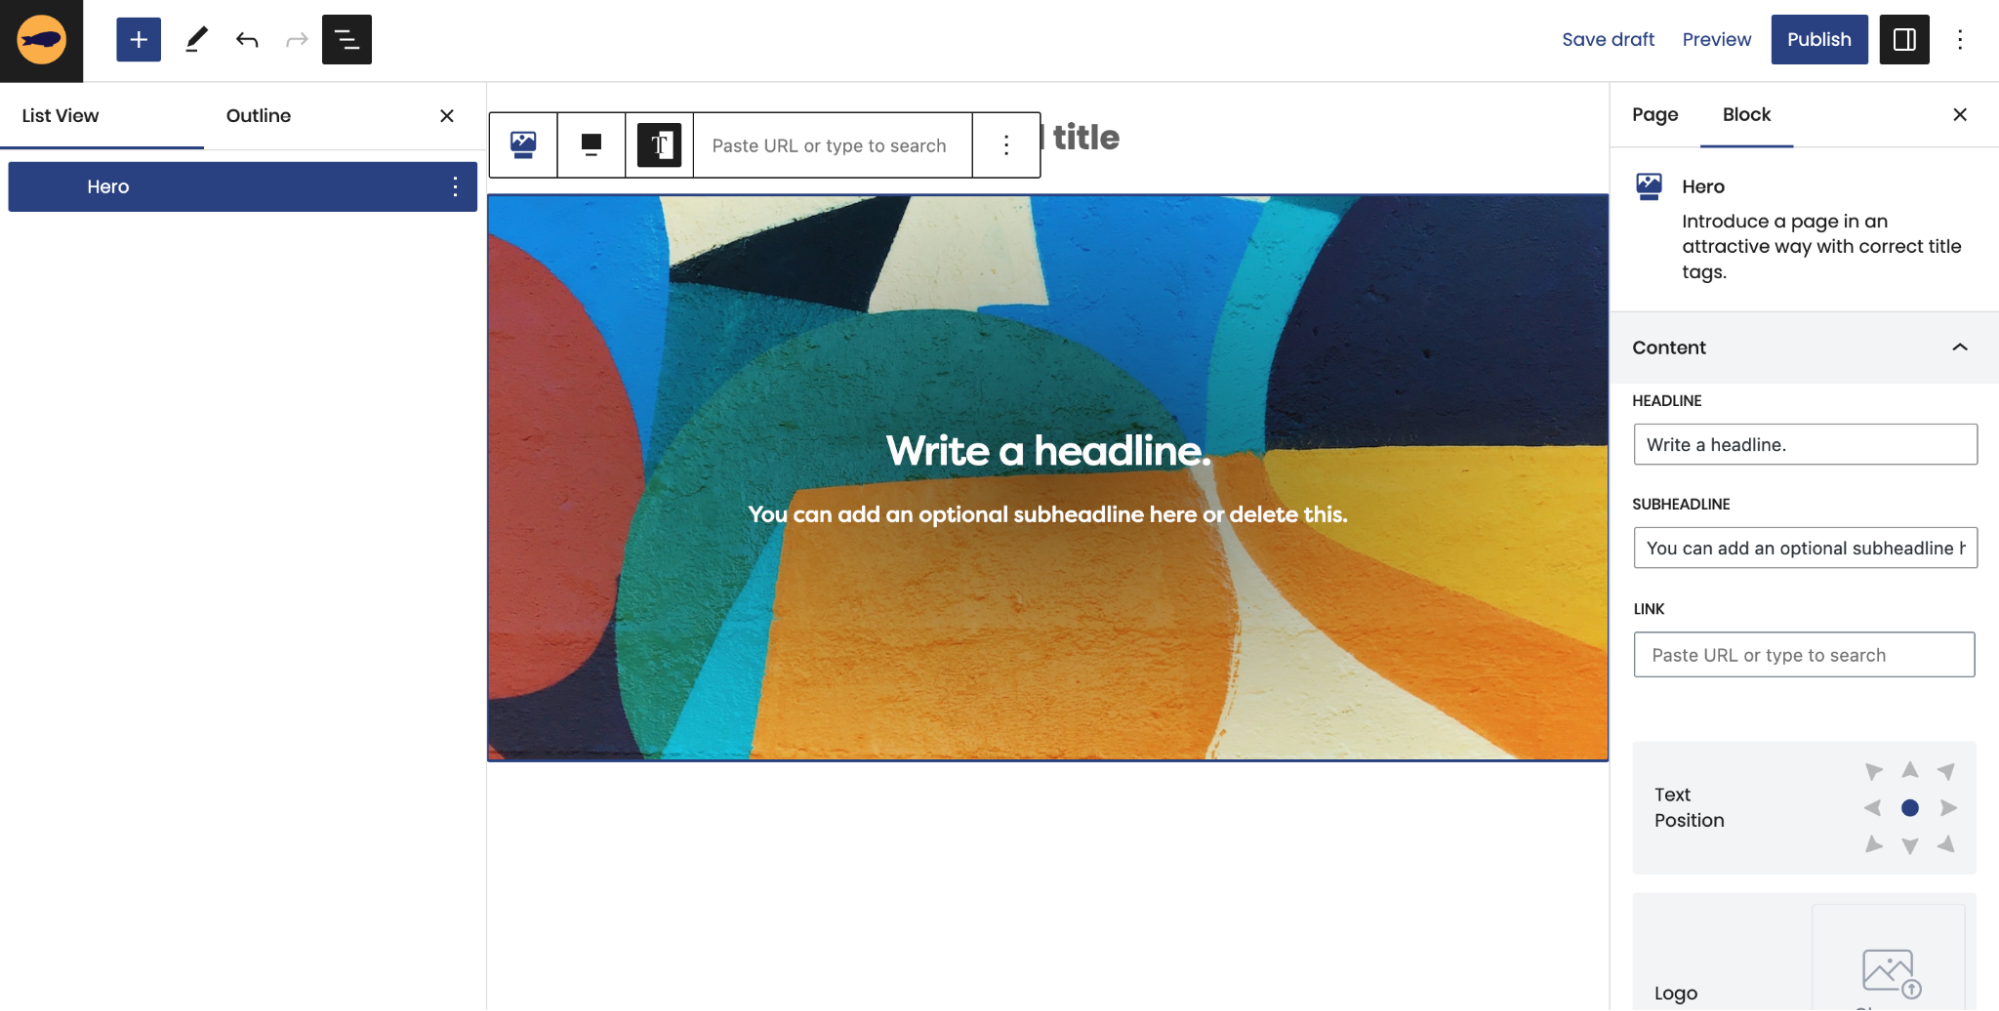
Now that you have opened up a Hero Block, you can edit its four different content fields: Headline, Subheadline, Button, and Logo. You can edit these inline or in the block editor on the right.
Click on our knowledge base post to learn more about how to maximize your Hero’s features!
We hope that this tutorial will help you leave a lasting impression on your users when they visit your website!
How to Use the Power of Gravity Forms & Mailchimp to Grow Your Business
Build an Emailing List — The First Step to Successful Email Marketing
Email marketing is a worthwhile practice to promote your business and generate leads. While you may be ready to jump into Mailchimp and start crafting the most witty and eye-catching enewsletters, email marketing starts with generating an emailing list. Afterall, you can’t have beautiful email campaigns without people to receive them.
Luckily there is a very powerful tool at your disposal—Gravity Forms. With the help of gravity forms you can quickly build a mailing list out of your site’s visitors. This strategy enables people with an established interest in your business (your site’s visitors) to easily stay informed with all you have to offer. Gravity Forms and Mailchimp offers this simple integration to build your audience and, better yet, facilitate lead generation.
Let’s get started on building your emailing list!
How to Connect Mailchimp and Gravity Forms.
- Assuming you’ve already gone into Mailchimp and linked your site. In the backend of your site, navigate to Forms > Settings and then click the Mailchimp tab.


- Click on the Connect to Mailchimp button and log into your account.
- Give Gravity Forms permissions to access your Mailchimp account by clicking “Allow”.
- You are now able to start creating a Mailchimp feed. The settings you fill out here are how your form will communicate with Mailchimp. We especially like the Tags field to organize our mailing list. You can enter an already existing tag you have in Mailchimp or create a new one.
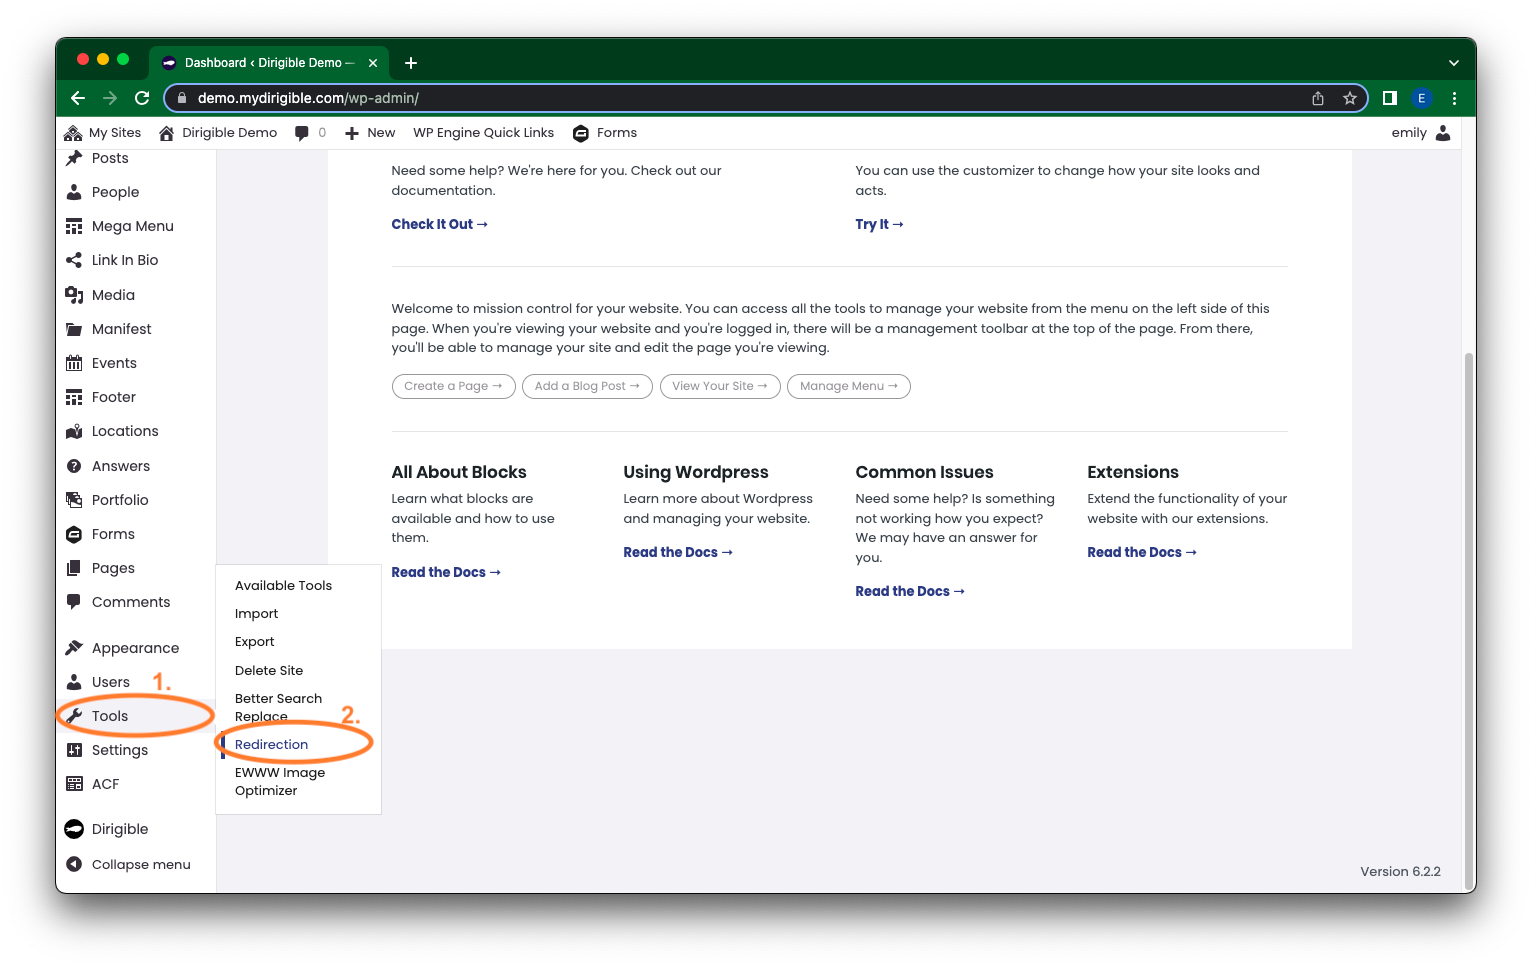
How to Use the WordPress Plugin, Redirection
The Redirection plugin is WordPress’s most popular plugin when it comes to redirects. Redirect plugins and redirects are helpful in maintaining the flow of your site so that your pre-existing links take your viewers to the right page either temporarily (i.e you are doing maintenance on a page) or permanently (i.e you combined two of your pages into one). Unfortunately, deleting or moving a page doesn’t delete that previous link, it still exists. It is kind of like if you have a route memorized to get to your favorite movie theater, but your movie theater moves or goes out of business. That route still exists even if the destination is no longer there. You need updated information to redirect you which is exactly what the WordPress plugin Redirection does, just for your website.
Here are the steps to follow to add redirects to your site
- From your Dashboard scroll down to Tools > Redirection. If this is your first time opening the plugin there will be a few set up questions for you to answer. Otherwise, your screen will look something like the second image below.
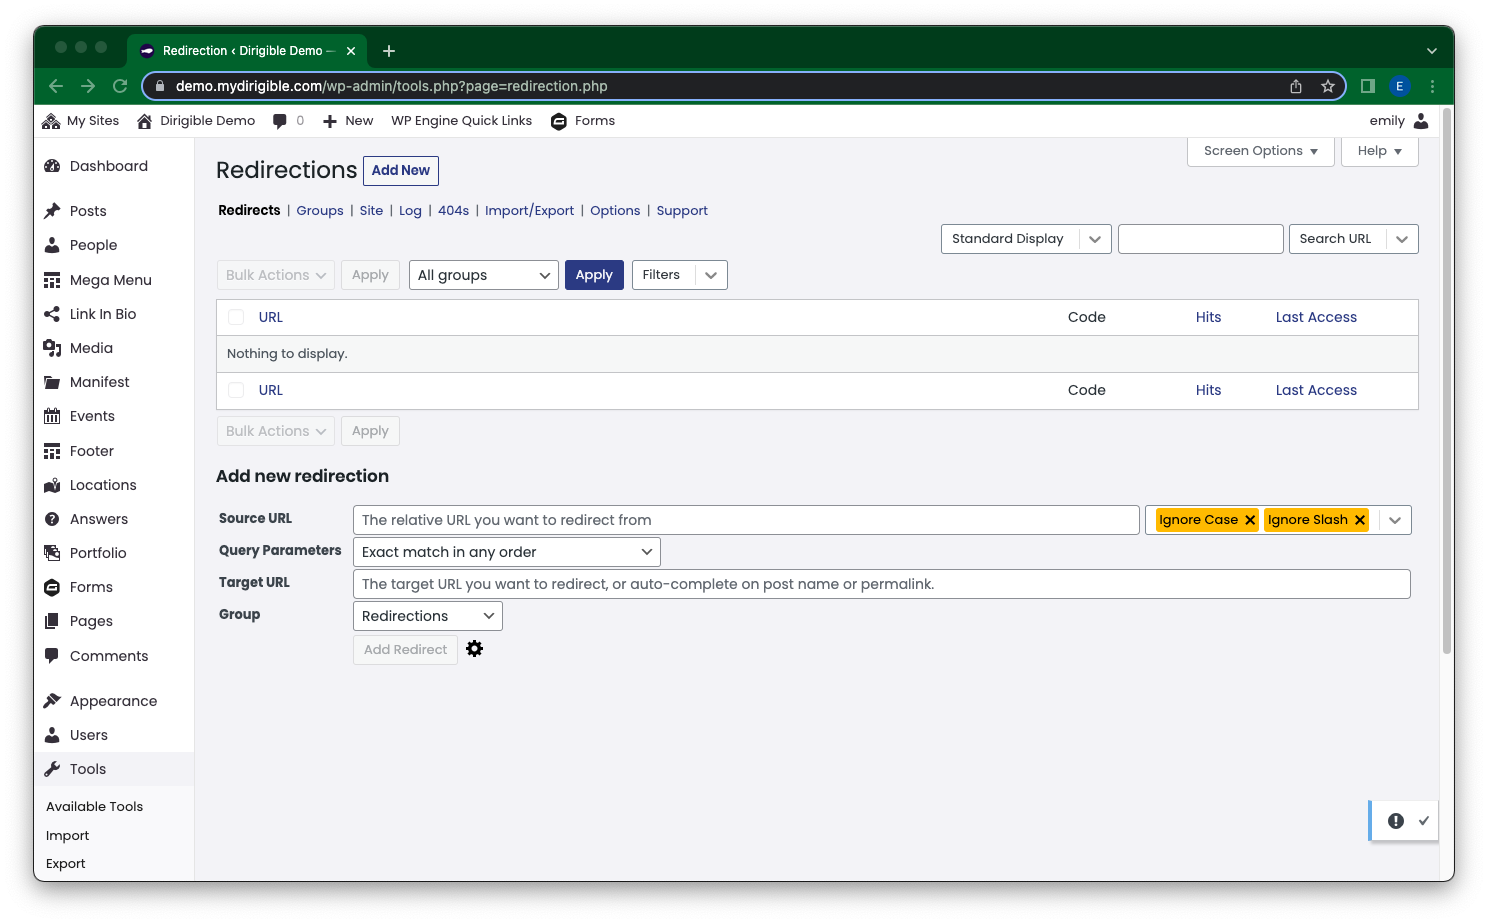
- Click Add New at the top of the page.
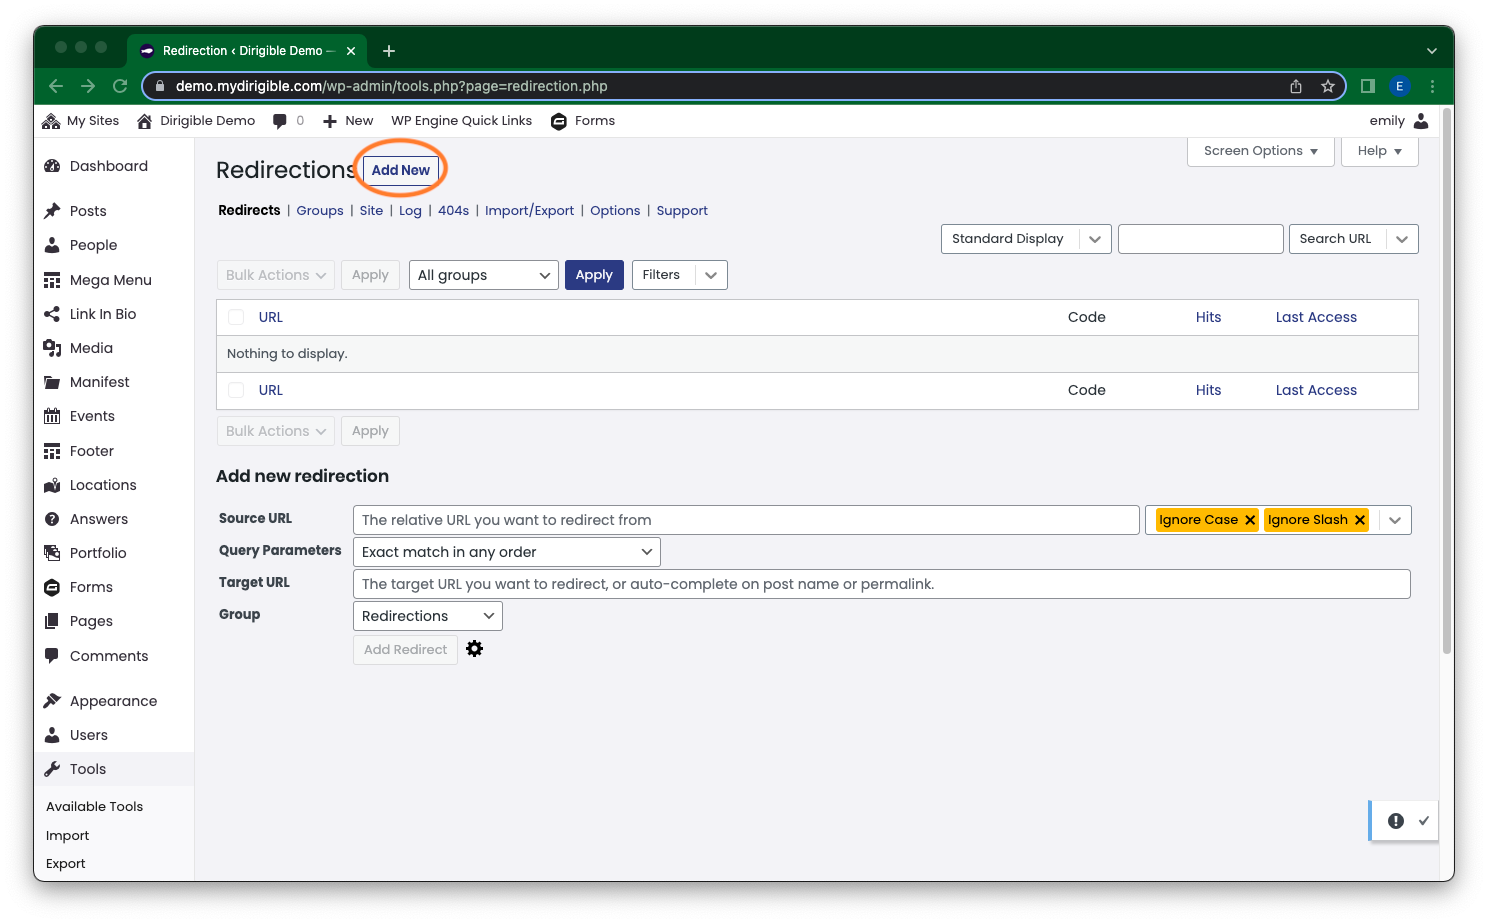
- In the Source URL you need to type in the old URL that you are wanting to redirect the traffic from. The Target URL is where you type in the new URL that your visitors will be directed to when they click on that old link. Once done, click Add Redirect.
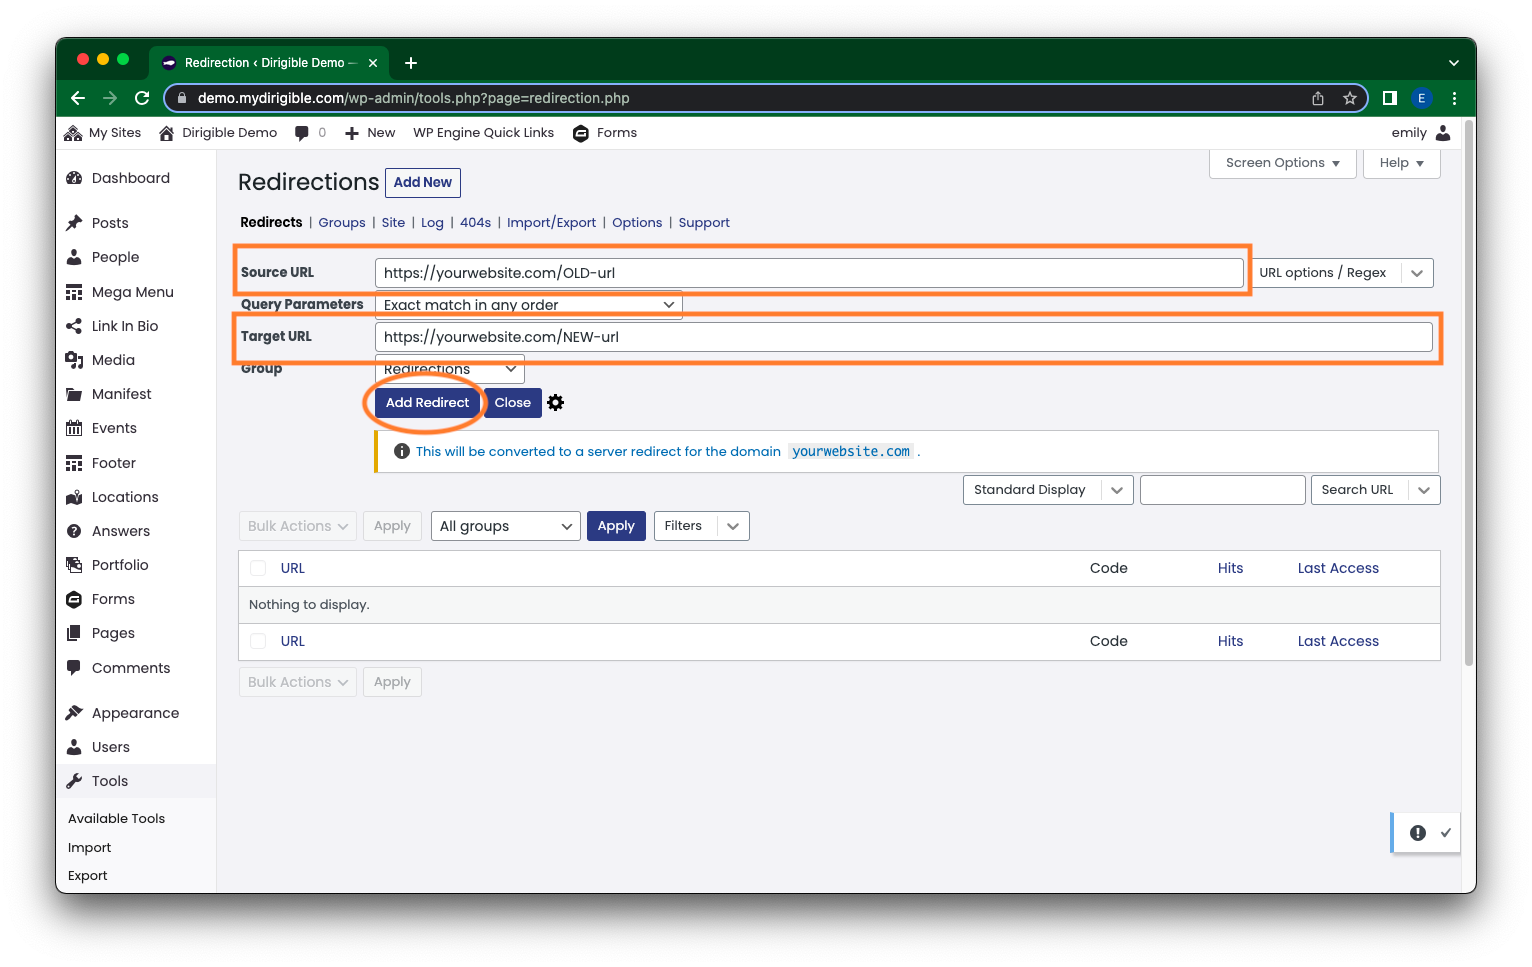
- OPTIONAL: If you click on the gear icon next to Add Redirect / Close you will be given additional options to further customize your redirect.


- More information on URL options / Regex and Query Parameters here.
- Title – you have the option to type in an explainer or label to describe the reason or purpose of the redirect.
- More information on Match here.
- More information on When matched here.
- Exclude from logs – this redirect will not be logged.
- More information on Group here.
- Position – sets an order to process redirects. The lower the number, the higher the priority of the redirect.
How to Verify Site Ownership in Google Search Console Using an HTML Tag
Verifying your website with Google Search Console is a crucial step to monitor and enhance your site’s performance on Google Search. By confirming ownership, you gain access to valuable insights and tools that can help optimize your site’s visibility and user experience.
Why Verify Your Site?
Google Search Console provides detailed reports on your site’s search traffic, indexing status, and potential issues. Verifying ownership ensures you have full access to these features, enabling you to make informed decisions to improve your site’s performance.
Verification Methods
There are several methods to verify site ownership in Google Search Console, including:
- HTML File Upload
- Domain Name Provider
- Google Analytics Tracking Code
- Google Tag Manager
- HTML Tag
Among these, we find adding an HTML tag to your site’s <head> section the most straightforward approach.
How to Verify Using an HTML Tag
- Sign in to Google Search Console:
- Navigate to Google Search Console and sign in with your Google account.
- Add Your Property (or Navigate to Your Existing Property Needing Verification:)
- Click on Add Property and enter your site’s URL in the URL prefix field.
- Click Continue.
- Select HTML Tag Verification:
- In the Verify ownership section, select the HTML tag option.
- Copy the provided meta tag.
- Insert the Meta Tag into Your Site:
- Log in to your site’s dashboard.
- Navigate to Site Settings.
- Go to Settings > Embed.
- Paste the copied meta tag into the
<head> Embedsection.
- Click Save or Publish to apply the changes.
- Lastly, return to Google Search Console and click the Verify button.
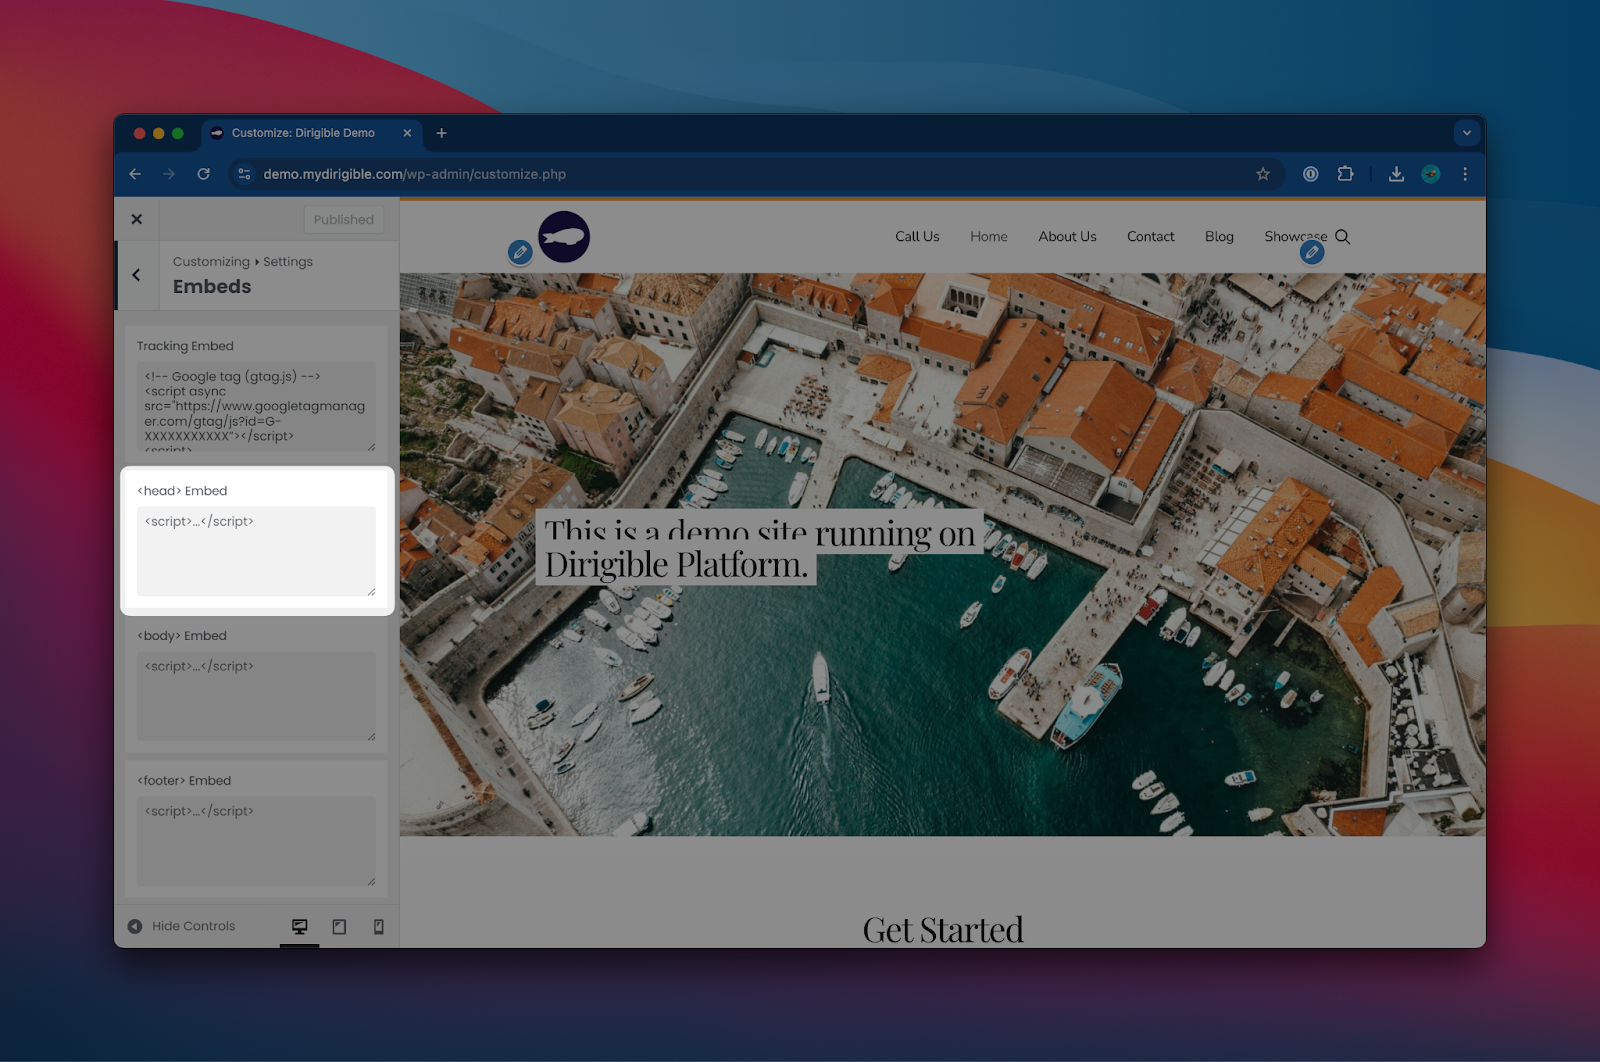
By completing these steps, you’ll have successfully verified your site with Google Search Console, unlocking a suite of tools to monitor and enhance your website’s performance.
I Can’t Delete Buttons
There is a common issue where removing a button will result in empty buttons on the frontend of your site. No, you’re not crazy. Here’s whats happening.
Gutenberg has replaced its Button block with a Buttons parent block that contains the old Button block as its children. It’s a subtle distinction that has caused quite a bit of confusion. This is great, because it allows you to easily add rows of buttons on your site, and the parent Buttons block includes options for aligning the buttons left, center, or right exactly like you’d expect.
The trouble comes when trying to remove a button. Just because you delete the last button does not mean you have deleted the parent block. To remedy this, you’re going to have to delete the parent block and not just all of its children. To do this, select the parent Buttons block and delete it. If you are having trouble selecting the parent block, we’ve written a guide to easily select the parent block from any child.
Voilà!
To completely remove a buttons block, be sure you’re removing the parent and not just the children!
I Want to Add a Logo to My Website
Our Logos Block is a powerful design tool that completes your website’s look and feel. Logos are important visual elements that help users navigate through your website to learn more about your brand.
It’s an easy way to begin showcasing the clients you work with or directing your users from one place to another, and even making sure your brand is seen!
Steps to adding a Logo:
- Click on the + icon to add a new block to your page
- Type in “Logos” to find the Logos Block
- Select Logos
Now that you have the logo on your site, you can begin to customize it by clicking on the Logos icon hovering above the image icon. The block editor will now appear on the right side.

Visit our support site for more information about editing your logos.
But wait, there’s more!
The logo child blocks hold links, so your users can be taken directly to any site that you want them to go to in just one click! You can also organize rows of uniform images with information using the child text blocks held within the parent Logos Block.
Logos make a big difference in your website’s design, so learning how to use them will set you apart from competitors while also helping users navigate seamlessly through your site!
Initial Setup for GA4
Hello and welcome! Today, I’m going to show you how to set up your first GA4 property and install your analytics tag. Let’s get started:
- Go to analytics.google.com and sign in to Google Analytics.
- You might need to do some minor beginner setup tasks, but what we want to do is create a new account.
- Create an account for your personal website. You can leave the default settings as they are.
- This will lead you to create your first property, which will be your first GA4 property.
- Name your property and set the time zone to Central (e.g., Chicago) and the currency to USD.
- The category can be “Arts and Entertainment,” and you can provide additional information about your website.
- Accept the terms and conditions.
- Google has improved the setup process, so we will follow the instructions provided.
- We are setting up a new web platform, so enter your website URL (e.g., oopsjkc.com).
- Check the “Website” box for enhanced measurement. GA4 captures a lot of information automatically, including page views, scrolls, outbound clicks, search queries, video engagement, and file downloads.
- Click “Create Stream” to proceed.
- At this point, Google will inform you that no information has been received yet.
- To continue tracking, click the “Copy” button to copy the global site tag.
- Go to the back end of your website and access the customizer.
- Navigate to settings > embeds and paste the global site tag in the tracking embed area.
- Publish the changes.
- To verify if everything is set up properly, go to “Configure” and then “Debug View.”
- Open Google Chrome and visit your website. In the debug area, you can see the events happening.
- If needed, install the Google Analytics Debugger extension for Chrome to monitor events and ensure proper tracking.
- The debug view will show the page views and other interactions on your site.
- You can use this data to set up events and conversions, allowing you to track how users navigate through your website.
- For more detailed instructions, you can refer to the official Google support documentation on setting up debug mode and installing your Google GA4 tag.
Thank you, and goodbye!
Learn How to Use a Vignette on Your Website
The Vignette Block is an innovative design element that brings your website to life. It consists of the classic Media and Text UX format, but can be customized in unique ways!
Discover new ways to make your content stand out from the rest using our Vignette Block!
Steps to adding a Vignette Block:
- Click on the + icon to add a new block to your page
- Type in “Vignette” to find the Vignette Block
- Select Vignette
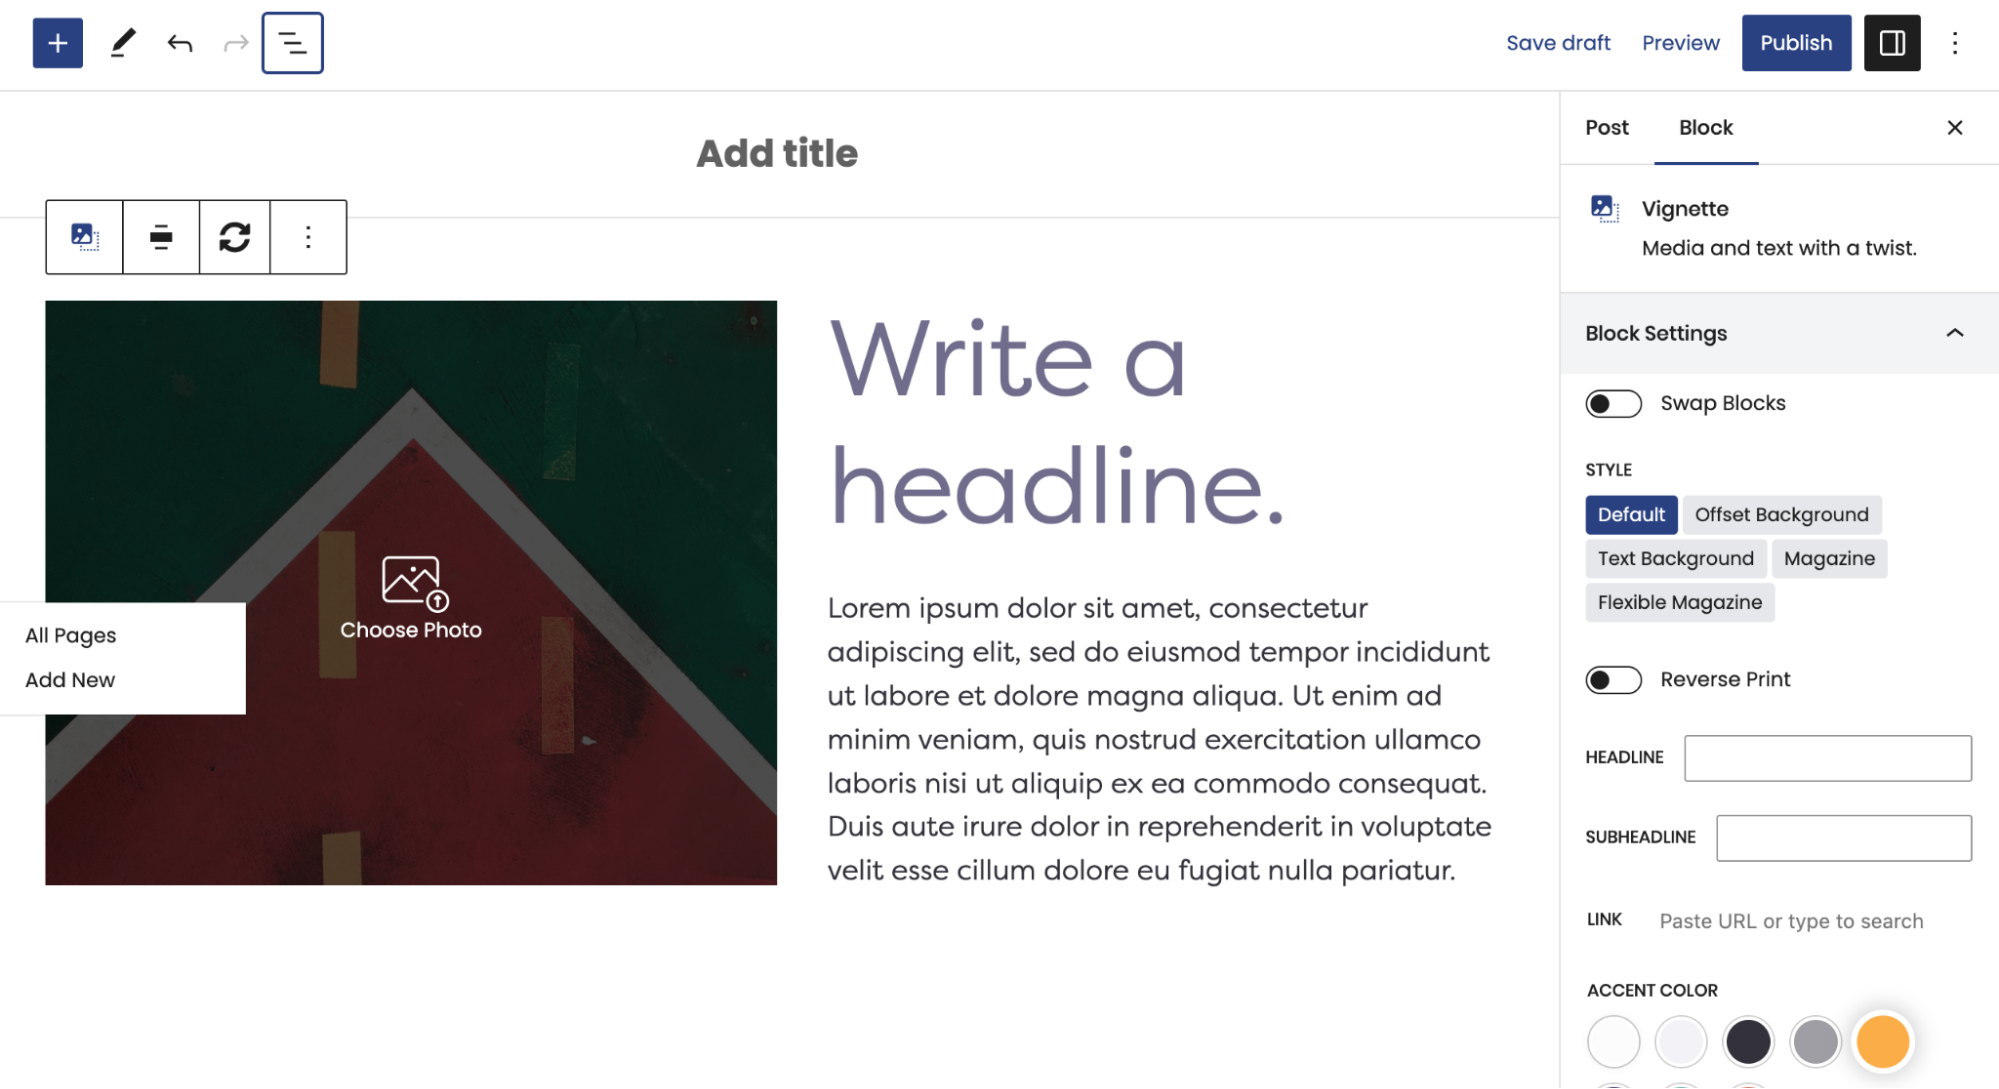
What’s Next?
After adding your Vignette to your page, the block editor will appear on the right side of your screen. Now, you can play around with the different block settings to customize your Vignette!
Visit our Knowledge Base post on Vignette to learn more about the different styles and how they work.
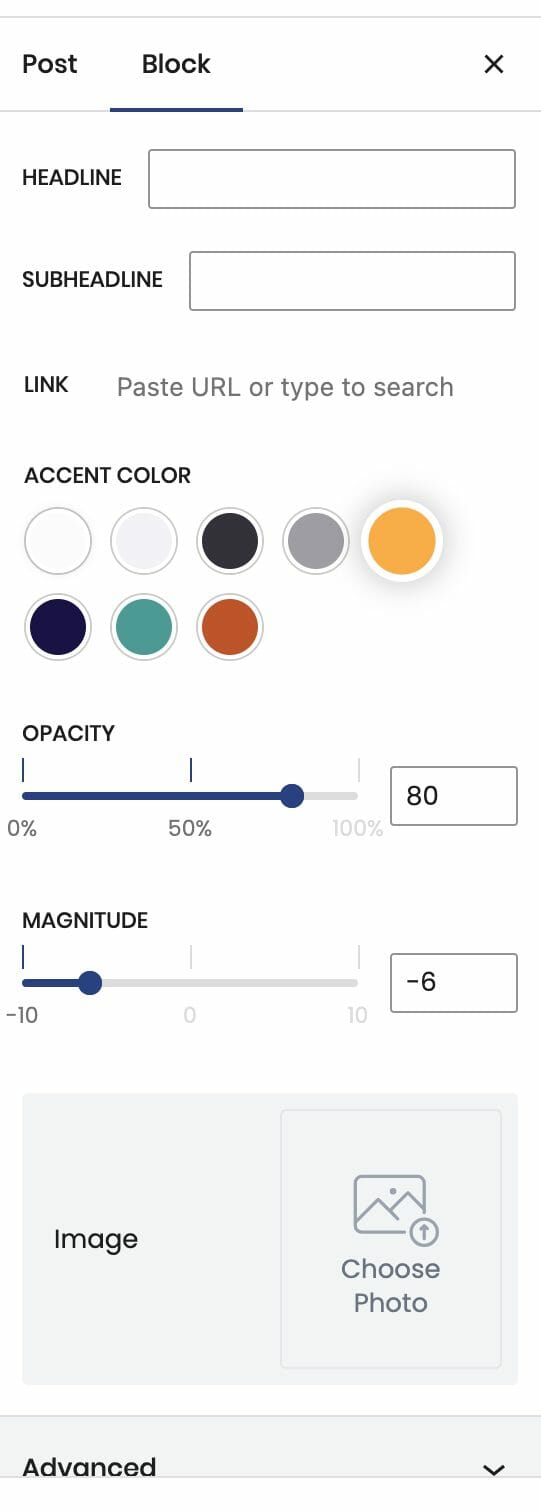
Our versatile Vignette Block is designed to captivate your users and highlight content that won’t be overlooked. We hope that this tutorial helps you get started on designing a beautiful, unique website that will stand apart from the rest!
My buttons aren’t centered even when set to be center aligned.
There’s a good chance that your buttons are inside of a columns block. When using blocks that support children alignment, you should be using those settings instead of individual block settings inside of it.
The text alignment option allows you to place your text anywhere inside of the child block. This is more useful than trying to control the alignment of each inner child block element, and is a combination of text position and text alignment. For example, setting the text to the lower right hand corner will not only position the text in the lower righthand corner, but also set right text alignment on all children.
Not only does this let us make sure your site will look good at any size, but this lets us respond to updates holistically.
Note: Because right text alignment is generally used compositionally on desktop, text set to be right aligned will automatically revert to left alignment on mobile to give your users the best experience.
My Circle Images Look Wrong
Circular images are often a popular choice for headshots and other photography on Dirigible sites. However, circular images are one of the instances where the image aspect ratio matters. Crop your image to have a 1:1 aspect ratio, and they’ll behave much more reasonably!
What is aspect ratio?
Aspect ratio refers to the proportional relationship between the height and width of an image, video, or any rectangular shape. It is expressed as a ratio, typically in the form of width:height.
In the case of an image with dimensions 200×200 pixels, the aspect ratio would be 1:1. This means that the width and height are equal, resulting in a square shape.
While we try and take care of most of this for you and this should work without uploading a square image, browsers can be wonky things. If you feed it what it wants directly, there’s much less room for error.
My Sidebar Is Missing in the Editor
So your dashboard sidebar went missing, huh? A recent WordPress update has made the page editor default to Fullscreen Mode, which removes the dashboard sidebar. Chances are, you’re going to want it back if you need to navigate around the backend of your website.
With the steps below, you’ll be toggling Fullscreen Mode like a pro! Alternatively, you can use the Command + Option + Shift + F key combination shortcut.
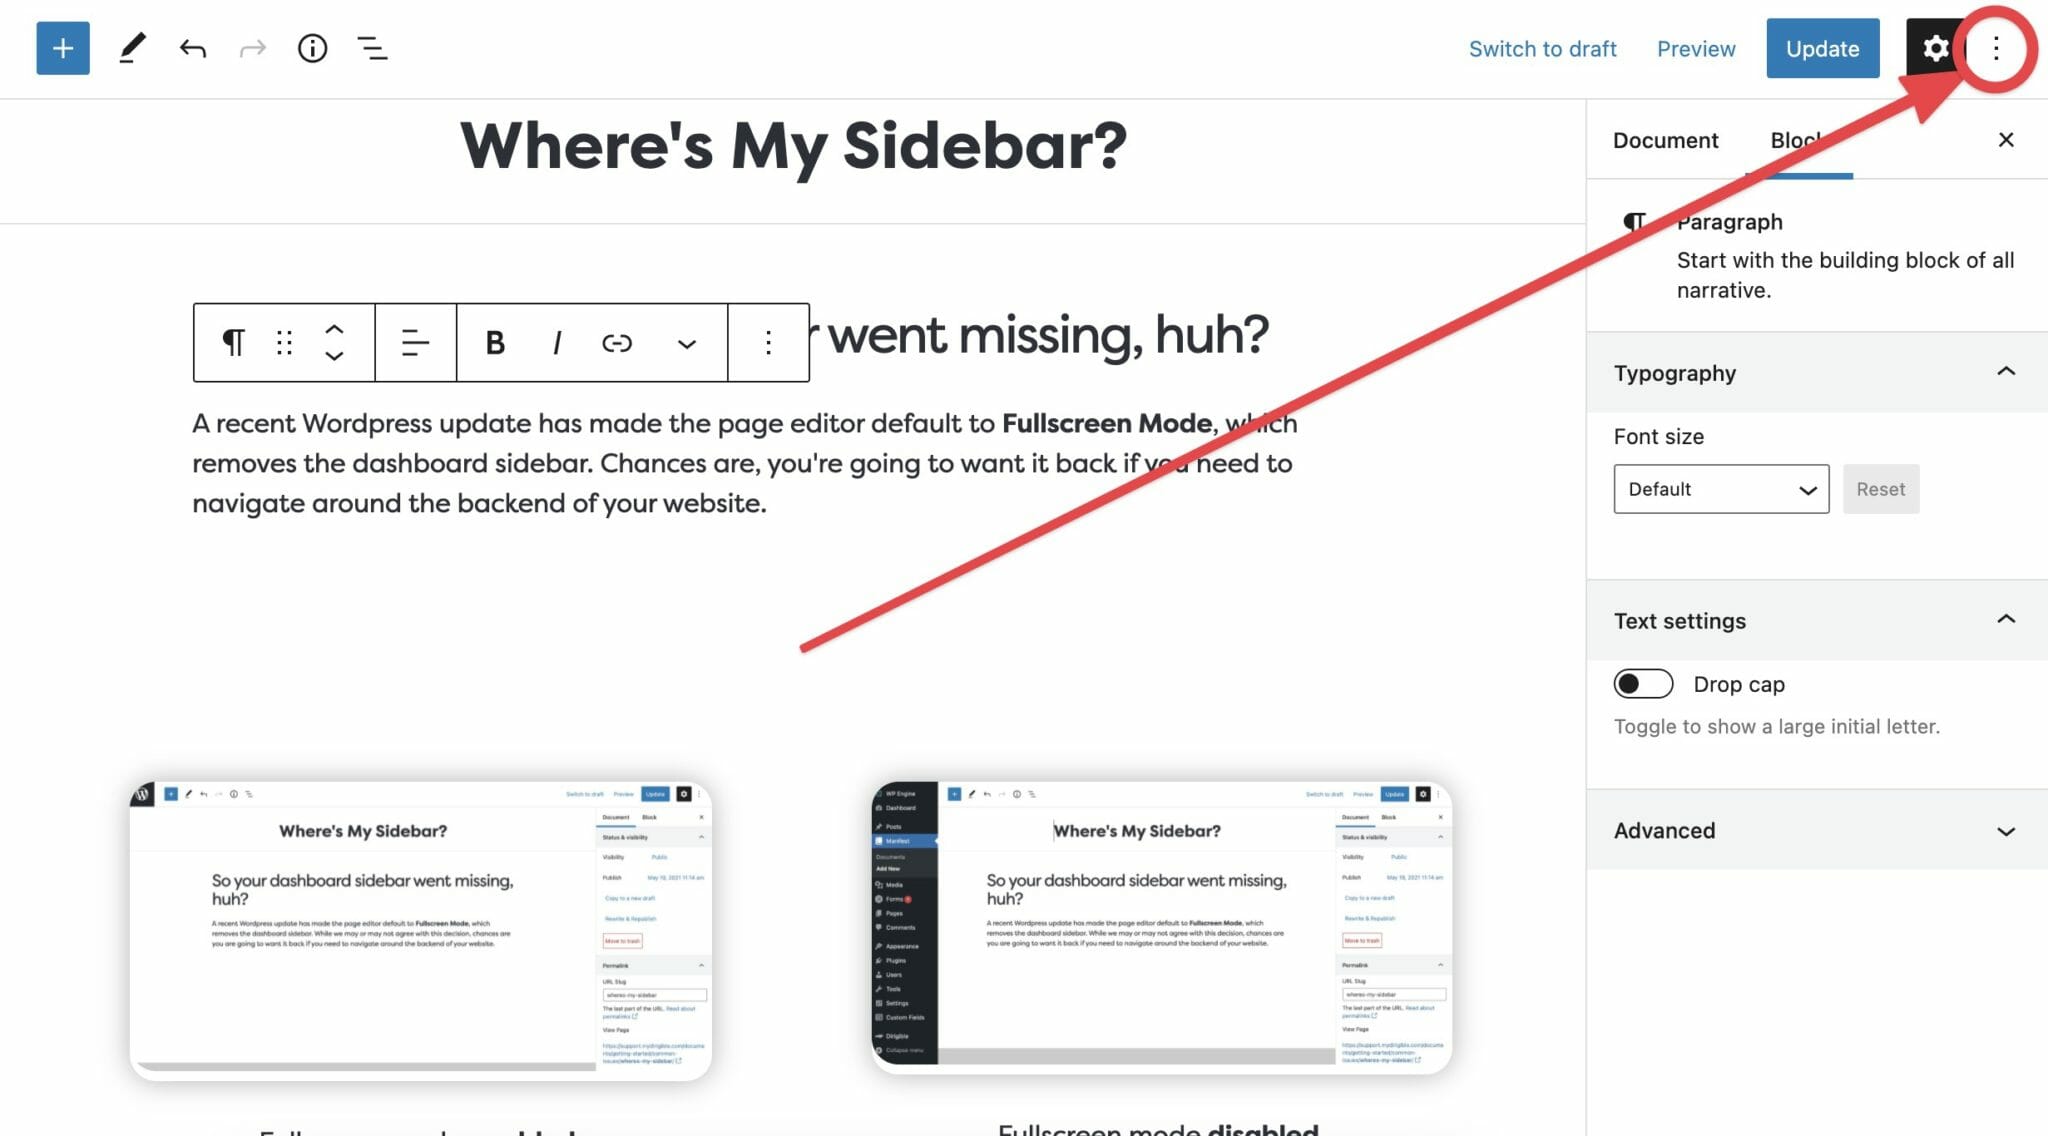
1. Open the Editor Options
In the right hand corner of the page, you’ll find the editor options menu hidden behind a ⋮ button.
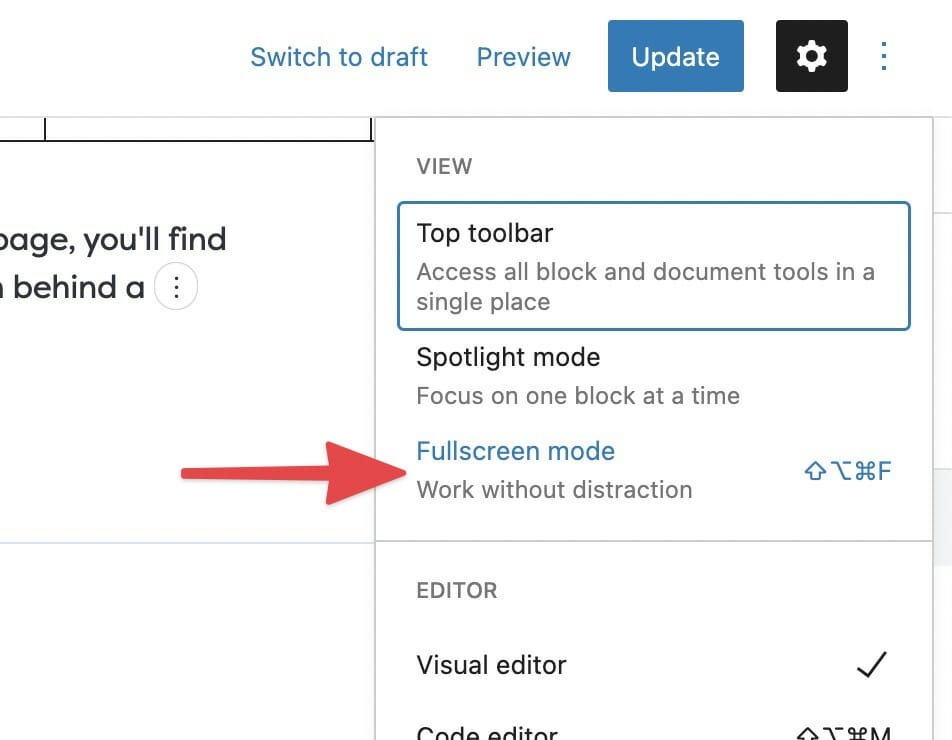
2. Toggle Fullscreen Mode
Toggle Fullscreen mode by clicking on the entry in the editor options menu.
Products Aren’t Showing on Product Block
How to set the number of products that appear in product blocks.
If you find that some of your products are not displaying in a product block, you’ll want to check the display settings.

Products Aren’t Showing on Product Category Page
How to set the number of products that appear in product archives.
If you find that some of your products are not displaying on a product archive page, you’ll want to check the display settings.

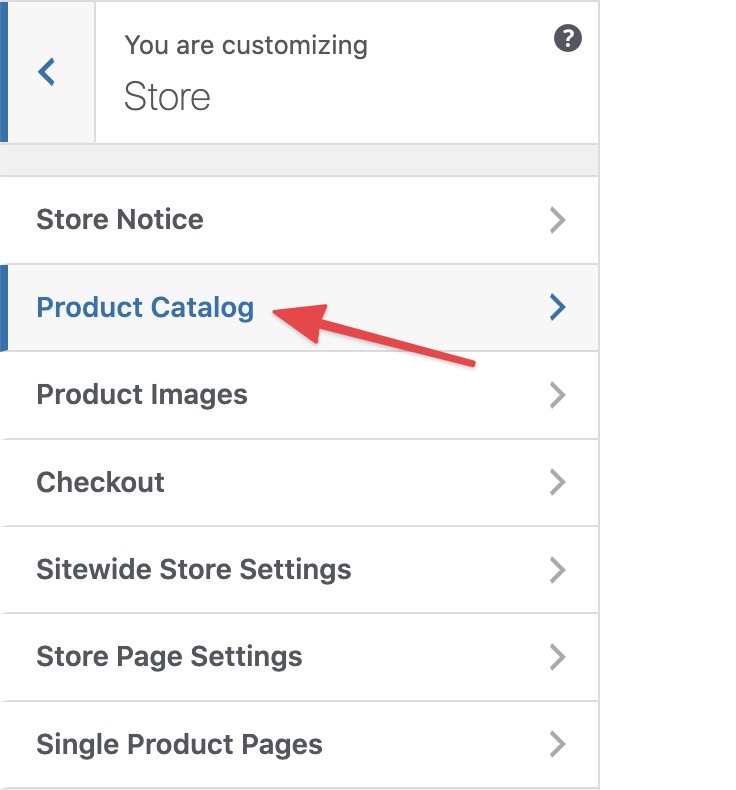
Set Your Homepage in WordPress
Your homepage is the first impression your viewers get of you and your business–it is the first page your visitors will see, so you want to make a good impression! A good homepage grabs people’s attention, while also clearly communicating what your website and business is all about.
Most WordPress themes make your default homepage your most recent blog post. This can be an issue if you don’t have a blog or that’s really not the first thing you want your visitors to see. You might have even deleted your homepage and now WordPress has again set it to the default blog page. Or maybe you want your landing page to highlight an event or reflect the season. There are many reasons and benefits to having a set homepage, and here’s how to do it.
How do I change/set my Homepage in WordPress?
- In the Dashboard, go to Settings > Reading
- To set a specific page as your homepage, make sure A static page option is selected in the Your homepage displays section.
- In the Homepage drop down menu select one of your published pages to be your homepage.
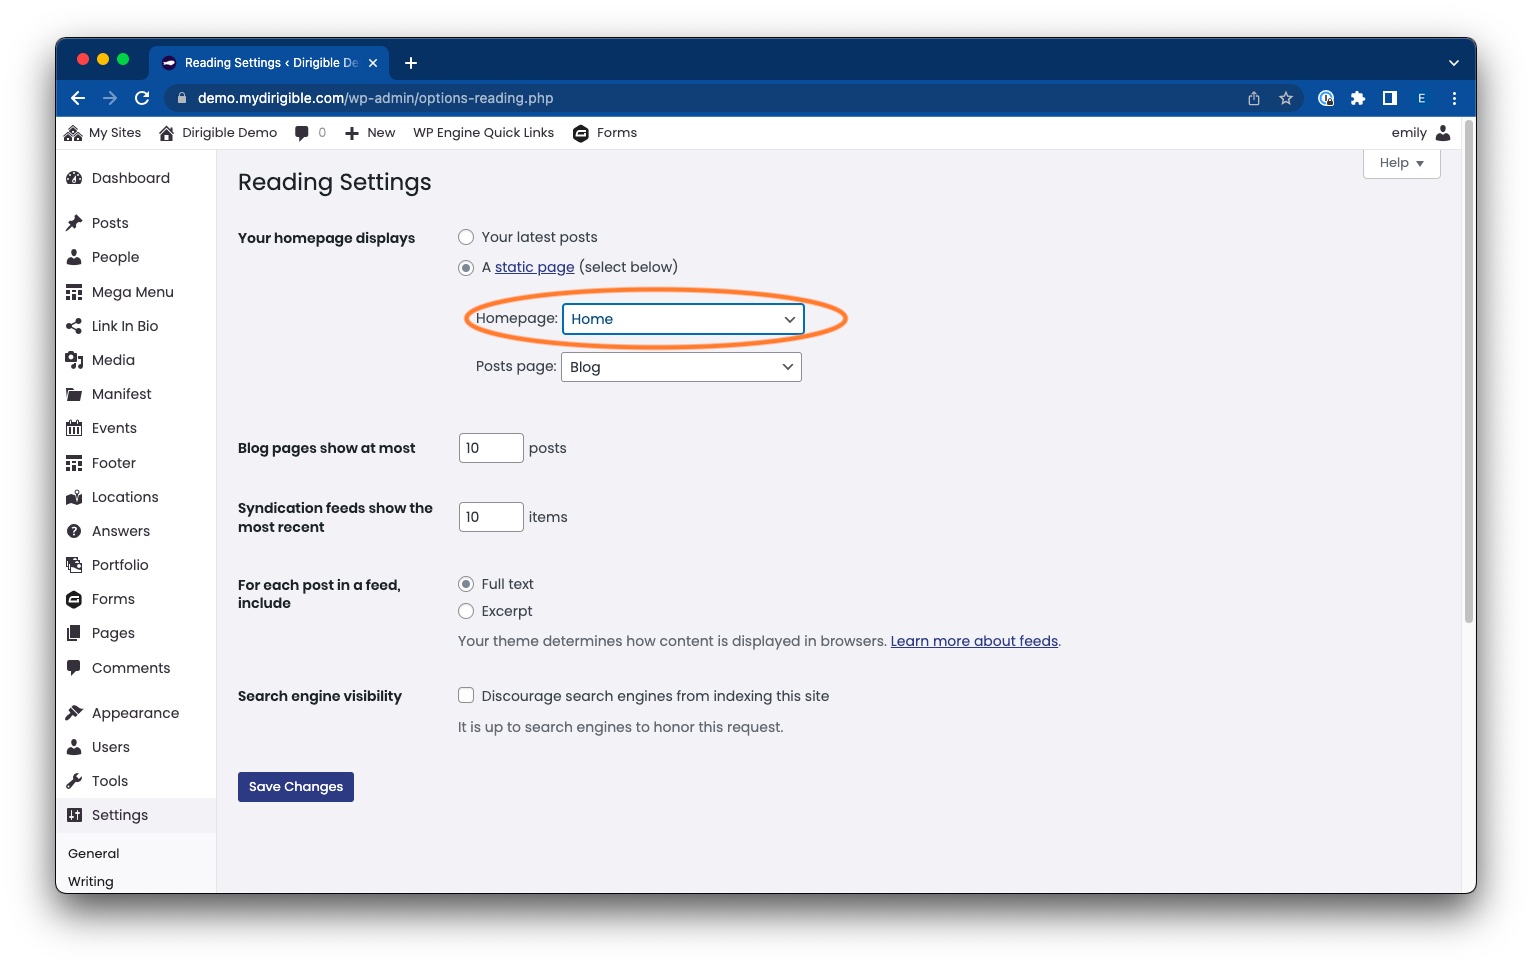
- Lastly, click Save Changes.
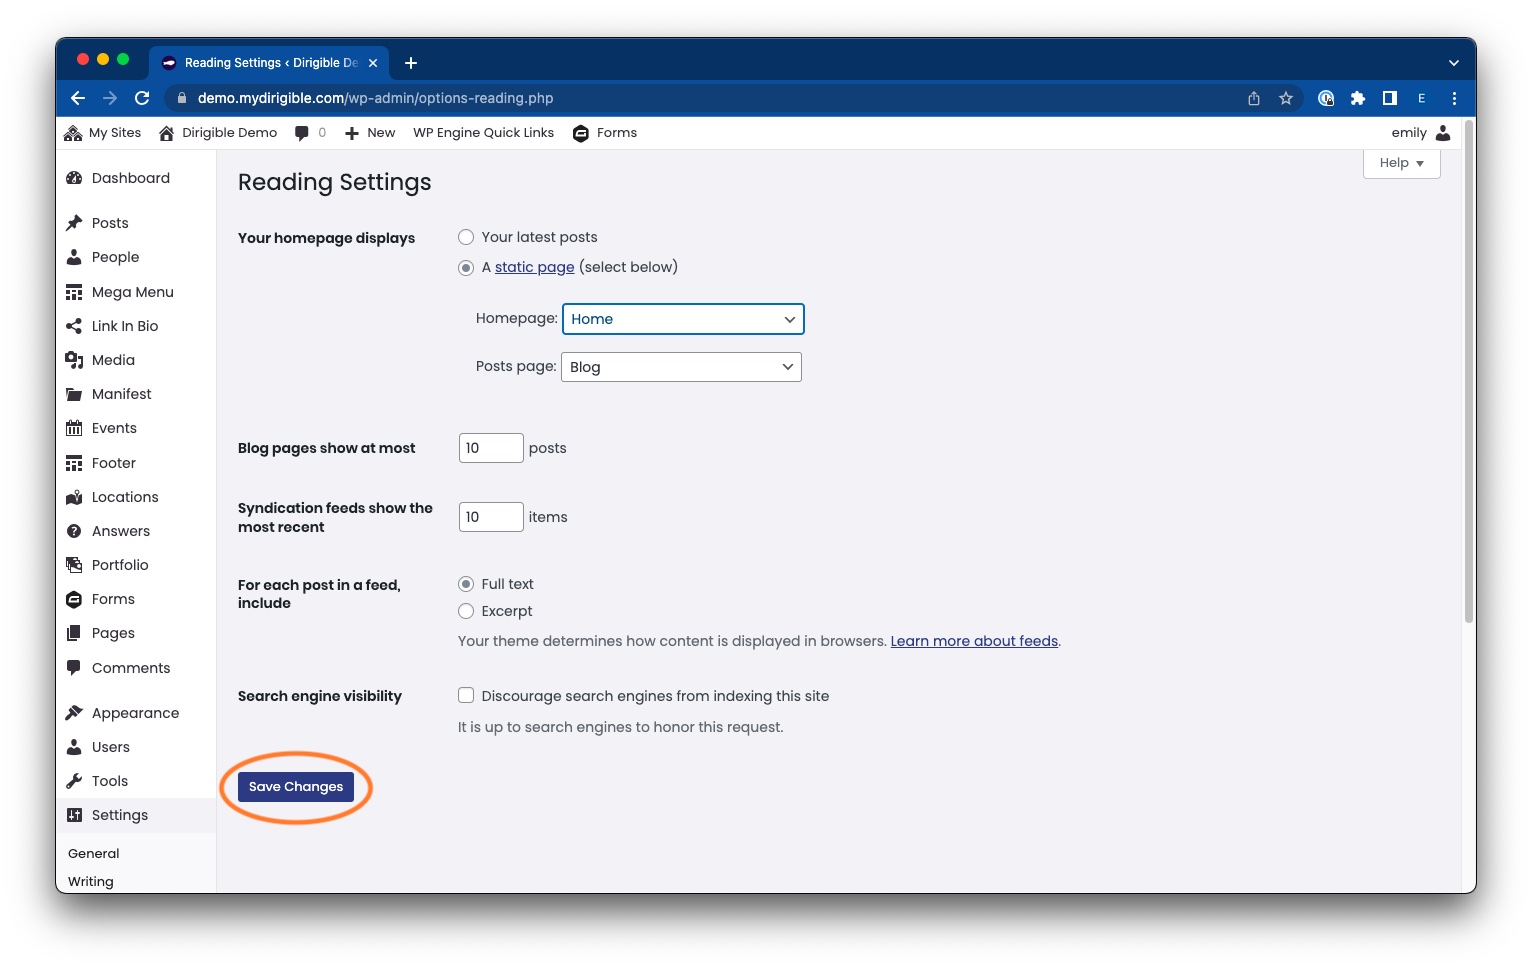
Step-by-step instructions on how to use Privnote:
Privnote is a free service for sending private information that self-destructs after being read. It’s a simple tool that allows you to send sensitive data like passwords or personal notes over the internet, ensuring that only the recipient can read them, and they’re deleted as soon as they’re read.
Here are step-by-step instructions on how to use Privnote:
- Open your web browser.
- In the address bar, type
https://privnote.comand hit Enter. - You’ll be directed to Privnote’s home page. Here, you’ll see a big text box where you can type or paste your note.
- Write your message in the provided box. This could be any sensitive information you want to send, like a password, credit card information, or a personal note.
- Below the note box, you’ll see some options that you can adjust according to your preferences:
- Note’s lifespan: By default, your note will be destroyed right after it is read. But you can choose to destroy it after a certain amount of time, even if it has not been read. Just click on the drop-down menu and select the time you prefer.
- Password protect: If you want to add an additional layer of security, you can password-protect your note. Check the box “Protect with password”, and then type your password.
- Confirm reading: If you want to make sure that the note was read and not just deleted, you can select the option “Ask for a confirmation before showing the note”.
- Once you’ve customized your note’s settings, click on the “Create Note” button at the bottom.
- Privnote will generate a link. You can click on the “Copy Link” button to copy this link to your clipboard.
- Now, send this link to the person who you want to read the note. You can do this through email, text message, or any other form of communication. Remember, do not send the link and the password (if you set one) through the same channel for security reasons.
- Once the recipient opens the link, they will see the note you wrote, and the note will be destroyed. If you chose to be asked for a confirmation, the recipient would have to confirm that they intended to read the note before the note is shown.
- If you chose the “Notify me when this note gets read” option, you will receive an email when the recipient opens the note.
Remember that the main feature of Privnote is that once your note is read, it’s gone. So the recipient should be careful to save any information they’ll need later.
Uhh, What is a Favicon and Why Do I Want One?
How to Update Your Site’s Favicon
Do you see that little orange circle with an airship in the top left corner of this tab?
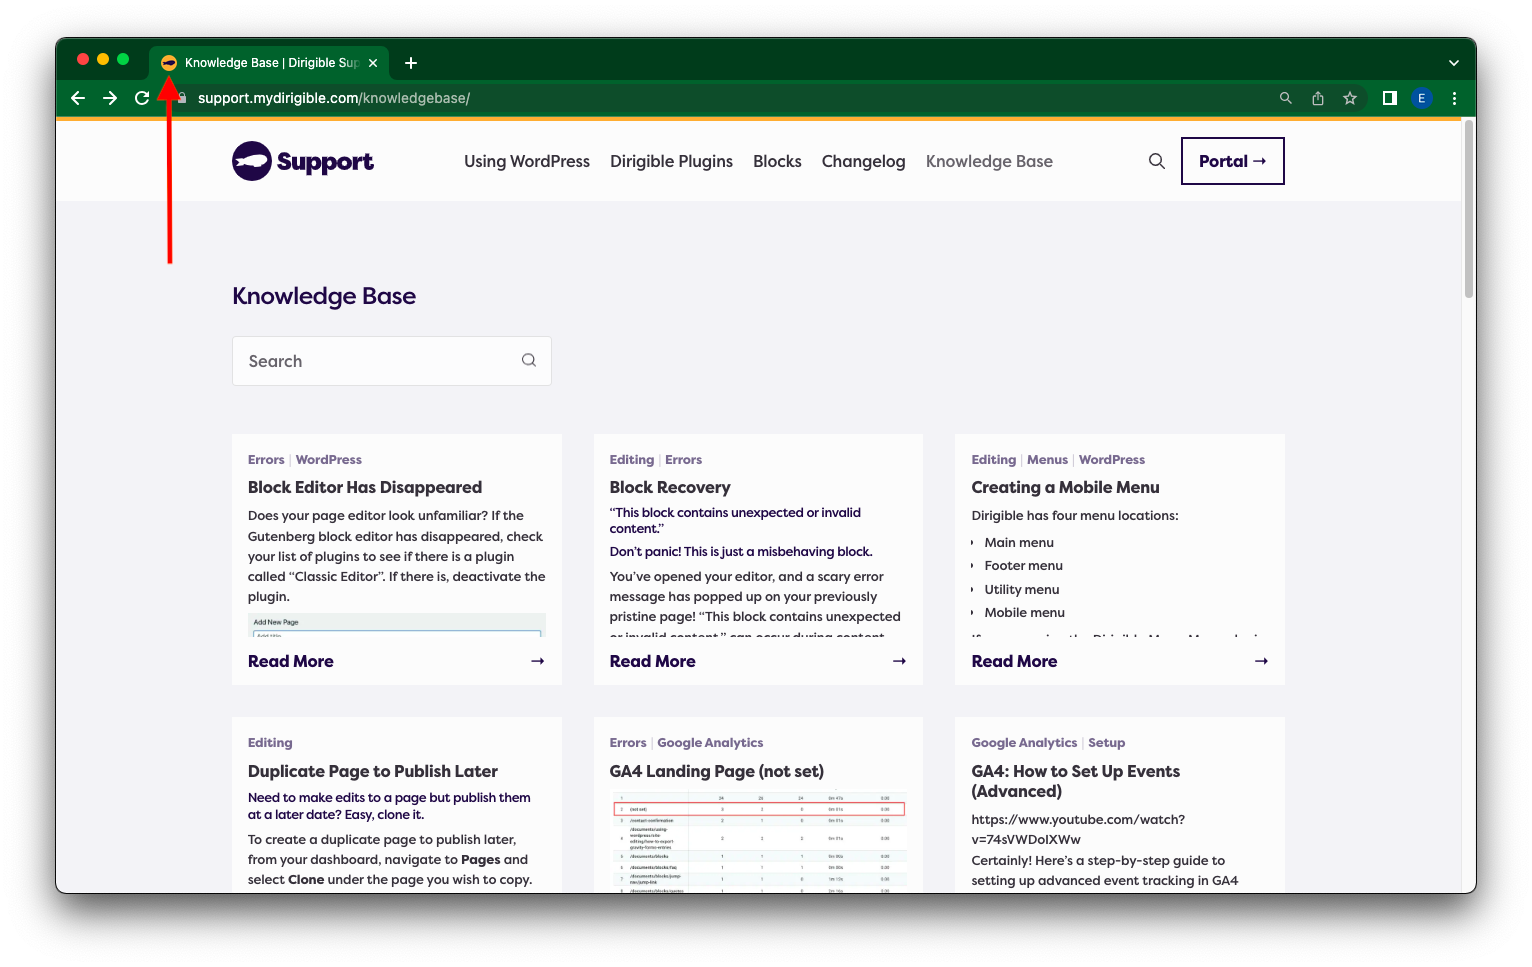
That’s a favicon! They are the little icons of websites that appear on tabs, windows, links, and in your Bookmarks bar. Favicons are everywhere and they are a way of branding. It is also intended to make it easier for users to renavigate to your site when they have lots of tabs open–they can just look for your icon! It is good practice to set a favicon for your website and it is extremely easy to do in WordPress!
How Do I Set/Edit My Site’s Favicon?
- In your Dashboard, on the left hand-side, scroll down and click on Appearances. Then select Customize.

- In the side menu, select Settings.

- Then, again in the side menu, click on Title & Favicon.
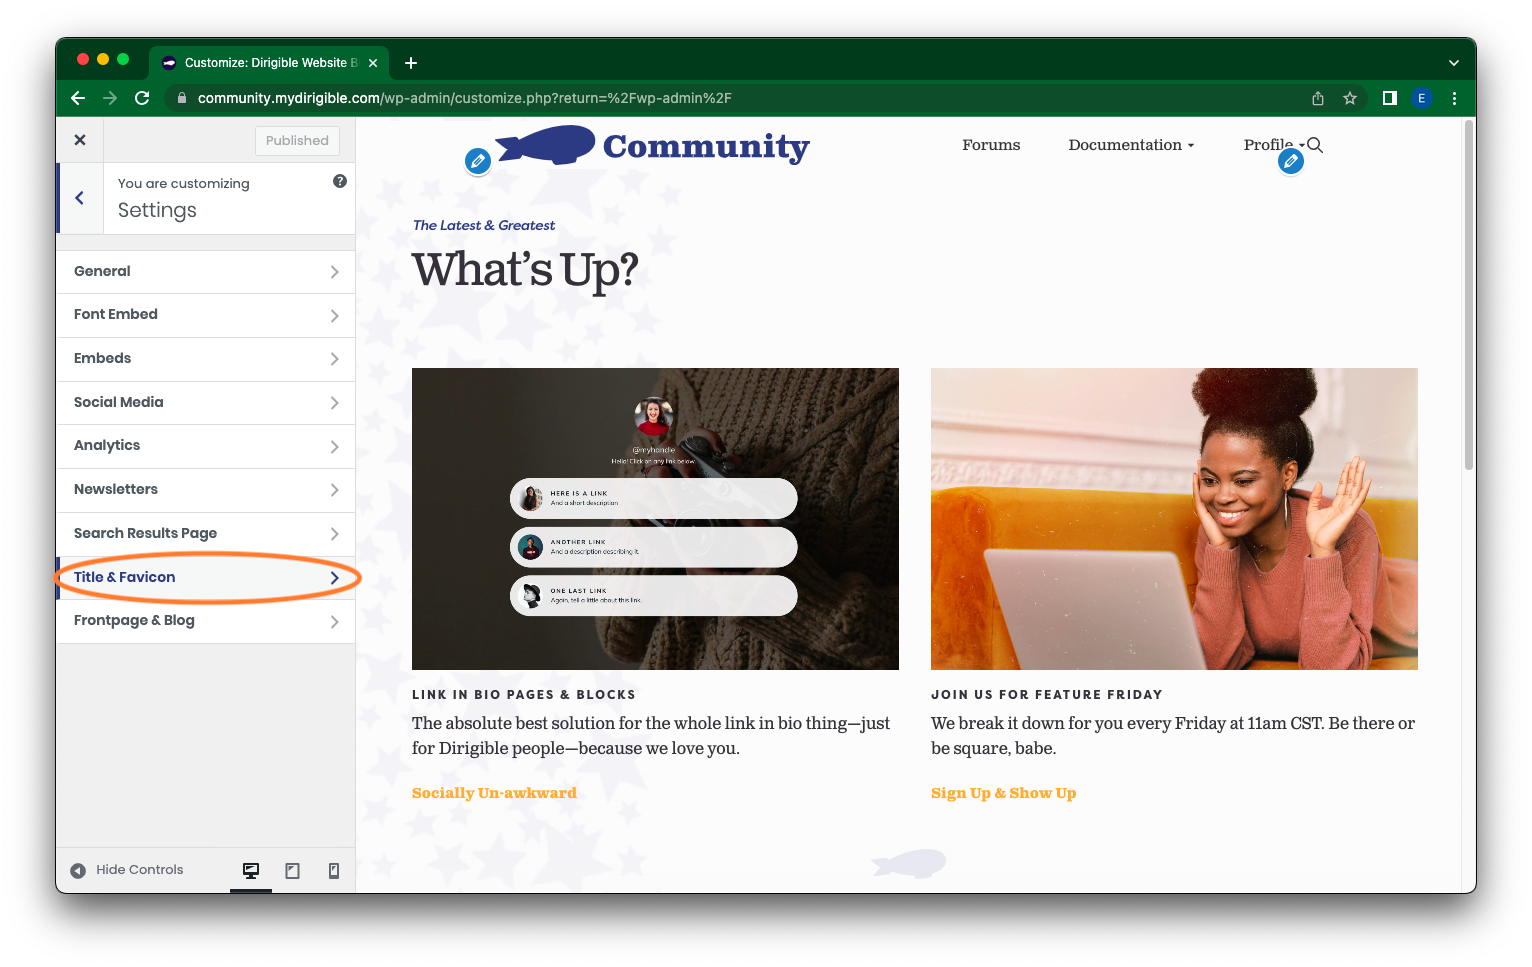
- The section you want to be looking at is Site Icon located in your Dashboard column at the bottom. Here you can either remove your preset favicon entirely if you wish or set up/change your favicon. Click on Change Image.
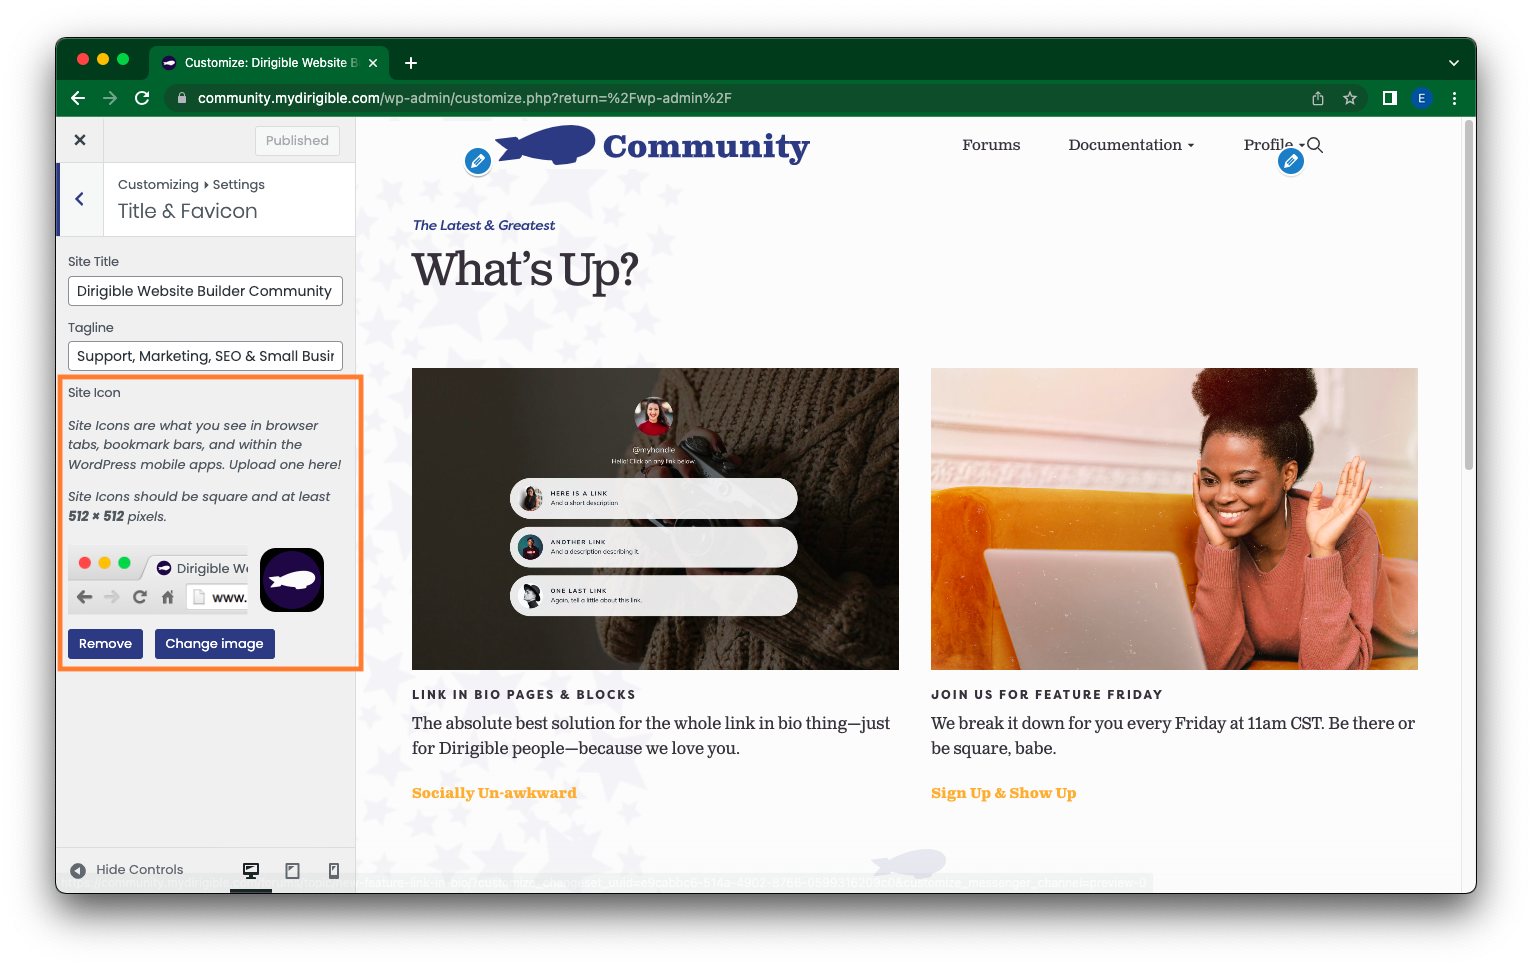
- You now have a couple options here for how to select your image. Looking in the top left, you can either select Upload files or Media Library.
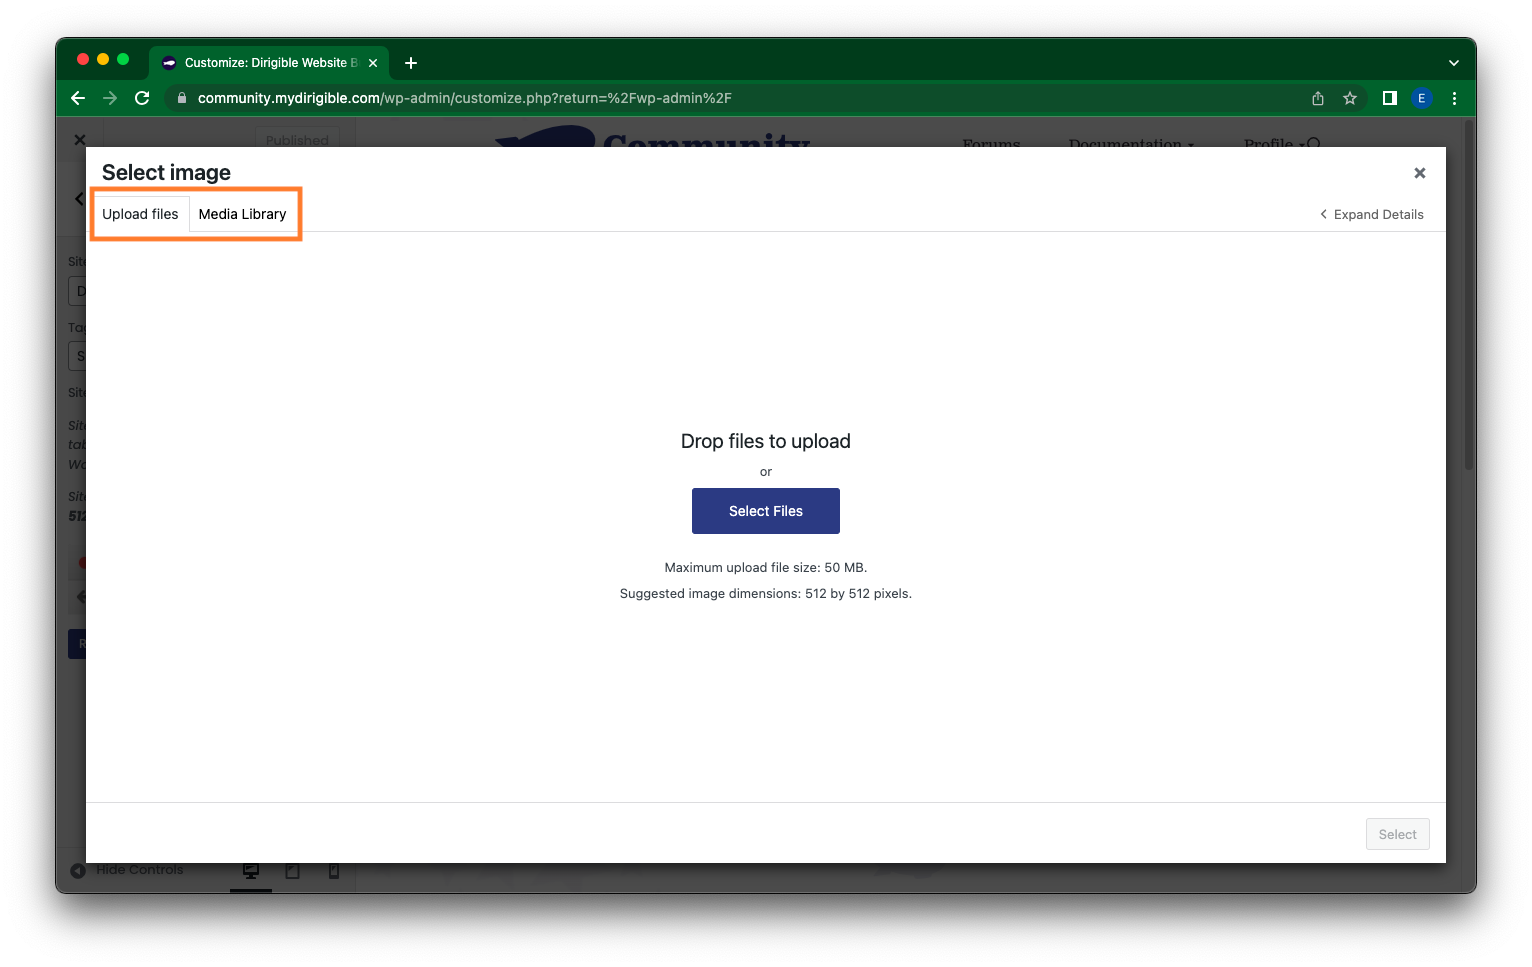
- If you are uploading a new file, you will want to be in the Upload files tab and either drag and drop your file or browse your computer by selecting the blue Select Files button in the middle of the page. Once uploaded, make sure to hit the Select button in the lower right corner.
- If you already have the file downloaded to WordPress, you want to be in the Media Library tab and click on the image you want to set for your favicon. Remember to save by hitting the Select button in the lower right corner!
Adding a favicon is really that easy! Your users will be grateful and your prevalent favicon will create brand recognition amongst your existing site visitors as well as potential visitors!
If you found this helpful and want to learn more about using your website and how to market your brand – sign up for our Website Building 101 course with Dirigible!
Update Your Payment Method with Ease
Need to make a change to your Dirigible subscription payment method?

Don’t stress—updating your payment method with Dirigible is easier than you might think! Stripe offers a user-friendly interface that allows you to make changes quickly and efficiently.
Here’s how:
- Log in to your Stripe account.
- Navigate to the billing section in your dashboard.
- Enter your new payment information and save your changes.
- Check your email for a confirmation message to ensure your update was successful.
As always, our team is just an email away (support@dirigiblestudio.com) should you encounter any issues during the update process.
Use the List Block to Make, Well, Lists!
Organize your Blocks into bulleted or numbered lists
Using bullet points or numbering your ideas can give a cleaner look to your website and allow you to more clearly share information with your visitors. If you are looking to create a checklist, an ordered list, or just organize your text, try using a List Block in WordPress.
How to add a List Block?
When editing one of your posts, to add a List Block click on the + icon of a new Block and in the drop down menu select List.
A bullet point will appear in the Block and you can start typing up your list. Your Block will look something like the below image.
How do I make my bulleted list numbered or vice versa?
Click on the List Block you want to edit. In the top left of the Block Toolbar, click on the Select List icon.
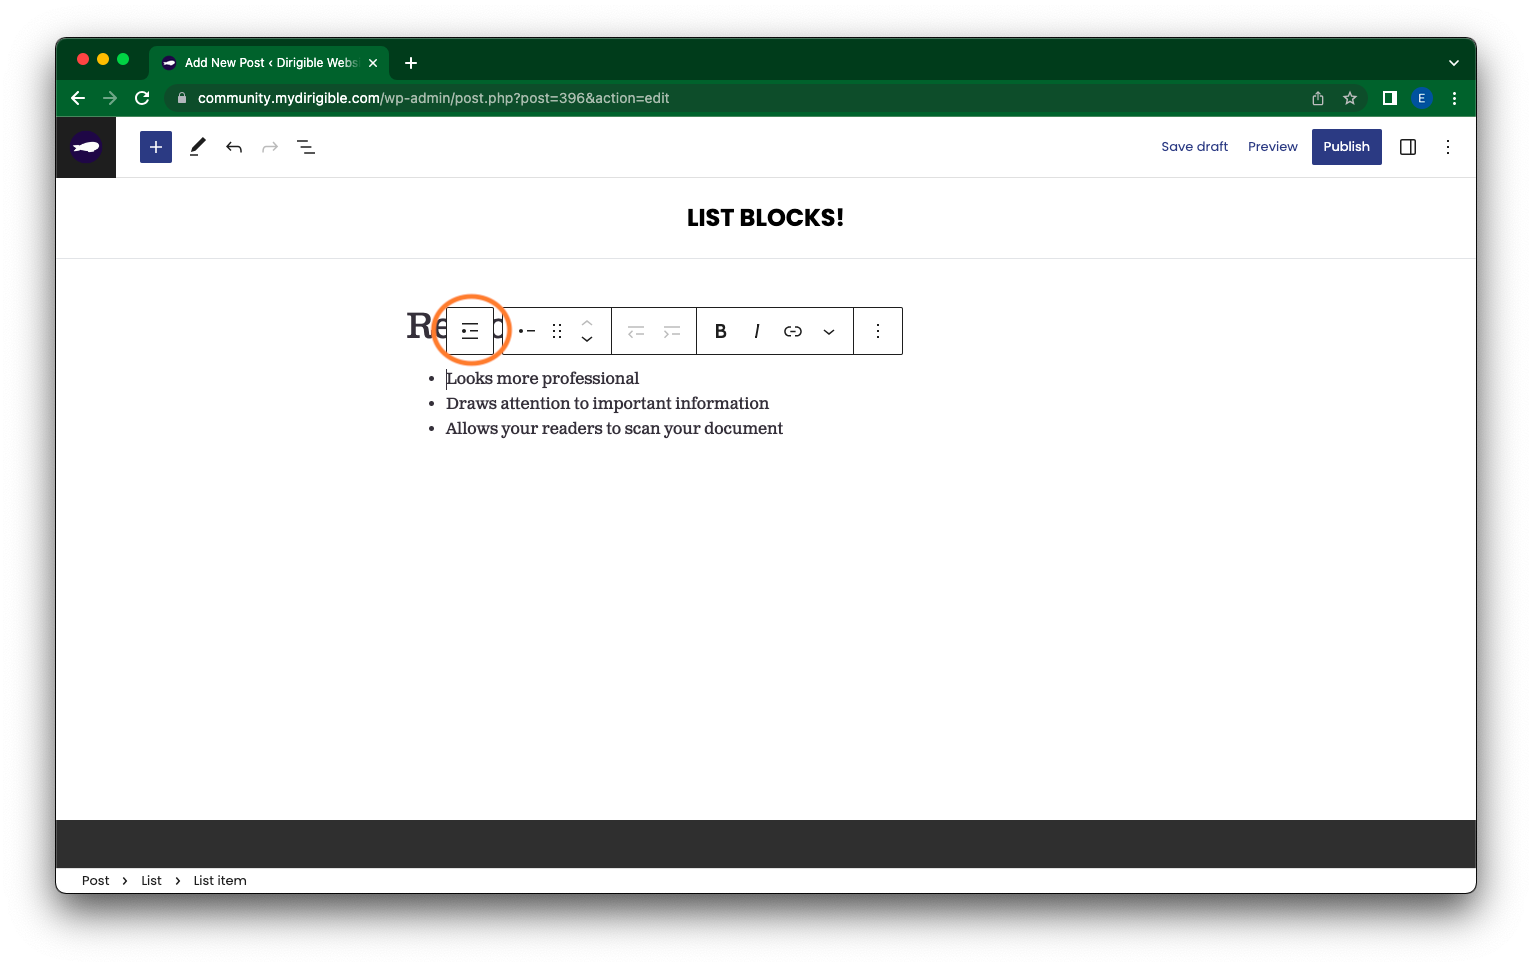
Then in the middle section of the Block Toolbar, there are your list type options. Either bulleted or numbered. Select which one you want.
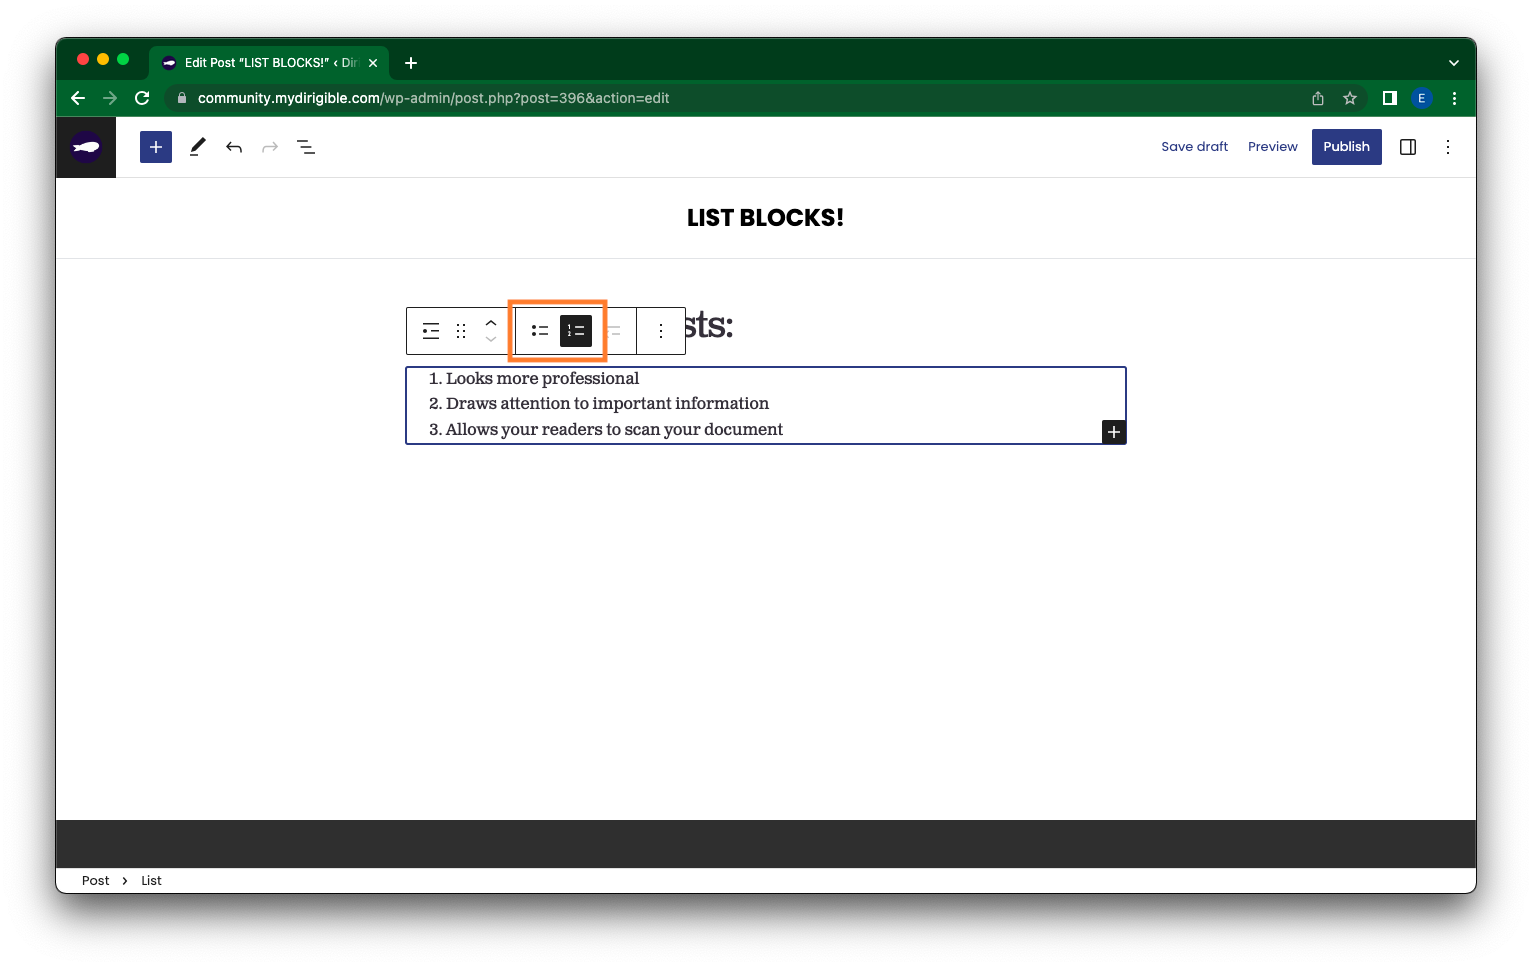
How can I further customize and edit my List Block?
For a numeric list, look at your Block settings sidebar to see additional options like adjusting the Start value of your list or toggle on Reverse list numbering to reverse the numeric order of your list.
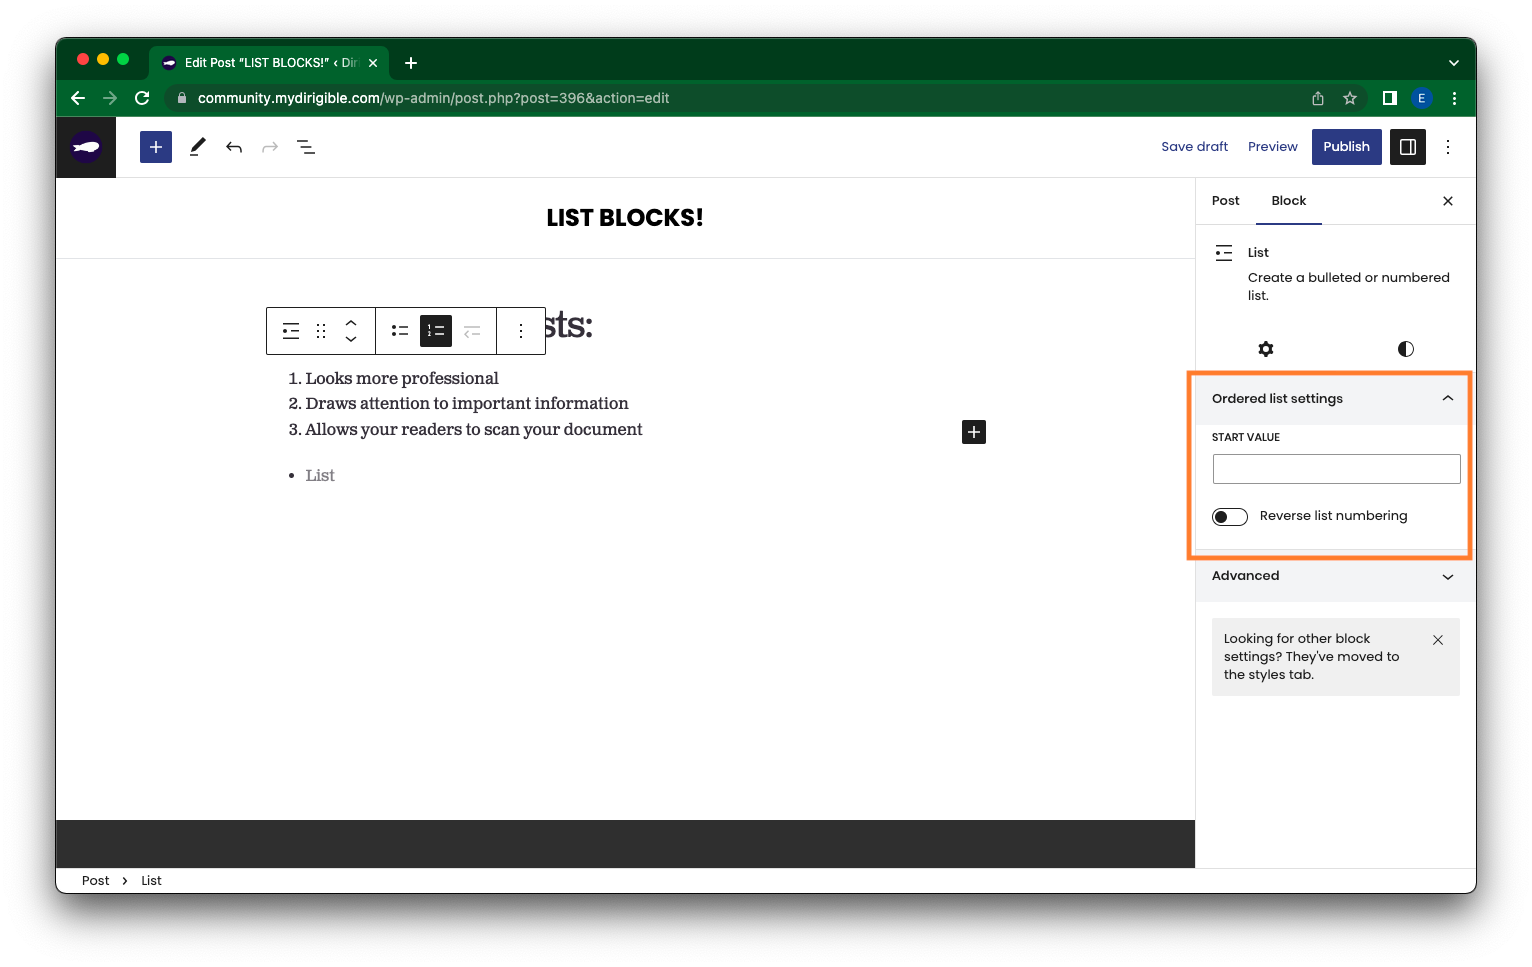
For a bulleted list, look at your Block settings sidebar to see additional Styles options like Chevrons, Checkmarks, etc.
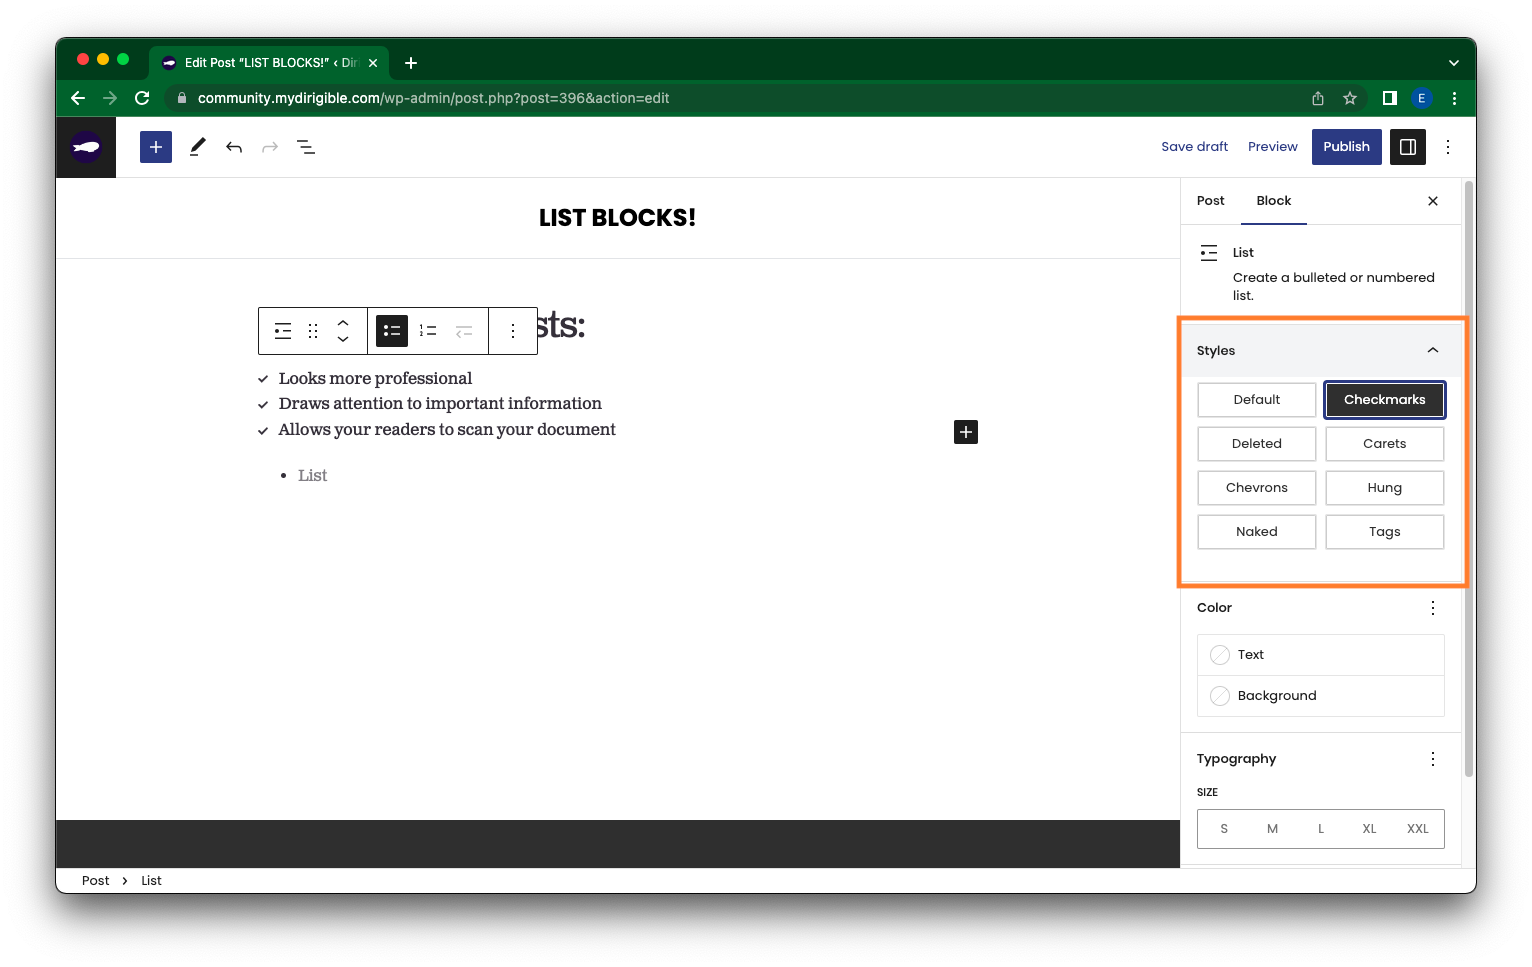
You are also able to indent (first below image) or outdent (second below image) lines of your list in the Block Toolbar.
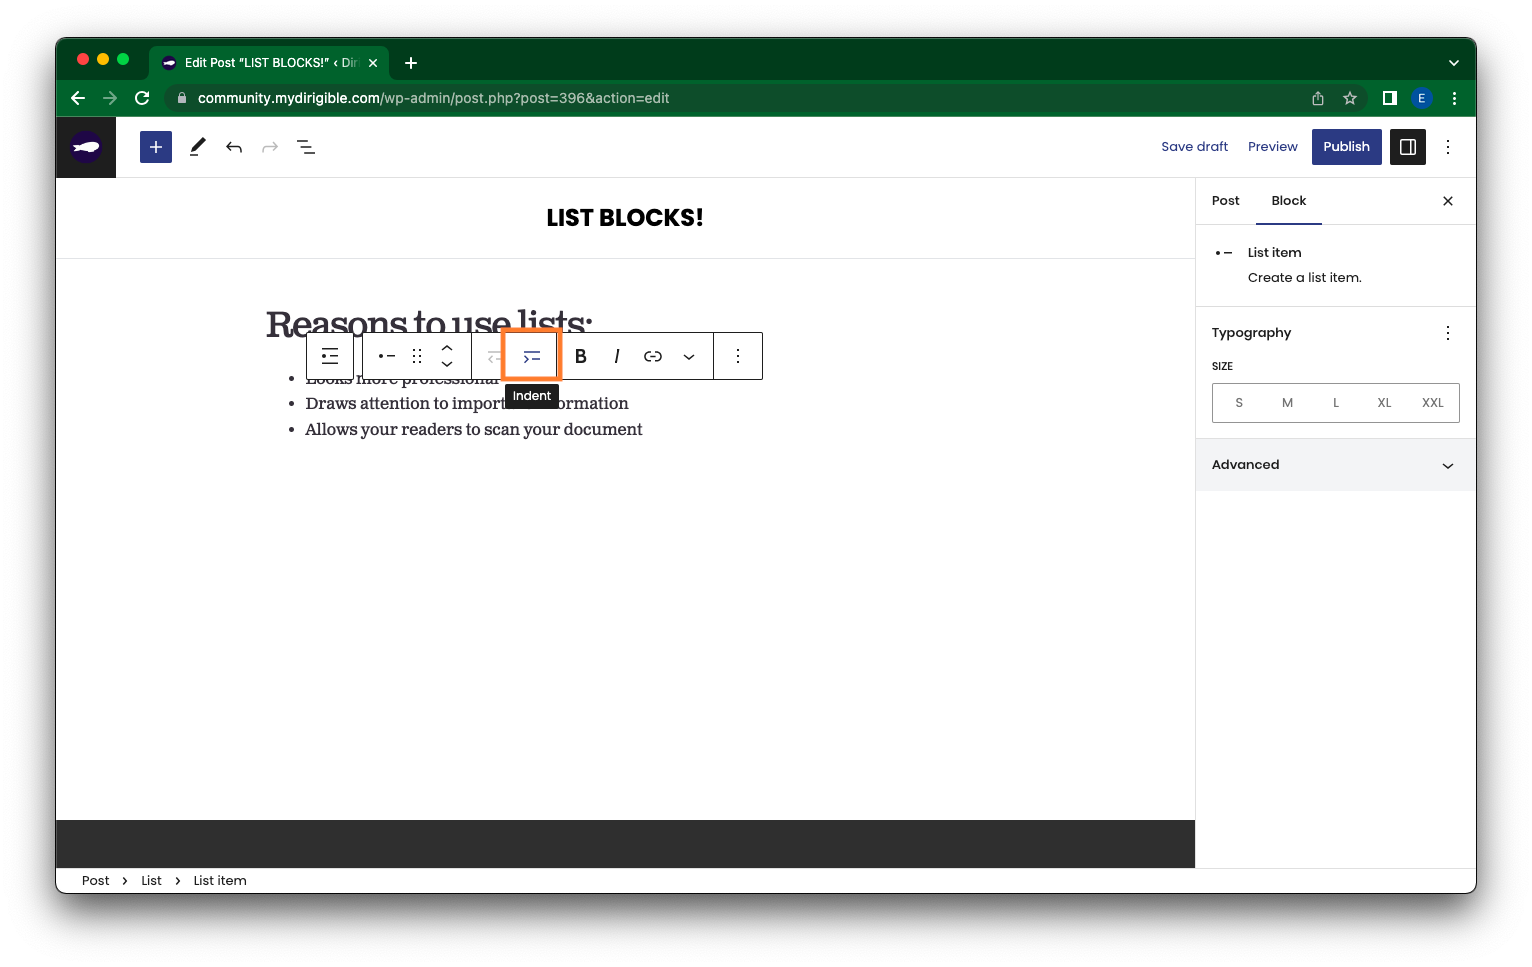

The List Block is a great way to further customize your site to give it a cleaner, professional look. Go nuts–Combine list types, customize the look of your bullet points, and indent or outdent your lines. Try it out!
If you found this helpful and want to learn more about using your website and how to market your brand – sign up for our Website Building 101 course with Dirigible!
User Management in WordPress
Hello everyone! My name is Jake, and I’m a developer and owner here at Dirigible. Today, I’ll show you some user management basics, such as resetting user passwords, adding new users, and removing old users. Please note that the following instructions are based on a personal website, and your setup may differ if you’re a digital studio client with additional plugins or customizations. If you have any specific requirements, feel free to contact us directly. Let’s dive in:
- To add a new user, go to the Users section in your WordPress admin area.
- Click on “Add New” and fill in the user details. For example, enter “testjake” as the username and “testjake@dirigiblestudio.com” as the email address.
- Generate a strong password or copy one from a secure password generator. You can choose whether to send the new user an email notification about their account.
- The most important part is selecting the user’s role. Each role (e.g., Editor, Contributor, Subscriber, Manager, Customer, Shop Manager) has different capabilities within your WordPress site and Dirigible site.
- The “Manager” role has the same powers as the site owner, so be cautious when assigning it. Only grant manager access to trusted individuals.
- Other roles like Contributor, Author, and Editor have predefined capabilities within WordPress. Refer to WordPress’s official documentation for more information on each role.
- Roles like Shop Manager and Customer are specific to WooCommerce. If you don’t have WooCommerce installed, you won’t see these roles.
- Once you’ve filled in the necessary information and selected the role, click on “Add New User” to create the account.
- You’ll now see the new user listed in the Users section. You can access and modify their account by clicking on their username.
- In the user’s account settings, you can change their role, first name, last name, nickname, and email address.
- You cannot change the username, but you can reset the user’s password or send them a password reset link if they’ve forgotten their password.
- Make the necessary changes to the user’s account settings and click on “Update User” to save the changes.
- To test the user’s role, log out of your administrator account and log back in using the newly created user’s credentials.
- Depending on the user’s role (e.g., Author), they will have access to specific capabilities such as creating and editing posts or accessing certain plugins. However, they won’t have access to critical site settings like appearance, colors, fonts, or menus.
- Log out of the user account and log back in as the administrator to regain full access to the admin area.
- If you no longer want a user to have access to the site, go to the Users section, locate the user, and click on “Delete” to remove their account.
- Optionally, you can choose to delete all content associated with that user.
- That’s it! You now have a basic understanding of user management, including adding, modifying, and removing users from your site.
I hope this helps! If you have a
User Management in Your Google Analytics Account
Manage who has what access to your Google Analytics account. You can add users, edit the type of access existing users have, and delete users. Sharing your Analytics account by granting access allows you to share information about your site’s performance. But you want to make sure the right people have access. It is important to note that only an admin account can add or edit users.
If you’re a Dirigible Studio client, be sure to add support@dirigiblestudio.com to your analytics account!
How do I add users:
- When in your Google Analytics account, click Admin.
- Under the Account or Property column (depends on where you want to add a user) , click Access Management.
- Click on the + in the Account/Properties permissions list, then click on Add users.
- Enter the Google Account or Google Workspace Account email address for the user(s) you are adding.
- Check the Notify new users by email box to notify the user(s) of their access.
- Select the permissions you want to grant the user(s). To learn more about Google Analytics permissions go here.
- Lastly, click Add.
How do I edit users’ permissions:
- When in your Google Analytics account, click Admin.
- Under the Account or Property column (depends on where you want to edit a user), click Access Management.
- Using search at the top of the list, type in the email address of the user you are looking to make changes to.
- After navigating to the user, click on their name and adjust their permissions. To learn more about Google Analytics permissions go here.
How do I delete users:
- When in your Google Analytics account, click Admin.
- Under the Account or Property column (depends on where you want to delete a user), click Access Management.
- Using search at the top of the list, type in the email address of the user you are looking to delete access from.
- If you are looking to delete multiple users, you can select the checkbox next to the users and click Remove.
- After navigating to the user, click on their name and click Remove. Another window will pop-up asking to confirm, where you will click Remove again.
Using Sections and Backgrounds
Transcription:
“Hello and welcome! My name is Jake, partner at Dirigible, and today I want to talk to you about one block in particular and then a little bit about how pages are structured and how we use that block to give pages the structure that they need. And that block is the background block. It is by far going to be the most used block on your site and on pretty much every Dirigible site.
The easiest way to get started with it is during page editing. If you pop open the list view, you’ll see that the top-level block on almost every page typically is going to be a background block. Now, the reason behind that is the background block groups other blocks together, and it also provides you with some interesting ways of modifying the background.
First thing I’m going to do is I’m going to run over the structure of this page. And this is a page that I’ve copied from another site and made generic. I’m going to run over the structure of these blocks and why we decided to place them that way. And then we’re going to go back and we’re going to look at some specific features and settings of the background block.
So at the very top of our page, we have a background block, and in that background block is a set of columns. And in those columns is a big logo or in this case, like a featured image that we’re having at the top of our page. And actually, I’ll show you the page rendered as well, not just in the editor.
So, I’ll just scroll through this for you just for a moment so you can get an idea of what’s all on the page. At the top, we have a background with columns in it. Then we have a title, and this title, all the copy that I have on this page right now is just placeholder copy, but they all still have their own purposes. So this top headline here is the H1 of your page, and it’s meant to describe the overarching theme of the page. What is this page talking about? What are we doing on this page?
The next thing we have is a small intro paragraph. Beneath that, we have essentially what amounts to a call to action or another way of routing users around your site. So we have an H2, and in that, we’ve given that as the default H2 style. We have an H2, small intro paragraph, a little list. This is just a list block. And then the actual call to action to make your users go and do something. So in this case, it would be “Go visit this other page that has more information on this specific topic that the H2 references. Go visit that page and learn a little bit more about that.”
And as you can see, we’re still in the background. So we have a background here, background here, and then the next item we have is top-level, and that’s a photo feature. And photo features do this cool thing where they go the full width of the page, really display a nice big, beautiful image. We have another headline here, another small short paragraph, and then another call to action button.
Then we have a post block, also settled once again within a background, with a headline. Here are our posts, and this post block essentially would be relevant to the topic of the page. And then finally, one last background block for a call to action. In this case, it’s a generic call to action, “Follow us on social media” with the social media icons. You can also put something else in this other little column.
Okay, so that’s the overarching piece, and you can see how the background
block categorizes and holds together these separate pieces of your page. Okay, we pop back to the top. So, this one references what the whole page is about or what the whole site is about. In this case, the next one is a separate topic, separate headline, separate paragraph, separate list, small call to action button, all housed within this background.
Photo feature, same thing, headline, small paragraph, small call to action. Background, this one is just housing the post block, but this is all relevant useful information to your users. If it had a category that matched the topic of the page, you would use that category. Background, small call to action for social media.
Now, let’s visit some of the specific settings of the background block. And as you can see, we get this nice little swoop down at the bottom here. That’s an interesting feature of the background block, but I’ll go down the gamut of all of the features here. So we have reverse prints, which is useful if you have a darker color palette on your website. Reverse print, just in this case, it makes it unreadable, but reverse print is typically there to provide the contrast that you need if you have a darker background color.
Padding, you can change the padding. Generally, I would say more space is better than less space, so I would always err on the side of having a little bit more space. You can choose the background style, and the background styles are all really useful. Right now, we have it as a gradient, and this is a subtle gradient. Because you have a stark color of white and an end color of gray, it’s very kind of pleasing to the eye to see it transition here.
But if you did white-blue to white or something, blue to gray, this doesn’t look as nice. Maybe white to red, still, this looks too much like a gradient, right? So you really want to be careful when using gradients in background blocks because it’s really easy to get in trouble. Because this is so subtle, that’s why this works nicely here.
Some of the other styles, you can have it be just a solid color, which is typically a safe thing. And so, if you choose some of these different colors, you can see these are all locked into our color palette, right? You can put an image back there. In this case, we would have to do reverse print to get some of this visible.
Two-tone, which is fun. Two-tone kind of provides this snap gradient effect. It’s not technically a gradient, but it provides this two-tone color effect. You can change the direction. You can change where across it goes. Gradient, which you already know. Then we have a pattern block as well, which you would choose an SVG or something similar, and it tiles the pattern back for you. Leave that as a gradient.
Now we’re going to scroll down here just a little bit, and I’m going to bring this kind of swoop into view here. And you have what’s called the transition. So transitions are very powerful in the backgrounds, and it’s how you get some of your sites to look a little less blocky and just break up the different sections to provide a nice little flow. Not necessary to use at all, not required, but it is nice to have the option.
Currently, we’ve only enabled the bottom transition because this block is touching the top. So we just want to have it be touching the top. We are offsetting transition height. So I’ll show you what that does in just one moment. Right now, we’re using the rounded shape, and that is what causes this little rounded bit right here. And the color, this is where
it becomes that transition between the two blocks. You have the color, and you always, not always, but typically, you’re going to want to choose the color that matches the background of your next block.
So right now, we have this kind of fade-to-gradient gray here, and we’ve chosen the color, which is this kind of the background of the background color. So it could be black, blue, red, and obviously, none of this looks very nice. Yellow-gray kind of breaks over. It doesn’t do anything. It gets rid of our roundedness. But when we choose white because the background, this next background block, its background is white and it’s just a solid color, it provides this nice transition effect where it doesn’t look like there are two background blocks here. It looks like it’s one continuous piece.
I’m going to go ahead and choose my top background again, and you can see that this transition, and you can change the size of this and the bubble as well if you wanted to get greasy with it. I’m going to bring that back down, and we can explore some of these other transitions. So wavy left, wavy right, angle, angle right, curve left, curve rounded. And to give you an example of the offset transition height, let’s pop this angle right down, and then we’re going to turn off the offset transition height. And as you can see, it pulls this back up and makes it if you crank the size up a little bit here, you can get this effect where this transition bridges a lot higher. And if you offset the transition height, you get this big kind of slash.
I’m going to switch back to rounded because I like that. We’re going to turn this back on to five, give it that nice subtle effect. Let’s make sure all our other settings are where they were. Yeah, and so that is the general idea behind the background block. And you can see that you can produce a lot of different effects by combining two background blocks next to each other. And indeed, that is the building blocks of typically many dirigible sites that are built is these background blocks.
So when you’re starting to build a page, I would typically recommend starting with a generic URL block. Then underneath that, you may want to start with a background and then tack another background on underneath that one. That’s how you’re going to be able to really begin to connect these blocks together and build this flow through your entire site.
Thanks for listening. If you have any questions or you want to learn more about your dirigible site, visit support.mydirigible.com. Have a good one.
Using the Classic Small Quote Block
Meet Large Quote Block’s little brother, the Small Quote Block. This is your simple, go-to quote block that allows you to add subtle details to your website. The Small Quote Block is a simple yet bold design that doesn’t take away from the rest of your page, but still conveys important information to your users!
Keeping it Short and Sweet
You might notice that the block editor options don’t appear for this block, but that’s a good thing!
The simplicity of the small quote block – there’s no need for editing. This special little block is made up of 3 parts that you can manage: Headshot, Name, and TItle.
How to add a Small Quote Block:
- Click on the + icon to add a new block to your page
- Type in “/Small Quote” to find the block
- Select Small Quote
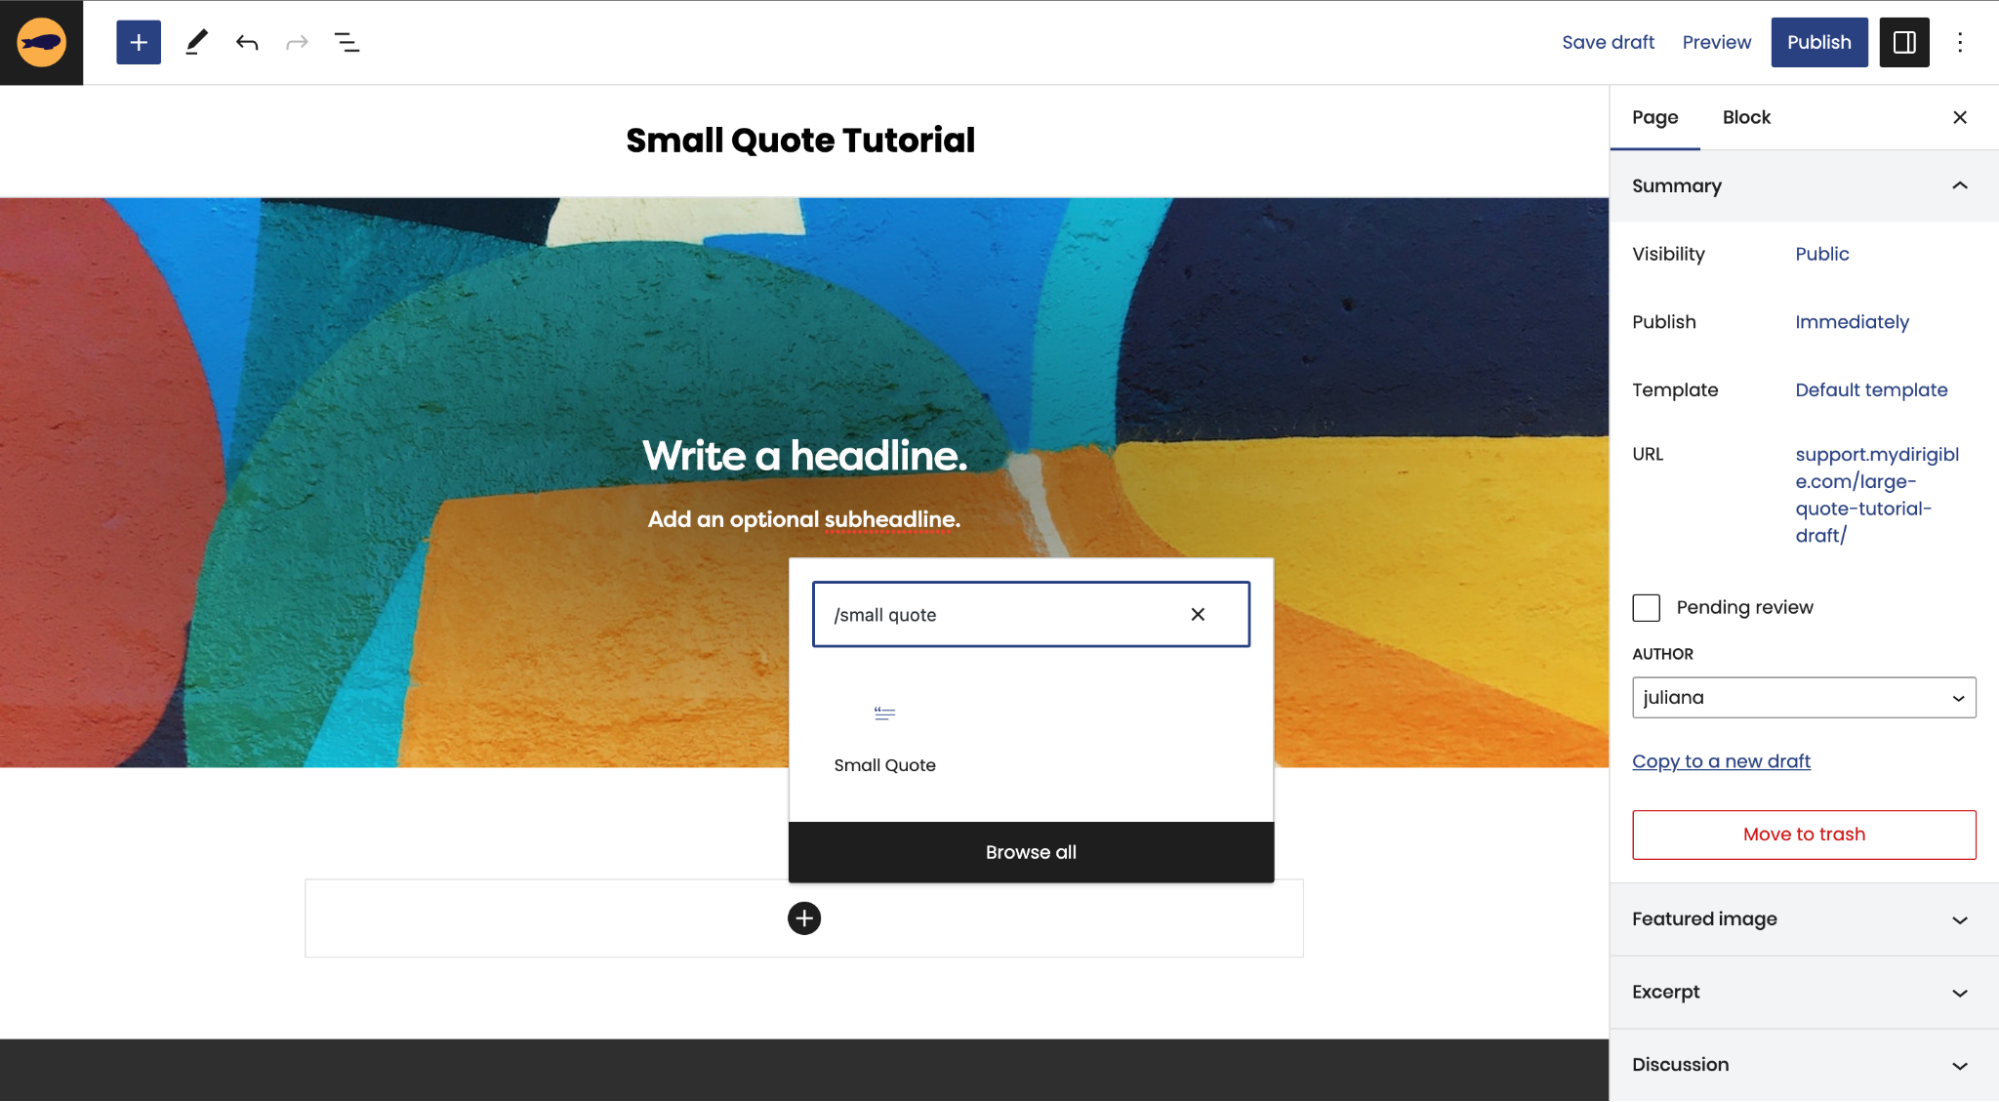
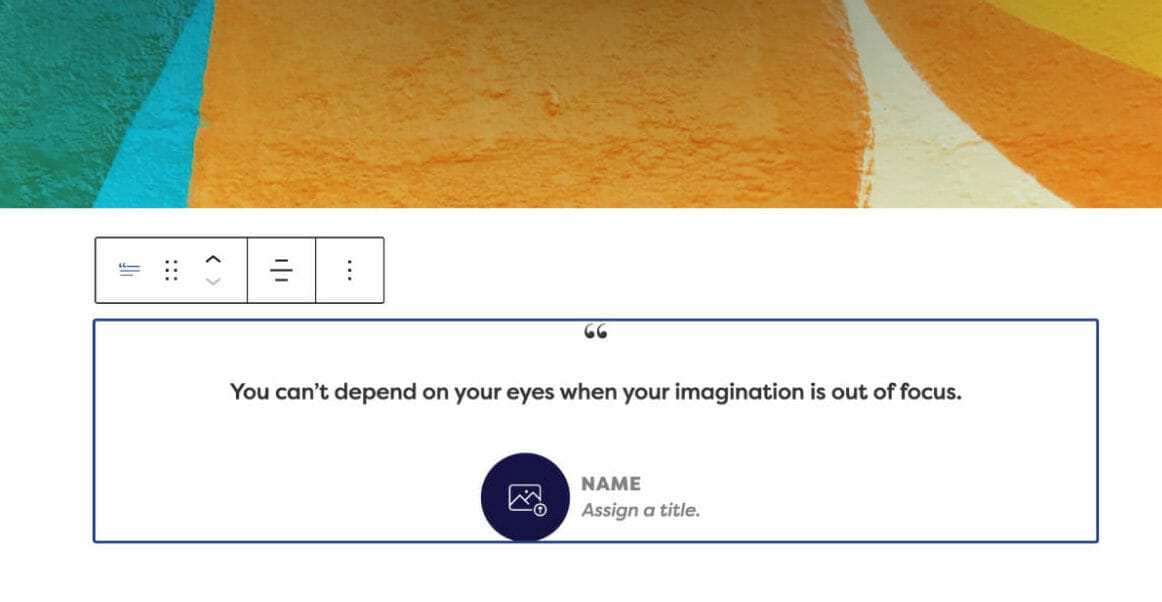
How to add a Headshot to your quote block:
To add a Headshot, click on the headshot icon to open your Media Library. If you don’t add a headshot, the Name and Title fields will appear centered underneath the quote on the frontend.

Looking to Scale Up?
We’ve designed this block to fit well in the middle of text, like a pull quote you’d find in a magazine. If you’d like more sizing options, you can go with this block’s big brother, the Large Quote Block.
Let’s get to Quotin’
It’s always the little things that make life easier. We hope this tutorial helped you learn more about our cool little quote block! The Small Quote Block is the perfect design element that will enhance your site’s content without doing too much.
What If I Want to Transfer the Provider of My Domain Name?
How to Transfer your Domain Name
At some point in time, you might find yourself in a situation where you want to transfer your existing domain name to another provider. Maybe you found a better provider to meet your growing needs or you are just unhappy with your current one. To make it easier for you to make this transition, we have compiled a list of major DNS providers with links to their explainer on how to transfer a domain name to them specifically.
But first, what is the general process of transferring my domain?
The general process no matter where you transfer your domain name will look something like this:
- Disable the registrar lock of your domain in your current web host. This is an extra layer of protection to combat unauthorized transfers of your domain, but as you do want to make a transfer, this needs to be turned off.
- Request an authorization/EPP code that is sent to your registered email. This is a password of sorts to ensure only the owner can transfer their domain.
- Set up an account/login to your soon-to-be provider and navigate to their transferring domain section. In this form you will likely have to type in your domain name and the EPP code you acquired.
- Lastly, pay up. There may be a transfer fee you will need to pay or you’ll have to make a payment in order to renew your domain with the new domain host.
How do I transfer my Domain Name to…?
- GoDaddy
- One of the biggest domain registrars on the market. They offer a wide variety of services beyond just domain registration, such as web hosting and website builders.
- NameCheap
- Namecheap is known for its great customer service and excellent security features. They offer affordable pricing for domain registration.
- Bluehost
- Bluehost is not only a popular domain registrar but also offers excellent web hosting services, including options for WordPress hosting.
- Domain.com
- They have a wide selection of popular and country-specific TLDs to choose from, with a host of add-on services like web hosting, SSL certificates, and email accounts.
- Google Domains
- Google Domains is a simple, straightforward service that integrates well with other Google services.
- Hover
- Hover is a straightforward, no-frills domain registrar. They offer good customer support and an easy-to-navigate website.
- HostGator
- HostGator is another provider that offers both domain registration and web hosting services. They have a solid reputation in the industry.
- DreamHost
- DreamHost offers a full array of online services including domain registration, web hosting, and cloud services.
- Network Solutions
- Network Solutions offers a full suite of services including domain registration, website hosting, website design, and online marketing.
- Register.com
- Register.com offers a variety of services including domain name registration, website design and management, search engine optimization, online marketing campaigns, local sales leads, social media management, and call center services.
We hope this aids you in your transferring process! There are many providers to choose from so make sure you do your research to find the best web host for you and your domain.
What is a Quote Block?
A Quote Block is like our other Blocks, but it comes with a special addition – an image field. Displaying a quote next to an image provides users with a holistic view of your website with a captivating visual design.
Our latest adjustment to the styling makes our Quote Blocks more prominent on the page, featuring a simple and elegant quotation mark on top!
Simple Quote Settings:
The quote itself has all the same fields as the Small Quote and Large Quote Blocks—you can adjust the Text Size, Background Color, and Headshot in the Block Editor on the right-hand side.
How to add a Quote Block:
- Click on the + icon to add a new block to your page
- Type in “/Quote Blocks” to find the Quote Blocks
- Select Quote Blocks


How to add or change the Featured Image?
To set the Featured Image, you can click directly on the image to open up your Media Library and make your selection.
If you want to change the Featured Image you will follow all those same steps, but first have to hit Remove BG Image in the Block Editor when the child block is selected..

Adding a Headshot:
To add a Headshot, you can click directly on the headshot icon to open your Media Library and make your selection.
If you want to change the Headshot you will follow all those same steps, but first have to hit Remove Headshot in the Block Editor when the child block is selected..
NOTE: If you don’t add a headshot, the Name and Title will appear centered underneath the quote on the frontend. So you don’t have to worry about a blank space showing up in your Quote Block. The headshot field is only there if you want to use it, it is not a requirement.
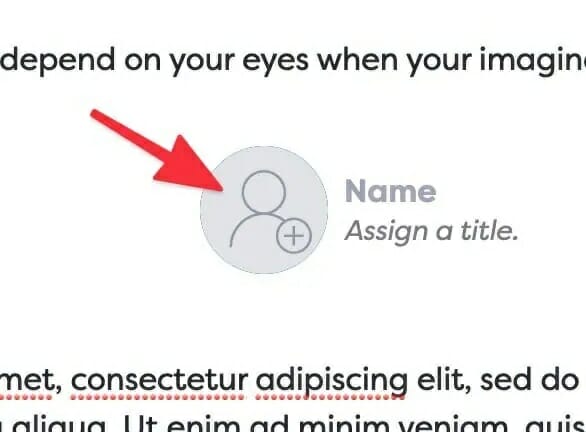
We hope this tutorial helped you understand how our seamlessly awesome Quote Blocks work! Try it out and discover how the perfect blend of an image and a quote can elevate the design and functionality of your website!
What is a Site Title in WordPress?
Keep it simple! Use your brand name.
Your Site Title is simply how people find your website. It should be your business or brand name–that way when people search your name they are directed to your website.
How do I set or change my Site Title?
- In your Dashboard, on the left hand-side, scroll down and click on Appearances > Customize.
- In the side menu, select Settings.

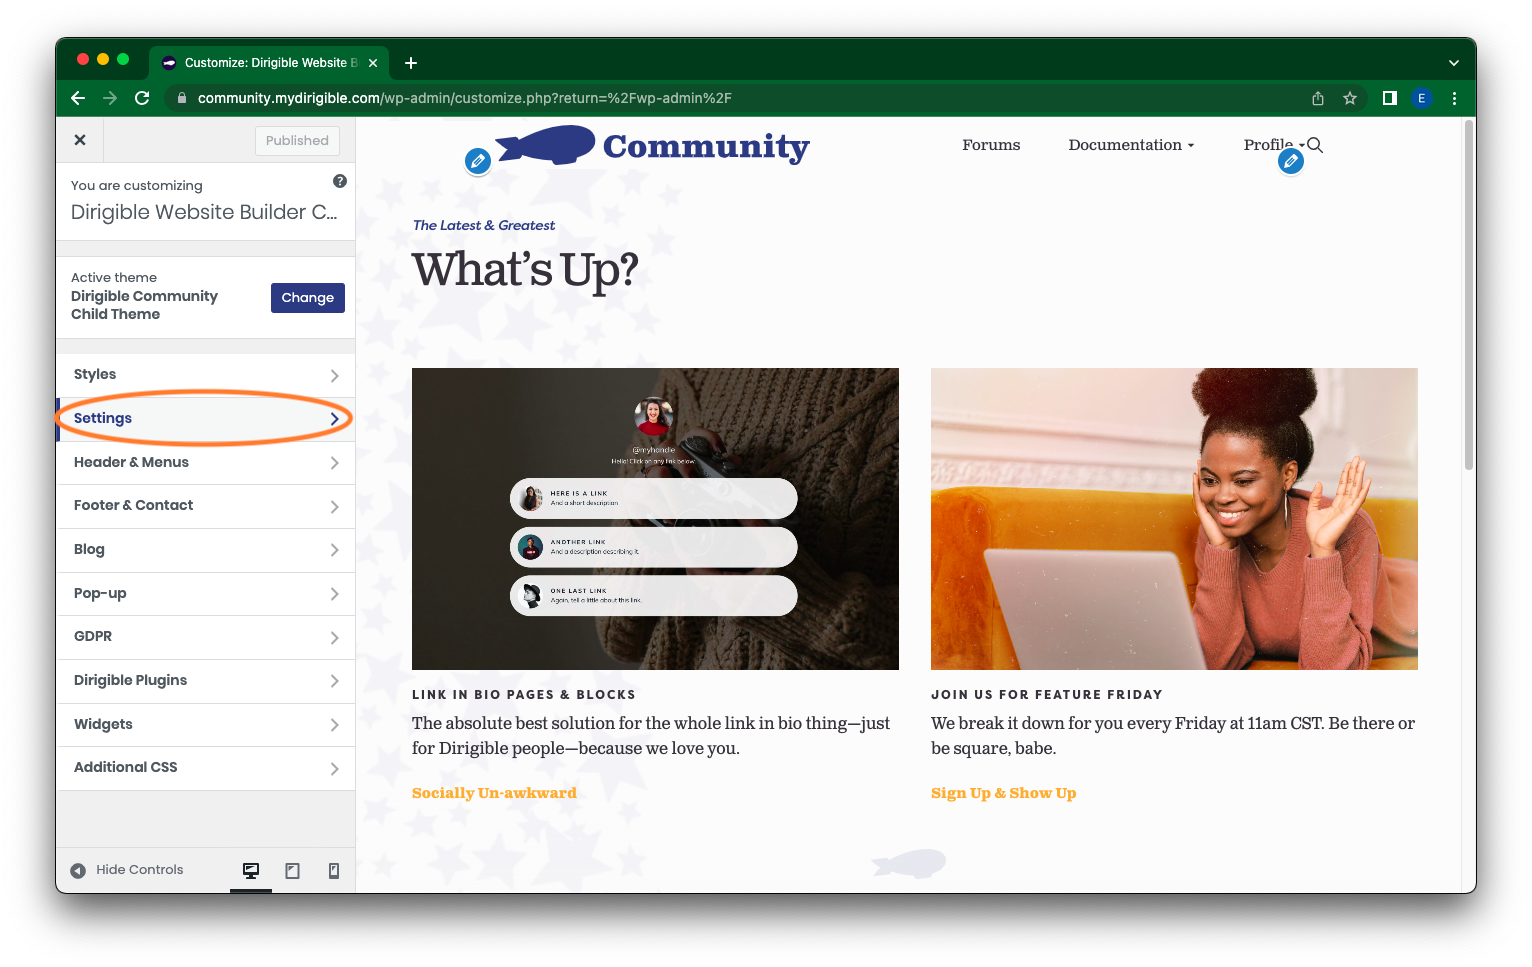
- Then, again in the side menu, click on Title & Favicon.

- The section you want to be looking at is Site Title located in your Dashboard column near the top. Here you can add or edit your Site Title. Once you have entered in your Site Title, click Publish in the top right of the Dashboard.
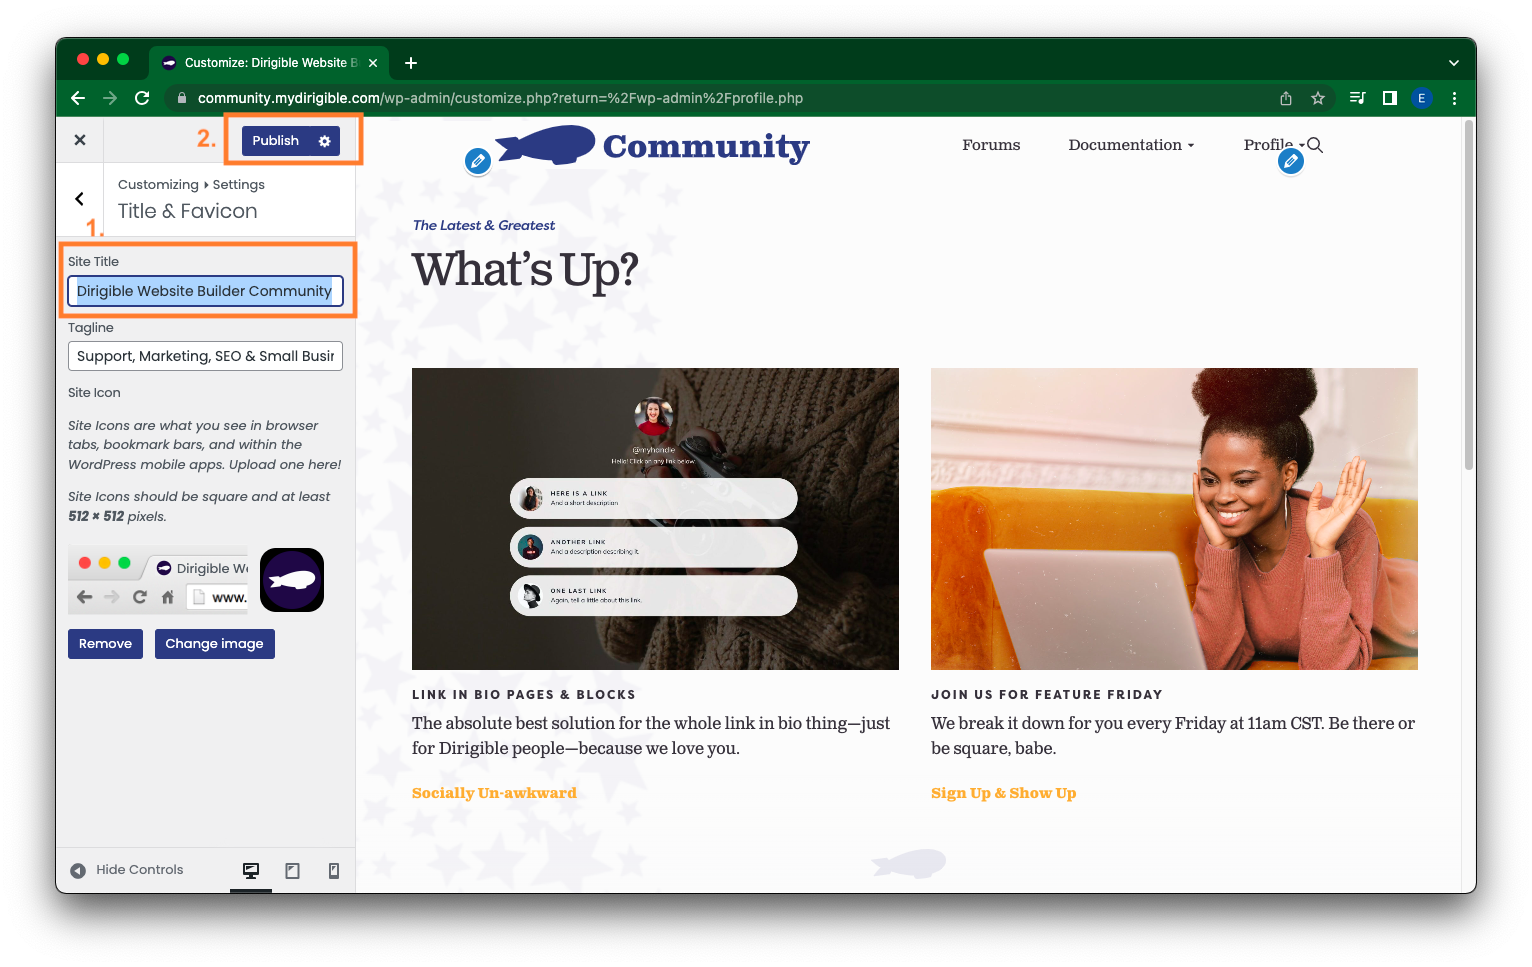
But, what should my Site Title be?
Your Site Title should be your brand name, business name, or something that describes what your website is about. For example, ours is “Dirigible Studio” and you can find our site if you search for it using that site title. You could also add a location or keywords to your Site Title.
And what about my Tagline?
Your Tagline is the box right below your Site Title, which you can also set and edit. Your Tagline should be your brand strap-line or a keyword-rich description of your business. Think of it as a teaser or glimpse for what to expect when visiting your website. Once you have entered in your Tagline, click Publish in the top right of the Dashboard.
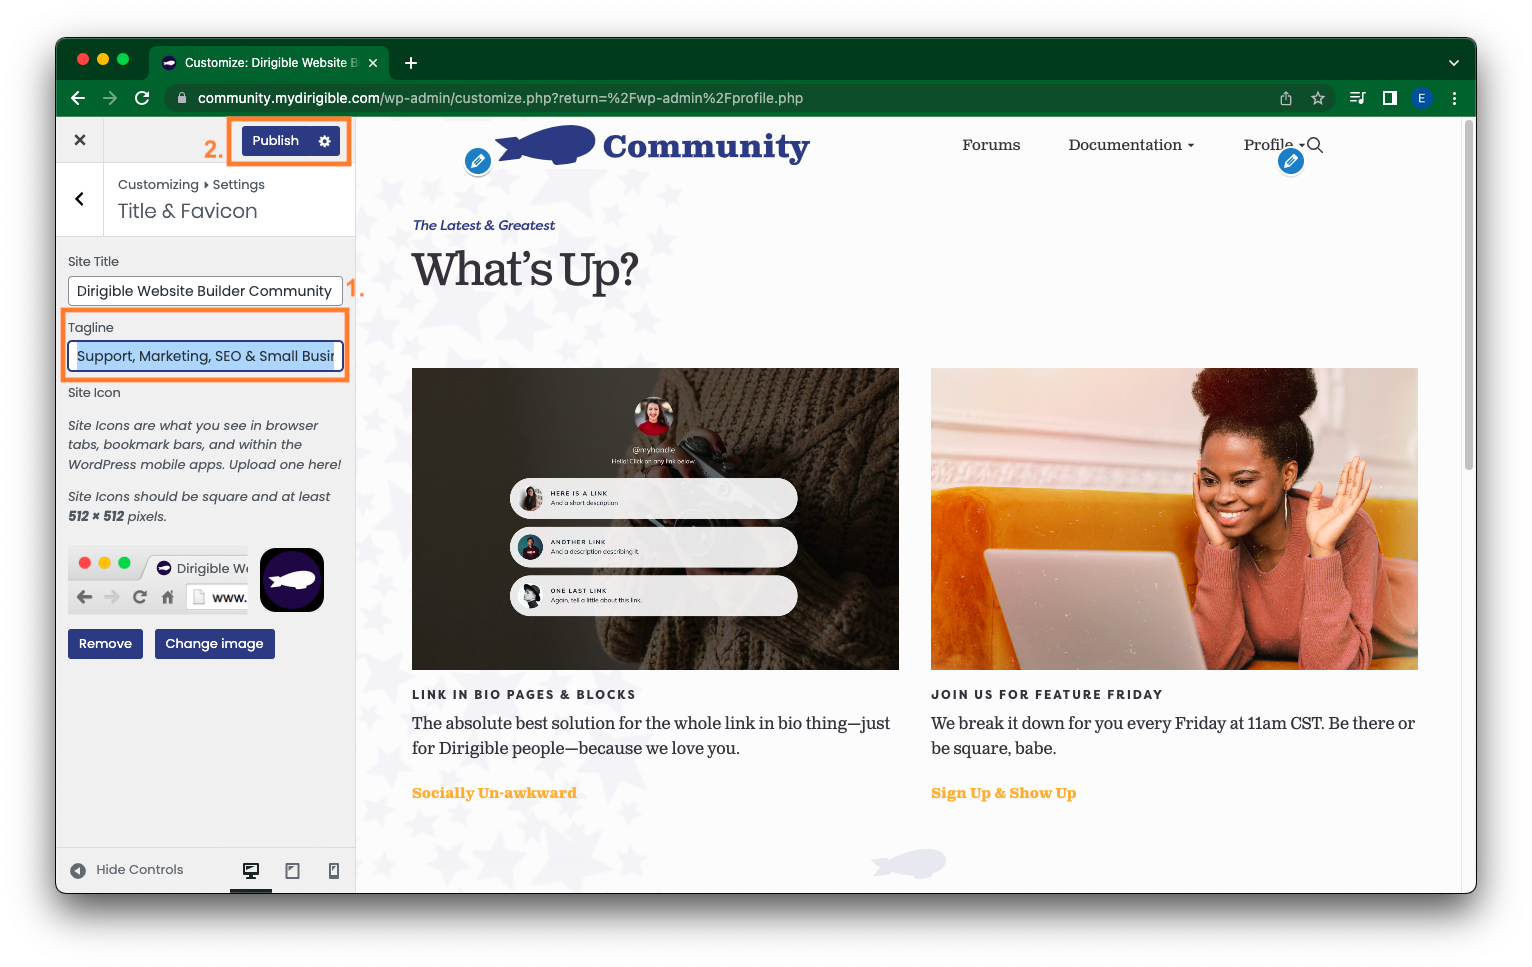
Getting something down can seem difficult, but remember you are just entering the basics here. Your site title is as easy as entering in your business or brand name. And if you later find you are unhappy with your site title or tagline, just follow these incredibly easy steps outlined above to update!
Which Plugins Are Installed?
Need help finding which plugins you have installed? Look no further.
To find your installed plugins you first need to navigate to your Dashboard. If you are viewing your site from the frontend while logged in, simply hover over your site title in the top menu and select Dashboard from the drop-down.
Once in the Dashboard, select Plugins from the left-hand menu.
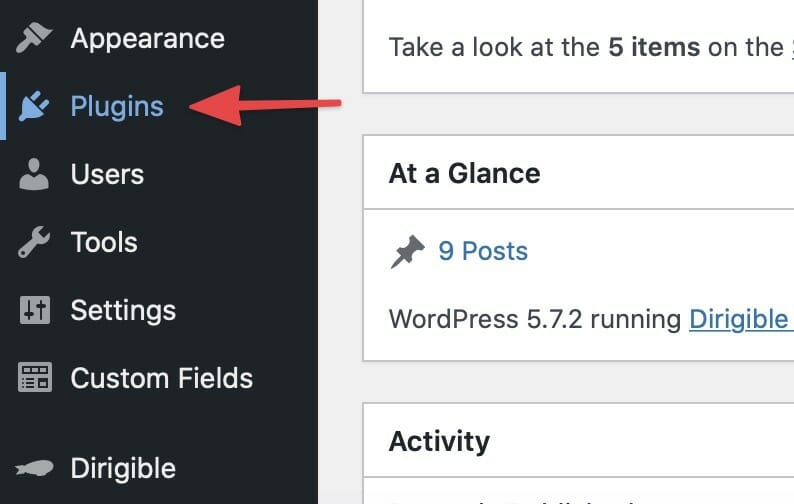
After you’ve selected Plugins from the Dashboard menu, you will see the list of all plugins currently installed on your site.

View all or sort according to active/inactive status by selecting the respective option above the list.
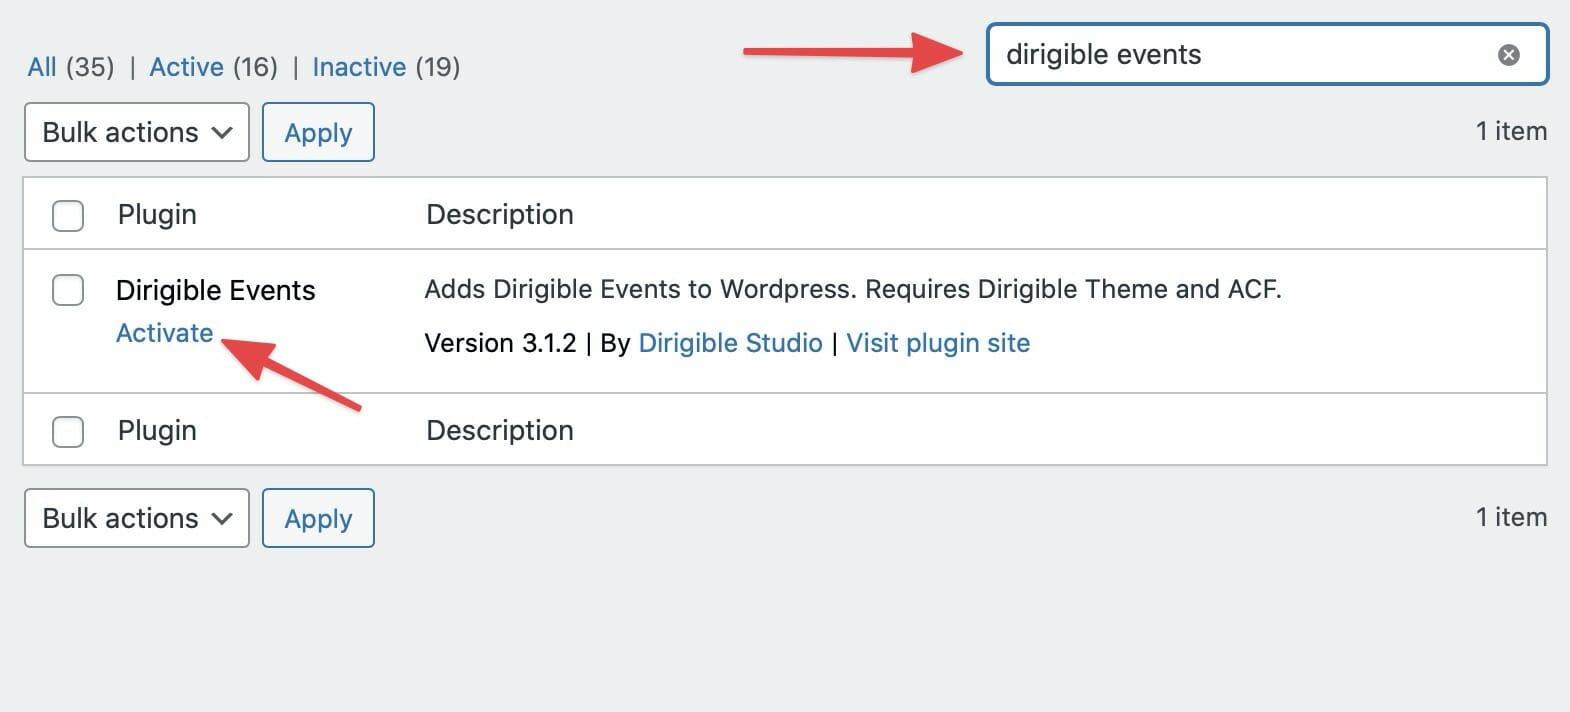
If you are searching for a particular plugin on your site, you may use the search bar above the list. To quickly tell whether or not the plugin is active, look at the text below the plugin title. If it reads Activate the plugin is currently inactive and if it reads Deactivate the plugin is currently active.
Why “Last Updated” Dates Matter for SEO
The value of including publish and “last updated” dates on your website’s content often gets overlooked, yet these seemingly small details provide rich search visibility and content credibility helping boost your content’s performance in search rankings.
If you publish blog posts or pages that get regularly updated over time, including a visible update date can give you an edge in search results and help visitors trust what they’re reading.
Here’s why showing “last updated” dates on your site matters, and how to make the most of them on your Dirigible Site.
Search Engines Use Freshness as a Ranking Signal
Search Engines’ algorithms take “freshness” into account when ranking content, especially for time-sensitive or evolving topics. If a search engine like Google sees that a page was recently updated, it’s more likely to consider that page relevant and reliable.
Dirigible sites have built-in, structured data like datePublished and dateModified to automatically send Search Engines the right signals. Search Engines pay attention to both what is encoded behind the scenes and what users can see on the page itself. Looking at your own site’s content, make sure the information is present both in structured data and visible on the page to ensure appropriate ranking with search engines and credibility with users.
Dates Build Trust & Improve Click-Through Rates
If your listing shows “Updated September 2025” while a competitor’s content appears to be from 2021, users are more likely to trust and click the newer-looking option. Once visitors land on the page, a displayed updated date reinforces credibility, reassuring them they’re not reading outdated information. This signals to readers (and search engines) that your content is being maintained.
When to Show a “Last Updated” Date
Make sure you include a visible update date when:
- You publish content about evolving standards, laws, or regulations
- You’re in a fast-moving industry like tech, healthcare, compliance, etc.
- Your competitors keep their content regularly updated
- You want your blog posts or resources to look current and trustworthy
We get it, it can be tough to update your content regularly, and with those old dates showing up, your content may look outdated even if the information is still valid. In these cases, you may choose to hide the visible date.
How to Show Dates on Your Dirigible Site’s Content
We recommend including both structured data (on the backend) and a visible date (on the frontend) to keep content aligned with SEO best practices. With your Dirigible site, we’ve conveniently built-in date data to always be included in the structured metadata so that you don’t have to worry about backend visibility.
To add or update a visible date:
- Open the post or page on your Dirigible site.
- Looking at the right Settings Panel, update the Publish line near the top and update the publish date as needed.
- Scroll down to the Display tab and set Post Meta to “Show” to display the publish and/or last updated date on the frontend.
- If your content is infrequently updated, you can select “Hide” here instead.

- Save and/or publish your changes.
Don’t Let Your Content Go Stale
Adding a visible “last updated” date is one of the simplest ways to signal your content as fresh and credible to both search engines and your readers. It can be the difference between getting the click or getting overlooked in competitive search results.
With Dirigible, you have the tools to keep your content and your site looking sharp, current, and SEO-friendly. If you’re regularly updating blog posts or refreshing key pages, displaying that date shows your audience that you’re paying attention. So add those dates, make those tweaks, and stay ahead of the curve.
Why does my Dirigible website builder domain name look funny?
Dirigible needs a place for your site to live even when you haven’t attached a domain to your site yet.
These are temporary URLs that will change when you finally launch your site.
These urls serve as a staging URL that allow you to share your site for feedback before it’s attached to your actual domain name.
It also lets you spend time editing and getting your site ready for launch, before you’re actually receiving traffic. When you are ready to launch, you an add your official domain name to your site!
These urls will look something like https://sitename.xx.getdirigible.com, where xx is a letter and a number.
Why Should I Purchase a Domain Name?
Look more professional with a domain name.

Having ownership of your domain name has many benefits from granting you control to helping build credibility for your business. It generates brand awareness and makes it easier for people to look for you. Additionally, protects your domain copyrights and trademarks.
What is a domain name?
Your domain is what people type into their browser in order to visit your site. For example, “dirigiblestudio.com” or “google.com”. Think of your domain name as a street address, it is how someone navigates to your location, or in this case, site.
Each domain name is unique and, technically, it’s linked to an Internet Protocol (IP) address, which is a string of numbers. Since numbers are hard for humans to remember, domain names were introduced to replace them.
What should my domain name be?
Keep your domain name short and sweet. It is something that you want people to be able to remember and that relates to your business. So use your business name, or keywords that relate to your craft, or include your location if you only serve a specific area. With that said, it is also a good practice to avoid uncommon words or characters as that will make it hard for your visitors to remember.
How do I purchase one?
To register your domain name you will need to set-up an account with an accredited registrar (i.e Name.com, GoDaddy). Then you will be asked to pay for the domain. Once paid, you will then be designated owner of that domain. It is important to keep in mind that you are not an owner for life, but rather a renter and in order to remain the owner of that domain, you will have to renew after a set amount of time.
Purchasing your domain name will help grow your business and give you security in ownership.
WordPress’s Media Library 101
Managing your site’s media
The Media Library is your best friend when it comes to storing and saving the files you put on your website. This is where you can find all of your uploaded photos, videos, documents, etc. that you have placed on your site. In the Media Library you can view, search, and make changes to your uploaded files. We want to help you get familiar with the Media Library and overall help with the look of your site when it comes to uploading media.
In this post we will cover:
- How to get to your Media Library
- How to upload new media to your library
- How to edit the metadata of your files
- Examples of blocks with media that you can utilize on your own site!
How to get to your Media Library:
- In your Dashboard, scroll down and click on Media > Library.


- When in your Media Library, there is a bar at the top to organize or filter your media.
- Your library items can be displayed in List Mode or in Grid Mode (the screenshot above is in Grid Mode).
- This next drop down menu allows you to filter for a specific type of media: All media items, Images, Audio, Video, Documents, Spreadsheets, Archives, Unattached, and Mine. This is helpful if you are looking for a specific format of media.
- The dates drop down menu helps you filter your library by timeframe. You might use this one if you are looking for a specific series of photos that you remember uploading this time last year.
- If you are looking to filter based on location of files, use this drop down menu.
- The last drop down menu lets you select between public versus private files.
- Clicking on Bulk select allows you to select multiple files in your Media Library. Very useful if you are needing to delete a lot of your media at once.
- Note: if you are in List Mode the Bulk select button instead says Filter, which you would click after making your drop down menu selections to search.
- Lastly, use the search bar if you remember the name of the file you are looking for.
How to upload new media to the library:
- Any piece of media or file that you upload onto a page or post on your WordPress site will automatically be saved and stored in the Media Library. You can keep uploading your files that way, but you can also upload directly into the Media Library if you click the Add New button at the top of the page.
- You can additionally upload media directly from the dashboard by clicking Media > Add New
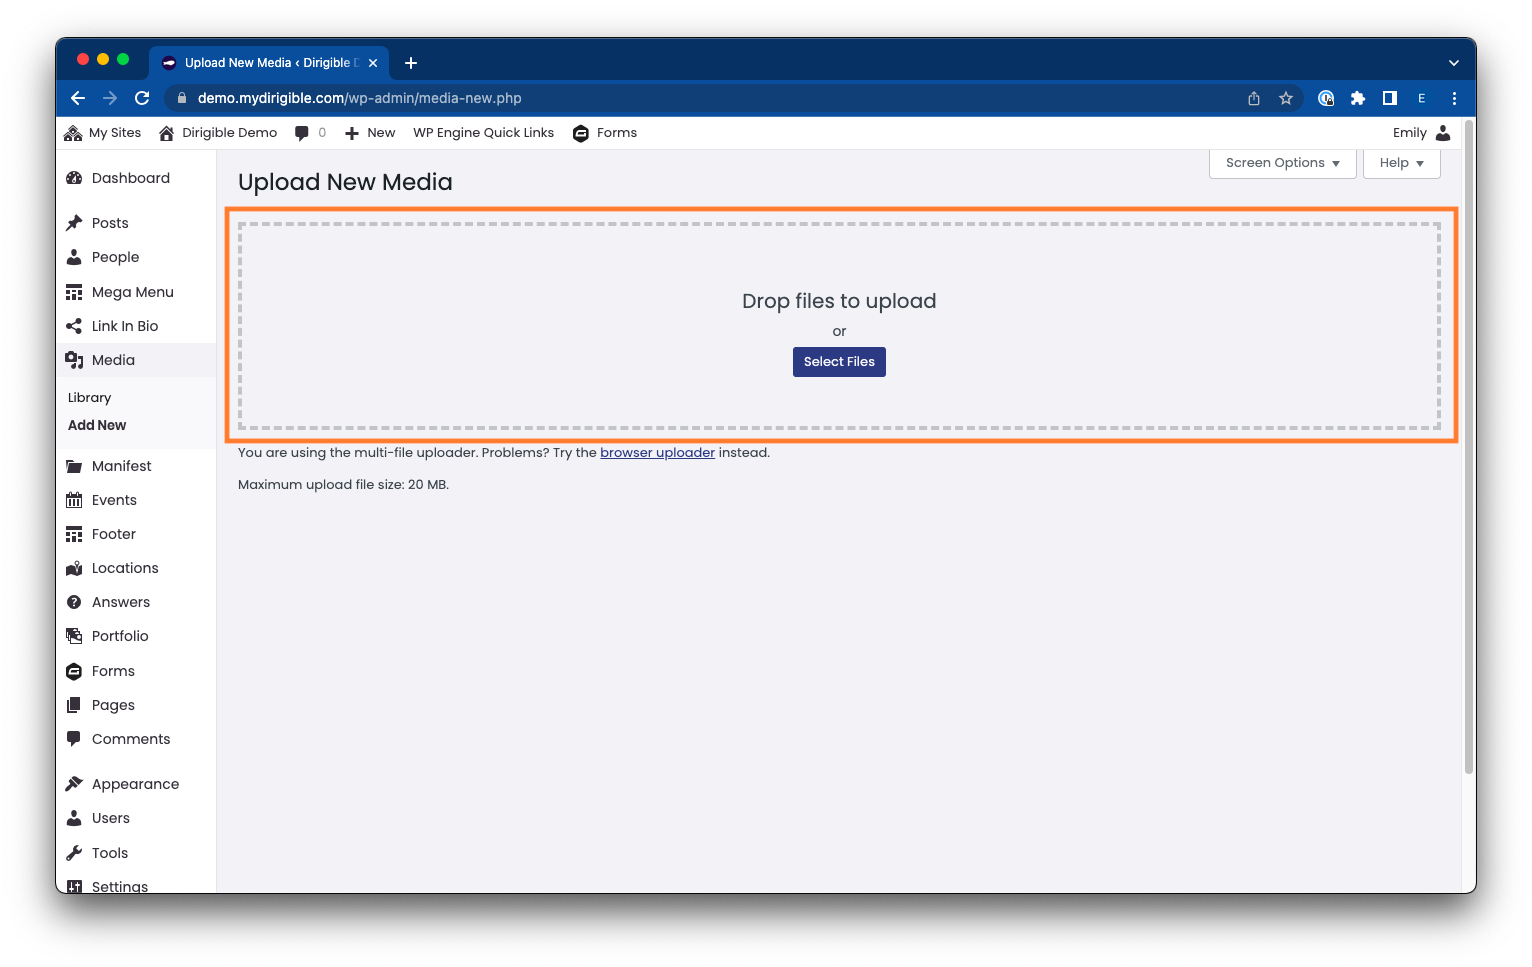
- Now you can drag and drop your files into the dashed box that pops up. You also have the option to browse your computer to upload a document if you click the Select Files button.
How to edit the metadata of your files:
- In your Media Library, images, videos, documents, and audio files have textbox fields where you can add or edit the information when you click to open up the media: Title, Caption, Alt Text (only for images), and Description.
- After selecting your file and clicking to open it you can add or edit to any of these text boxes to add more information to your file.
- Note: You can also view a file’s URL here just under the Description textbox.
- Note: You are also able to delete files here if you scroll to the bottom of the media window and click Delete permanently. This is better than the bulk selection method if you are just looking to delete one file.
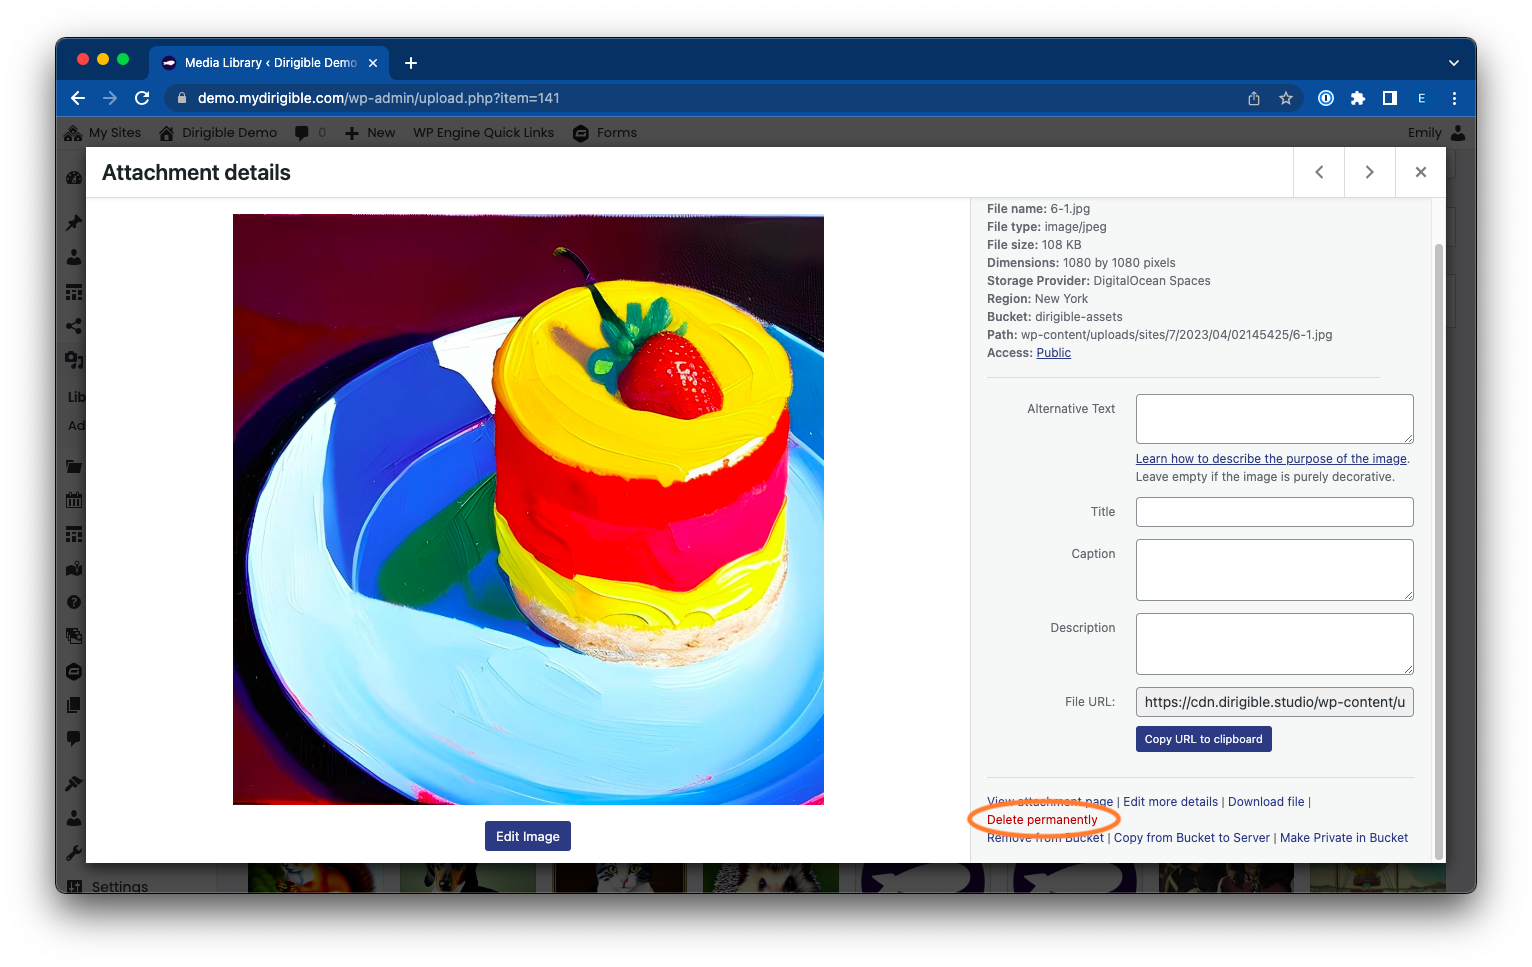
Examples of blocks with media:
Hero Block

Yearbook Block

Video Gallery Block

Vignette Block

Gallery Block
To see more examples or to get a more in-depth usage of blocks, visit our Blocks page here.