

Knowledgebase: Setup
Adding social media links
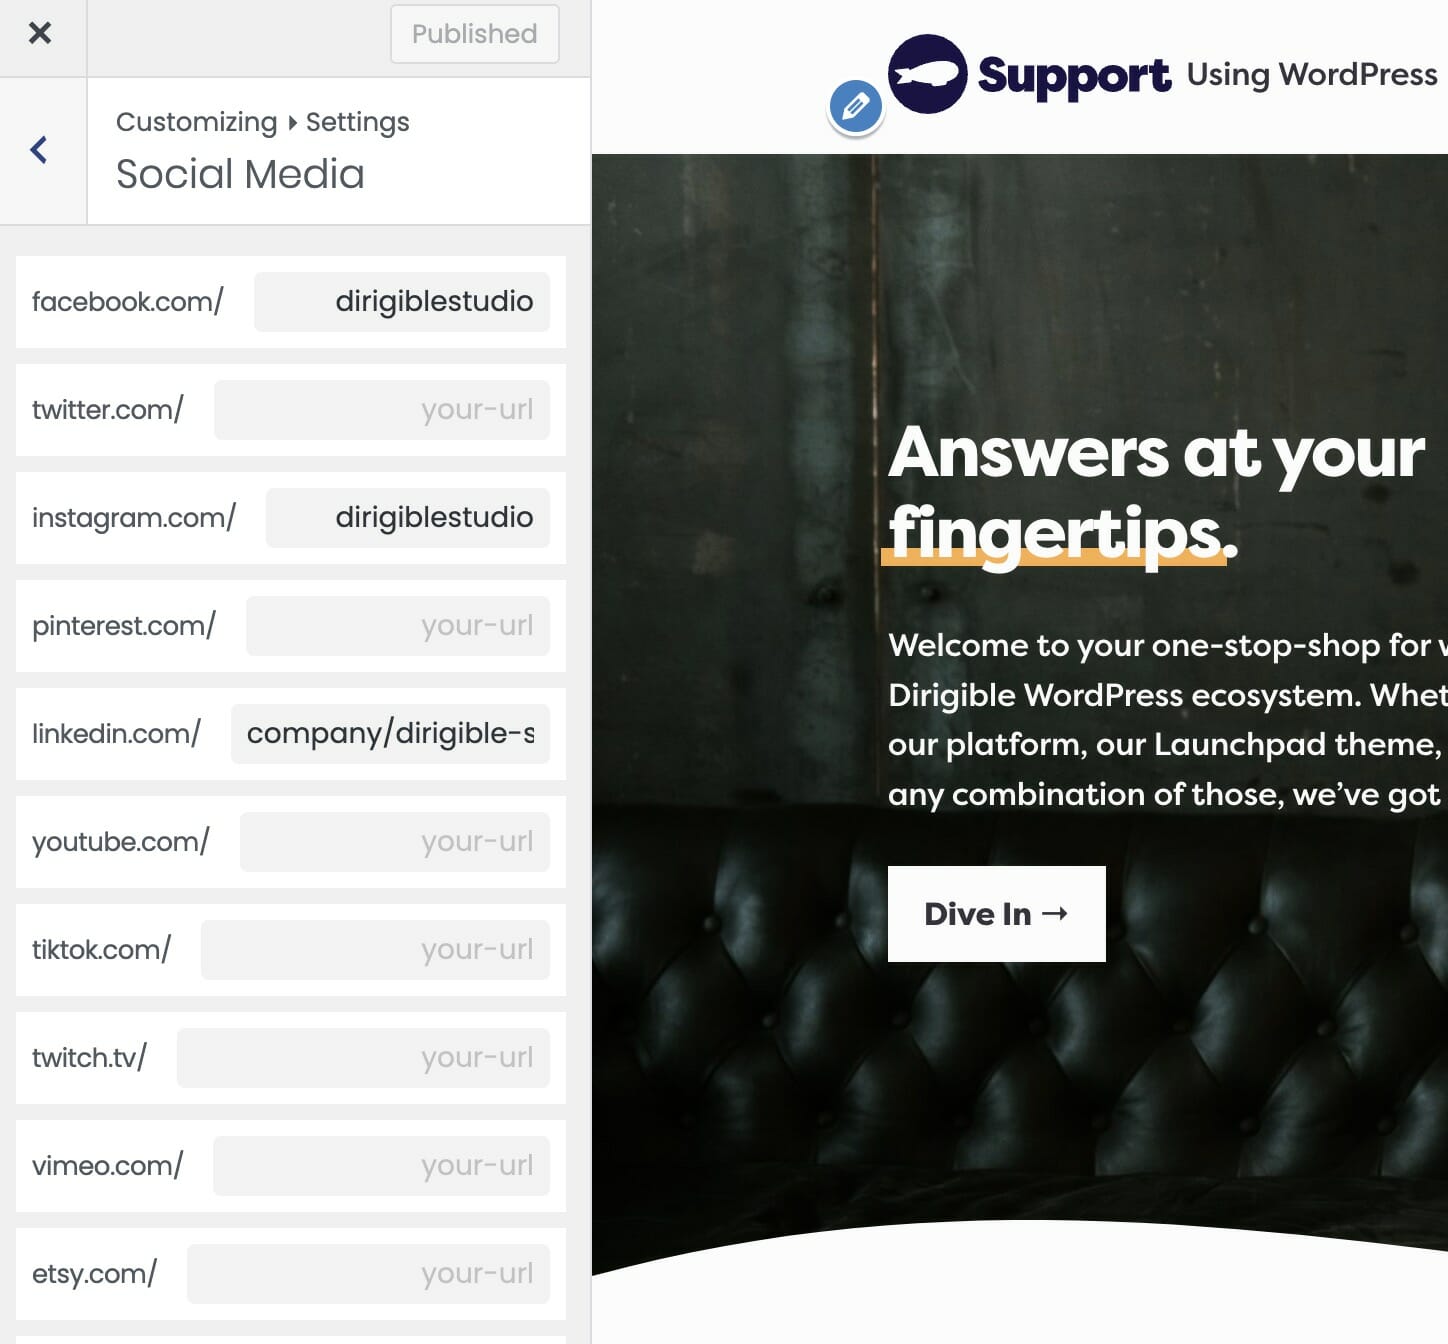
You can define your social handles in the Customizer. By defining them here, you can easily display them in your Header, Footer, Utility Bar, or anywhere on your site using our Socials block. When you update your social media here, your social links will update any place they are displayed.
You’ll find the social media settings under Appearance → Customize → Settings → Social Media. All you have to do is enter your handle, the link will be populated automatically.
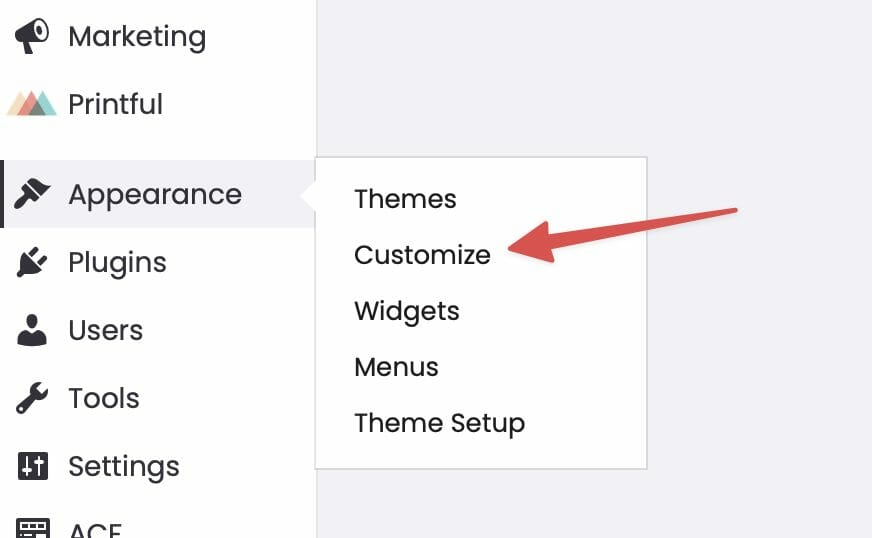
In order to display your social media, you’ll have to enable the respective setting in the Customizer. The settings can be found at the following places:
Header: Appearance → Customize → Header & Menus → Desktop → Show Socials
Footer: Always Shown
Utility Nav: Appearance → Customize → Header & Menus → Utility Nav → Social Media
To display your social media on a page, you can use the Socials block. From there, you can change the alignment, size, and color of the icons. Happy editing!

GA4: How to Set Up Events (Advanced)
Certainly! Here’s a step-by-step guide to setting up advanced event tracking in GA4 using Google Tag Manager (GTM) to capture additional data:
- Ensure that you have set up the GA4 configuration in Google Tag Manager. Go to “Tags” and create a new tag. Select the GA4 Configuration tag type and enter your Measurement ID, which can be found in your Google Analytics installation under Admin > Data Streams.
- Preview the page where you have the GTM tag installed. This will allow you to develop and test the event tracking.
- Identify the event you want to track. For example, if you want to track a button click, click on the button on the page.
- Use the GTM Debug view to see the events that have been tracked. Look for the event labeled “gtm.linkClick” in the left-hand side data layer.
- Enable additional variables to capture more data. In GTM, go to “Variables” and configure the variables you want to track. Check the boxes for elements like element classes, element ID, element target, element URL, and element text.
- Define a trigger for the event. In GTM, create a new trigger and select the appropriate trigger type. For a button click, you can use the “Click – All Elements” trigger type.
- Configure the trigger conditions based on the data layer variables. Specify the relevant values for elements like click classes, page path, and click URL. This will ensure that the trigger fires only when the specified conditions are met.
- Test the trigger by clicking on the button again. Use the GTM Debug view to verify if the trigger fires and the event is captured.
- Once the trigger is working correctly, create a new GA4 tag in GTM to send the event to GA4. Configure the tag to use the event name, such as “conversion_button_click,” and associate it with the trigger you created.
- Save and publish the changes in GTM.
- Use the GTM Debug view and GA4 to verify that the event is being sent successfully. You should see the event labeled as “conversion_button_click” in the GA4 debug view.
- If desired, you can mark the event as a conversion in GA4 by creating a conversion event for the “conversion_button_click” event.
By following these steps, you can set up advanced event tracking using GA4 and GTM, capturing additional data from button clicks or other interactions on your website.
If you have any further questions, feel free to ask.
GA4: How to Set Up Events (Basic)
Here’s a step-by-step guide to setting up Google Analytics for conversion goals and custom events using the new Google Analytics and Gravity Forms, along with a thank you page for your Gravity Forms:
- Make sure you have a thank you page set up for your form. Open the thank you page and note its URL.
- After setting up Google Analytics and confirming that it’s connected, go to the Events section in Google Analytics.
- Click on “Create Event” and provide a custom event name. Use a descriptive name in lowercase letters with underscores to represent the event you want to track. For example, “contact_page_view” for the contact thank you page view.
- In the “Event conditions” section, select “Page view” as the event name. This means that when a user views the specified page, the event will be triggered.
- In the “Event conditions” section, set the “Page location” to “contains” and enter the unique path of the contact thank you page. This ensures that the event is tracked only when a user lands on that specific page.
- Create the event, and it will appear in the custom events list. Note that the event may not show up until it has occurred, typically after the site has received some traffic.
- Once the event appears in the custom events list, there will be a toggle on the right side. Click on “Mark as conversion” to indicate that it is a conversion event.
- The conversion event will then be listed in the conversions section of Google Analytics.
By following these steps, you can track conversions and custom events for your forms using Google Analytics and Gravity Forms, specifically targeting the contact thank you page. This method allows you to monitor analytics and gather insights on form submissions and conversions.
If you have any further questions, feel free to ask.
GA4: How to Set Up Events (Intermediate)
Here’s a step-by-step guide to setting up advanced event tracking in GA4 and Google Tag Manager, including tracking intra-site movement between pages using GA4 and creating a custom event:
- Start by setting up Google Analytics 4 (GA4) and Google Tag Manager (GTM) for your website.
- Open the debug view in GA4 to test and monitor events. Go to “Configure” and select “Debug View.” This view allows you to see the events triggered on your site.
- Install the Google Analytics Debugger extension from the Chrome Web Store. This extension provides detailed information about the events triggered on your site.
- Refresh the page to see the events in the debug view. You should see the events being triggered by conversion events.
- Set up the intra-site movement tracking using GA4. Create a new event in GA4 and name it something like “analytics_test_conversion.”
- Define the event conditions for the intra-site movement tracking. Set the event name to “Page view” and add another condition for “Page referrer” with the value of the original page link.
- Create the event and go back to the debug view. Navigate from the original page to another page and check if the event is triggered in the debug view.
- Next, set up button click tracking using Google Tag Manager (GTM) for more granular tracking. Create a new trigger in GTM to track the button clicks.
- Set the trigger type to “Click” and define the specific button element or CSS class that you want to track.
- Create a new GA4 tag in GTM to send the button click event to GA4. Configure the tag to send the event data to GA4 when the trigger is activated.
- Save and publish the changes in GTM.
- Test the button click tracking by clicking on the specified button. Use the debug view and Google Analytics Debugger extension to verify if the event is triggered and sent to GA4.
- Once the events are working correctly, you can mark the conversion event as a conversion in GA4. Go to the conversions section in GA4 and mark the event as a conversion event.
By following these steps, you can set up advanced event tracking in GA4 and GTM, including tracking intra-site movement between pages and button clicks. Debugging with the debug view and the Google Analytics Debugger extension will help ensure that the events are triggered correctly.
If you have any further questions, feel free to ask.
Get a Google Maps Key
So your maps aren’t working? Chances are you need an API Key.
In the good old days, you could use Google Maps pretty much anywhere, anytime. That recently changed, and in order to show a Google Map on your site, you’re going to need to get an API Key. This can be a little daunting, so we’ve made a video explaining exactly how to do it.
Hello, everyone! My name is Jake from Dirigible Studio, and today I’ll guide you through the process of acquiring a Google Maps API key. This process can be a bit technical, as Google made changes in 2018 regarding how maps are displayed on websites. However, if you provide us with the necessary credentials or billing information, we can handle the account setup for you, making it the easiest and fastest option. If you prefer to maintain control and set everything up yourself, I’ll walk you through the process step by step.
- Sign up for a Google Maps API account by visiting the Google Maps API website.
- Click on “Get started for free” to create an account and set up billing information.
- Access your console by logging into your Google Maps API account.
- In the console, click on “New project” in the top left corner.
- Provide a name for your project, such as “API Key Demo,” and create the project.
- Go to the “APIs & Services” section in the console and select “Library.”
- Enable the “Maps JavaScript API” by searching for it in the library and clicking on the “Enable” button.
- Return to the library and enable the “Geocoding API” using the same process.
- Navigate to the “Credentials” section in the console.
- Create a new API key by clicking on the “Create credentials” button.
- Give the API key a name, such as “Demo Key,” and click “Create.”
- Once the API key is generated, copy it to your clipboard.
- Restrict the API key by going to the “HTTP referrers” section and specifying the allowed website(s) or URL(s) that can use the key.
- Save the API key and make sure to select the Maps JavaScript API and Geocoding API for the key’s restrictions.
- Copy the API key to use it in your website’s installation or launchpad installation.
- If you encounter any issues or see a different-looking Google Maps area, consider reaching out to us for assistance.
- To resolve common issues, go to the general dashboard, access the billing section, and create a billing account for the project.
- Enable billing for the project to ensure the maps display correctly.
- Insert the copied API key into your website’s code or designated section to integrate Google Maps.
- Test the functionality by entering an address or location to see the map display on your website.
- If you have any questions or difficulties, feel free to contact us for further assistance.
I highly recommend letting us handle this process for you as it is much easier. The Google dashboard can be confusing and not very user-friendly. However, if you have any questions or run into any troubles, don’t hesitate to reach out to us. Thank you very much!
How do I change my colors?
Need to change your color palette? Look no further! For more details on the customizer visit Customizing Styles.
Hello everyone! My name is Jake, and I’m a partner and developer at Dirigible Studio. Today, I’ll show you how to make simple color changes using the Customizer in Dirigible. Let’s get started:
- Go to the Customizer by clicking on “Customize” in the WordPress admin bar or by navigating to “Appearance” and selecting “Customize.”
- In the Customizer, find the “Styles” section and click on it.
- Within the “Styles” section, locate and click on “Palette.” This is where you can change various colors on your site.
- Scroll down to view the different color options available in the palette.
- For example, let’s change the “Secondary” color, which is often used for buttons on your site.
- Adjust the sliders or color pickers to select a different shade or hue for the secondary color. You can make it more vibrant or less pastel, depending on your preference.
- As you make changes, you’ll notice that the colors on your site update in real-time, allowing you to preview the changes.
- Continue making adjustments until you’re satisfied with the new color.
- Next, you can modify the “Accent” color, which is used in various elements throughout your site.
- Similarly, use the color picker or sliders to select a different shade or hue for the accent color.
- Preview the changes on your site to see how they look.
- Once you’re happy with the new colors, click on the “Publish” button to make the changes live on your site.
- Until you publish the changes, they will only be visible to you, allowing you to experiment and make adjustments without affecting the live site.
- That’s it! You’ve successfully changed the colors on your site using the Customizer’s palette menu.
- Remember, you can modify other colors as well to ensure a consistent and cohesive look throughout your site.
I hope this guide helps you customize your site’s colors easily. If you have any further questions, feel free to ask. Thank you!
How to Set up Google Search Console
The Google Search Console is a free tool that will become your primary communication with Google. Not only this, but the Google Search Console also helps optimize your visibility on Google Search and gives you statistics on your rankings. It can also help monitor potential penalties or identify errors that could affect your rankings. You only need to set it up once per domain. However, you need to do it every time you create a subdomain or add a new protocol. (For example: migrating to https://)
To sign up for the Google Search console, you first need to go to https://search.google.com/search-console/ and log in with your Google Account. Next, Google will ask you to “Select a property type” and you want to select “URL prefix.” It is important to note that your URL is exactly as it appears in the URL bar. Once you submit this information, you’ll be prompted to authenticate your account.
You’ll want to choose the HTML Tag method of verifying ownership of your domain.

You will then go to your site’s customizer, section, and copy and paste that code onto your site.
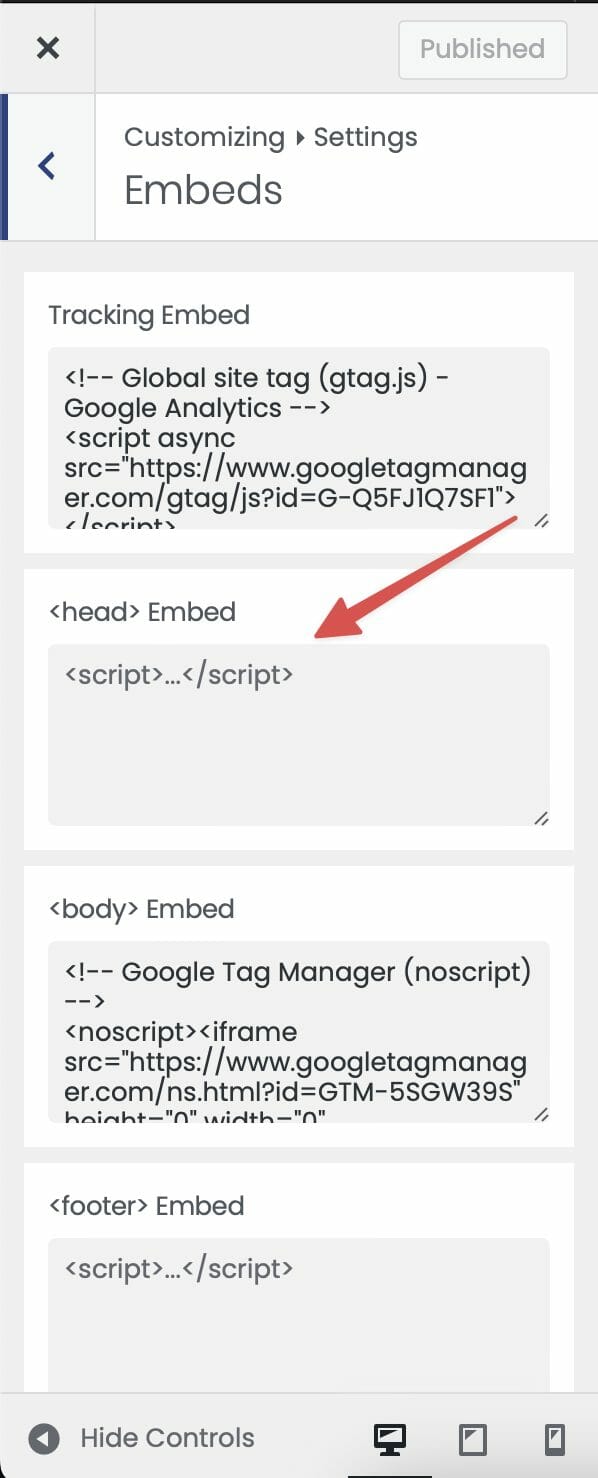
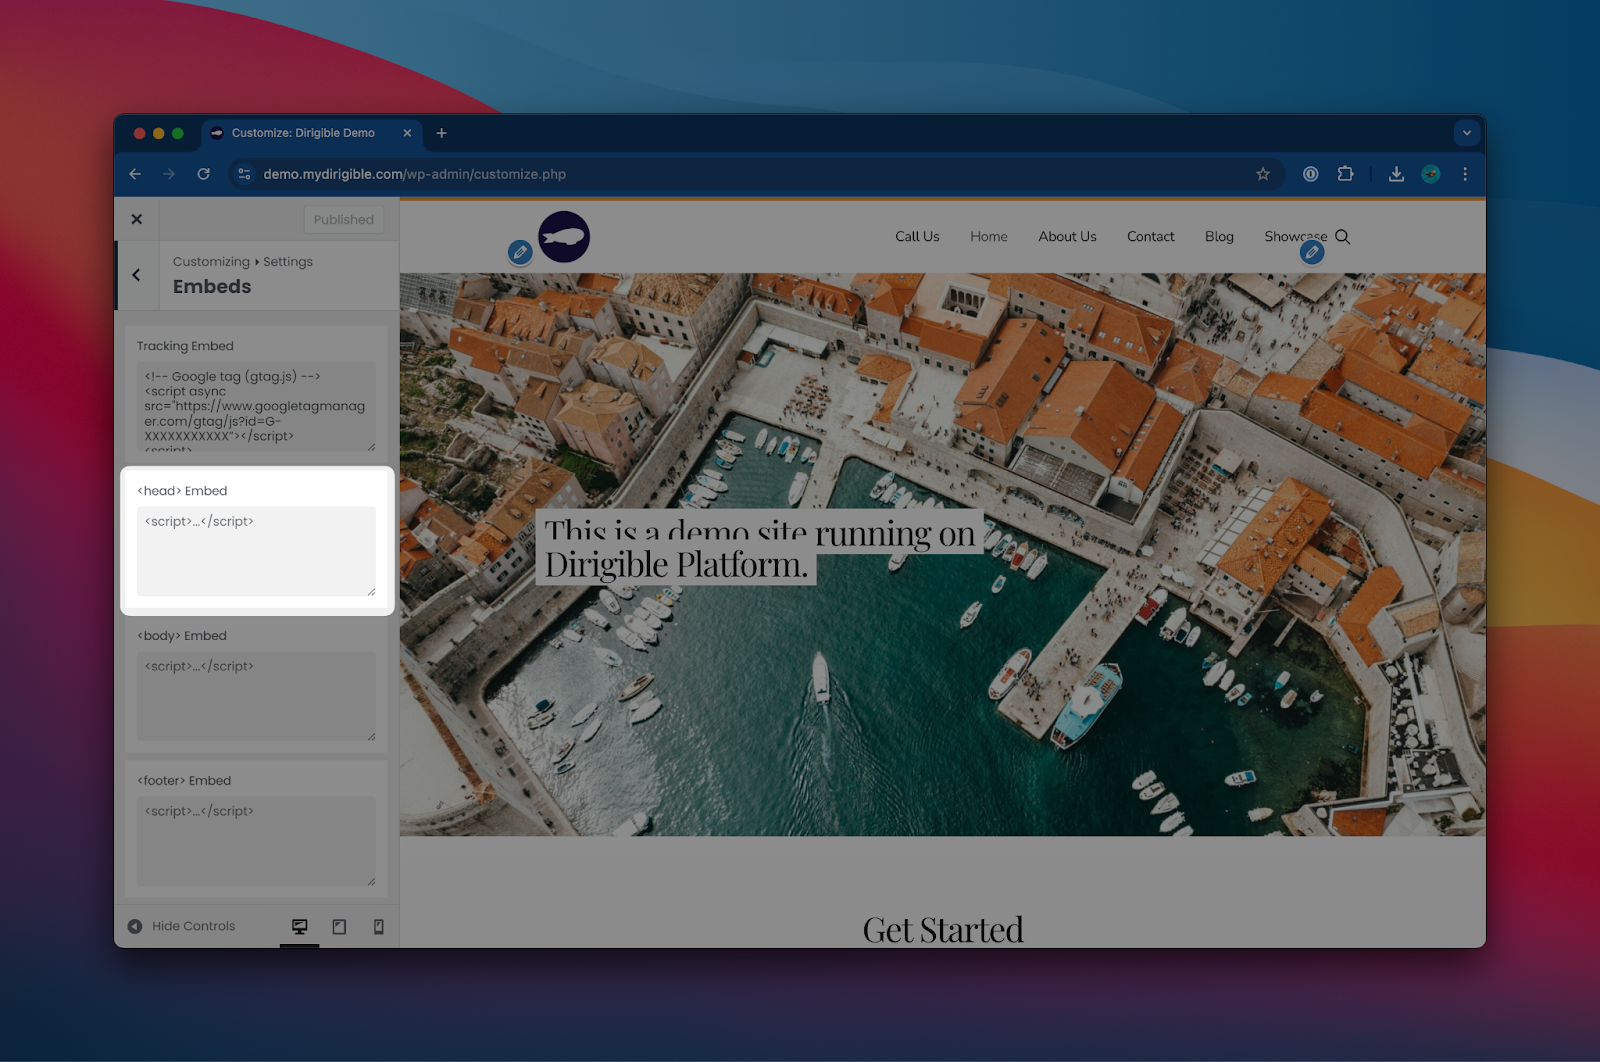
Go to Appearance > Customize > Settings > Embeds:
And paste the meta tag in the <head> Embed field:
You may need to allow your site’s cache to refresh before that tag will show up on your site, so allow up to 24 hours if your site doesn’t verify immediately!
How to Verify Site Ownership in Google Search Console Using an HTML Tag
Verifying your website with Google Search Console is a crucial step to monitor and enhance your site’s performance on Google Search. By confirming ownership, you gain access to valuable insights and tools that can help optimize your site’s visibility and user experience.
Why Verify Your Site?
Google Search Console provides detailed reports on your site’s search traffic, indexing status, and potential issues. Verifying ownership ensures you have full access to these features, enabling you to make informed decisions to improve your site’s performance.
Verification Methods
There are several methods to verify site ownership in Google Search Console, including:
- HTML File Upload
- Domain Name Provider
- Google Analytics Tracking Code
- Google Tag Manager
- HTML Tag
Among these, we find adding an HTML tag to your site’s <head> section the most straightforward approach.
How to Verify Using an HTML Tag
- Sign in to Google Search Console:
- Navigate to Google Search Console and sign in with your Google account.
- Add Your Property (or Navigate to Your Existing Property Needing Verification:)
- Click on Add Property and enter your site’s URL in the URL prefix field.
- Click Continue.
- Select HTML Tag Verification:
- In the Verify ownership section, select the HTML tag option.
- Copy the provided meta tag.
- Insert the Meta Tag into Your Site:
- Log in to your site’s dashboard.
- Navigate to Site Settings.
- Go to Settings > Embed.
- Paste the copied meta tag into the
<head> Embedsection.
- Click Save or Publish to apply the changes.
- Lastly, return to Google Search Console and click the Verify button.
By completing these steps, you’ll have successfully verified your site with Google Search Console, unlocking a suite of tools to monitor and enhance your website’s performance.
Initial Setup for GA4
Hello and welcome! Today, I’m going to show you how to set up your first GA4 property and install your analytics tag. Let’s get started:
- Go to analytics.google.com and sign in to Google Analytics.
- You might need to do some minor beginner setup tasks, but what we want to do is create a new account.
- Create an account for your personal website. You can leave the default settings as they are.
- This will lead you to create your first property, which will be your first GA4 property.
- Name your property and set the time zone to Central (e.g., Chicago) and the currency to USD.
- The category can be “Arts and Entertainment,” and you can provide additional information about your website.
- Accept the terms and conditions.
- Google has improved the setup process, so we will follow the instructions provided.
- We are setting up a new web platform, so enter your website URL (e.g., oopsjkc.com).
- Check the “Website” box for enhanced measurement. GA4 captures a lot of information automatically, including page views, scrolls, outbound clicks, search queries, video engagement, and file downloads.
- Click “Create Stream” to proceed.
- At this point, Google will inform you that no information has been received yet.
- To continue tracking, click the “Copy” button to copy the global site tag.
- Go to the back end of your website and access the customizer.
- Navigate to settings > embeds and paste the global site tag in the tracking embed area.
- Publish the changes.
- To verify if everything is set up properly, go to “Configure” and then “Debug View.”
- Open Google Chrome and visit your website. In the debug area, you can see the events happening.
- If needed, install the Google Analytics Debugger extension for Chrome to monitor events and ensure proper tracking.
- The debug view will show the page views and other interactions on your site.
- You can use this data to set up events and conversions, allowing you to track how users navigate through your website.
- For more detailed instructions, you can refer to the official Google support documentation on setting up debug mode and installing your Google GA4 tag.
Thank you, and goodbye!
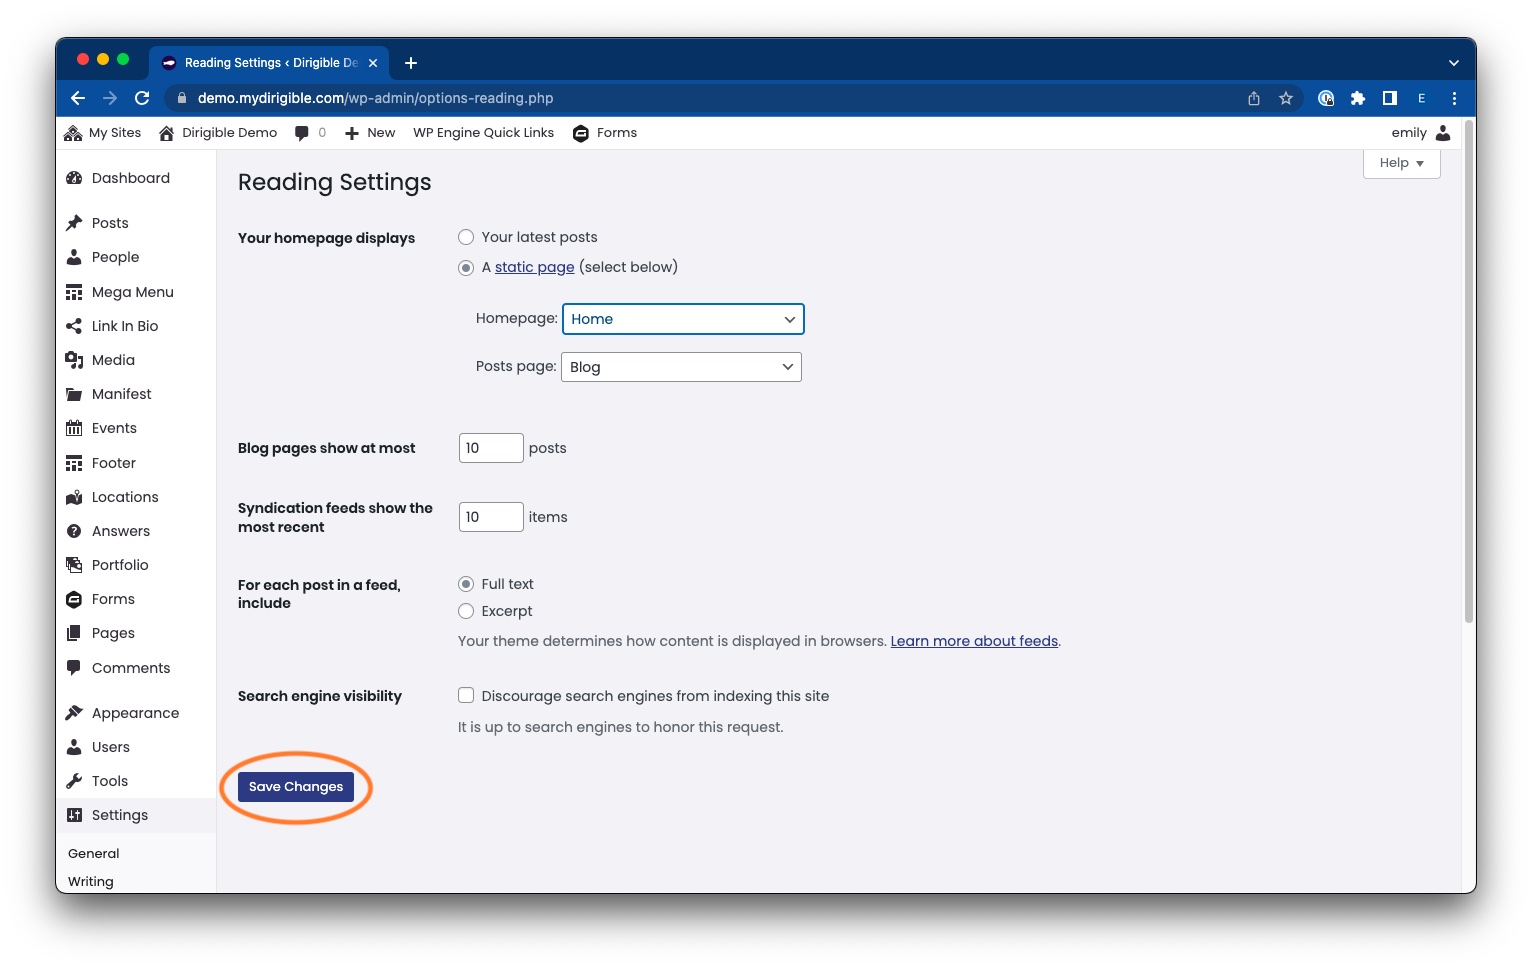
Set Your Homepage in WordPress
Your homepage is the first impression your viewers get of you and your business–it is the first page your visitors will see, so you want to make a good impression! A good homepage grabs people’s attention, while also clearly communicating what your website and business is all about.
Most WordPress themes make your default homepage your most recent blog post. This can be an issue if you don’t have a blog or that’s really not the first thing you want your visitors to see. You might have even deleted your homepage and now WordPress has again set it to the default blog page. Or maybe you want your landing page to highlight an event or reflect the season. There are many reasons and benefits to having a set homepage, and here’s how to do it.
How do I change/set my Homepage in WordPress?
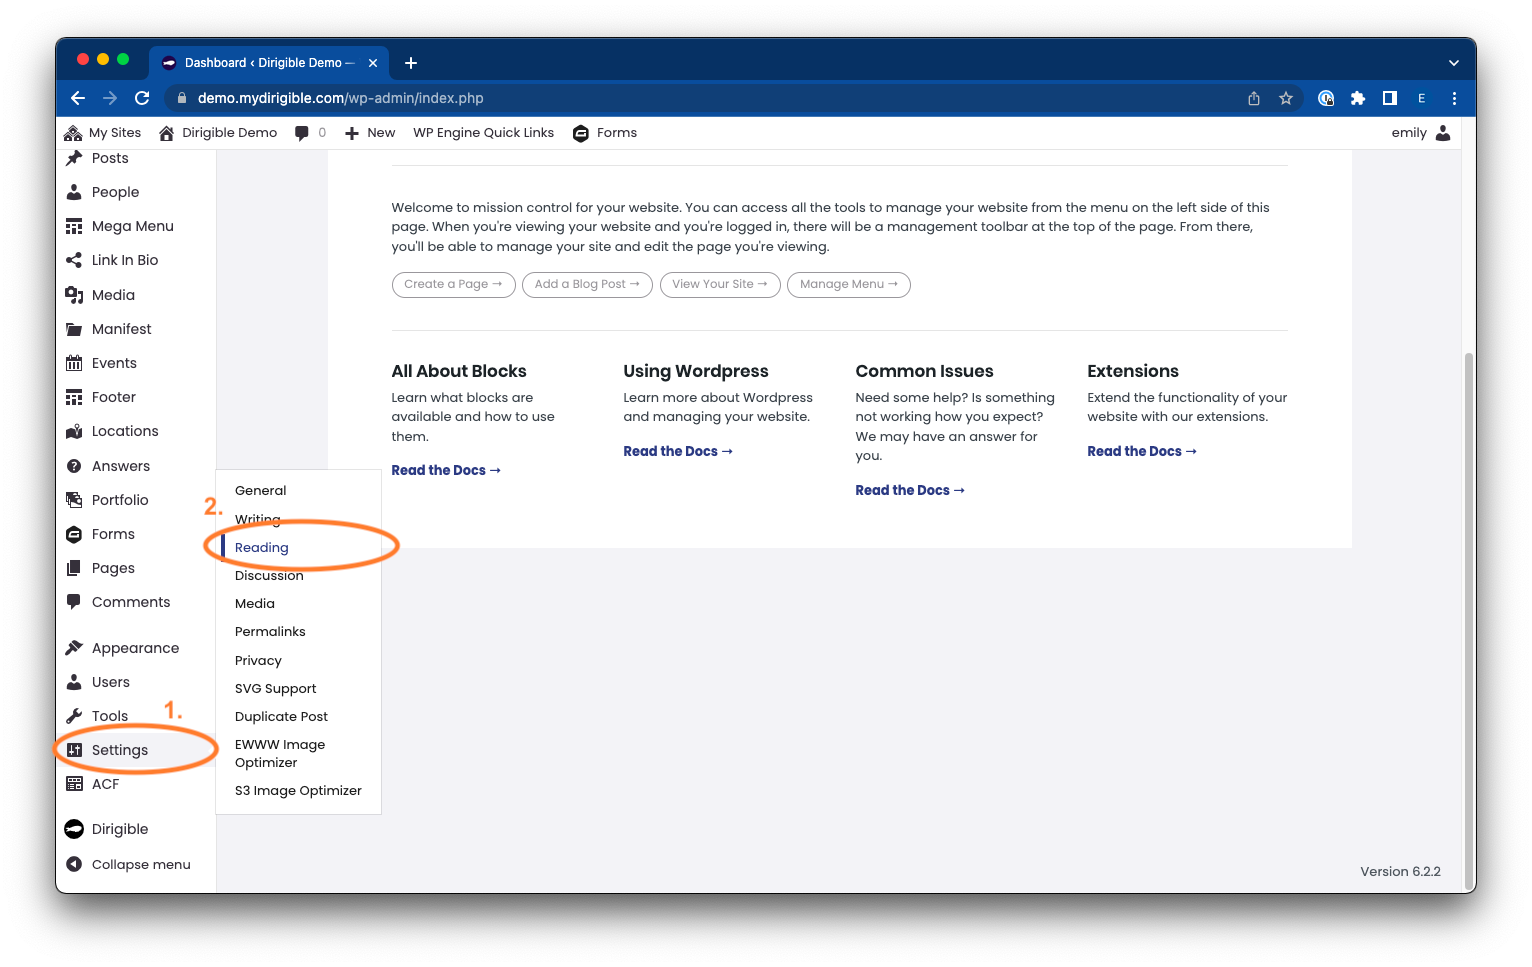
- In the Dashboard, go to Settings > Reading
- To set a specific page as your homepage, make sure A static page option is selected in the Your homepage displays section.
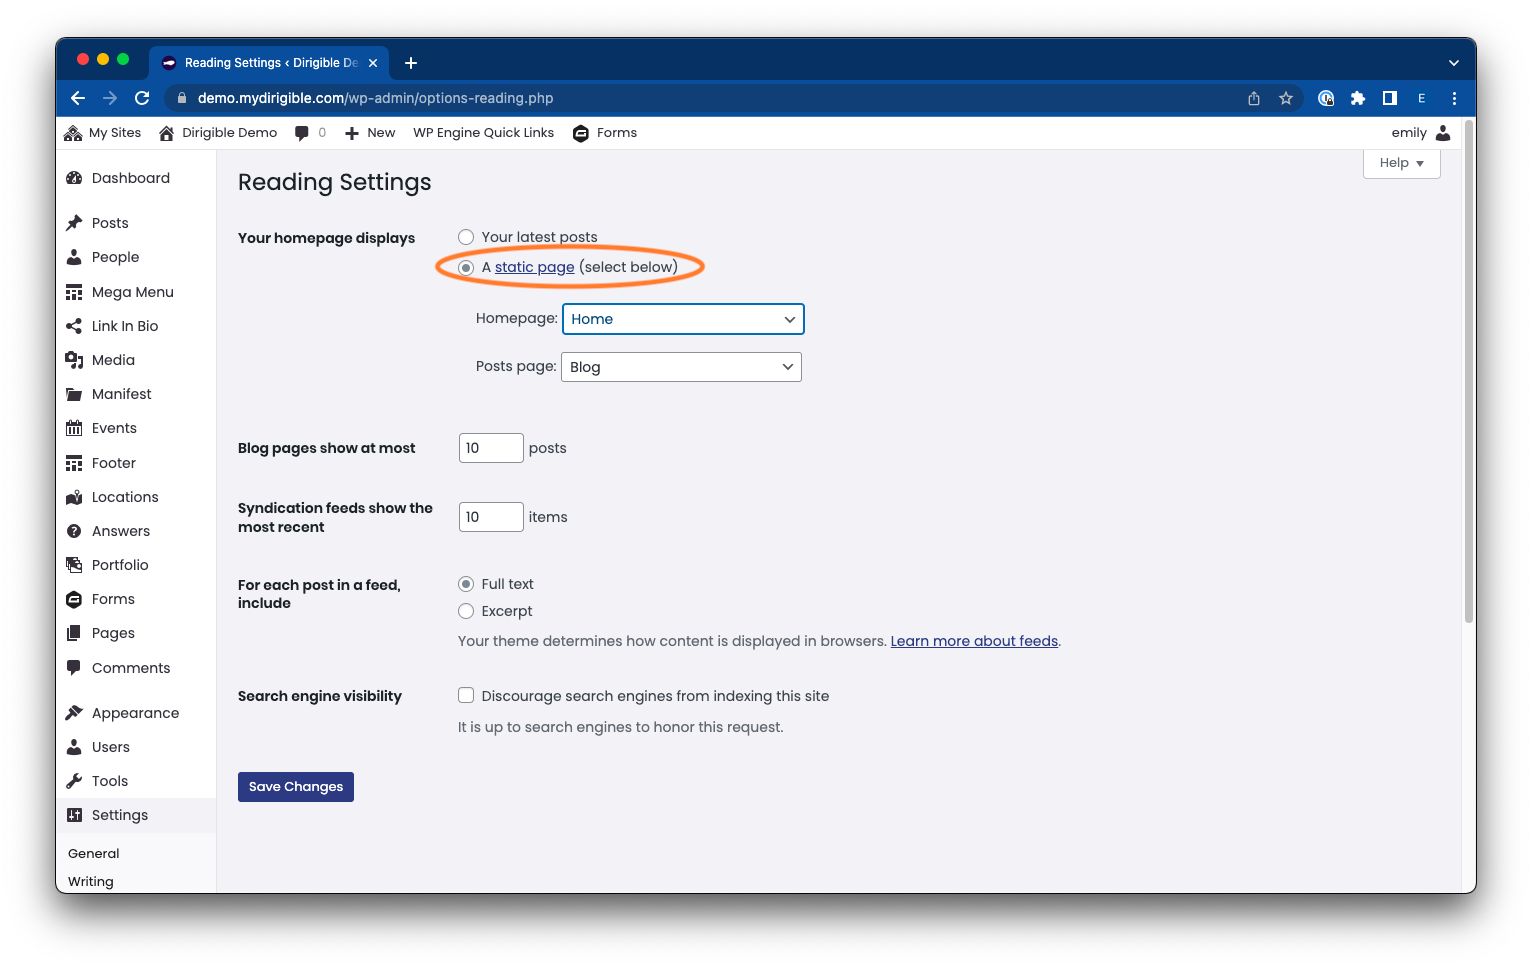
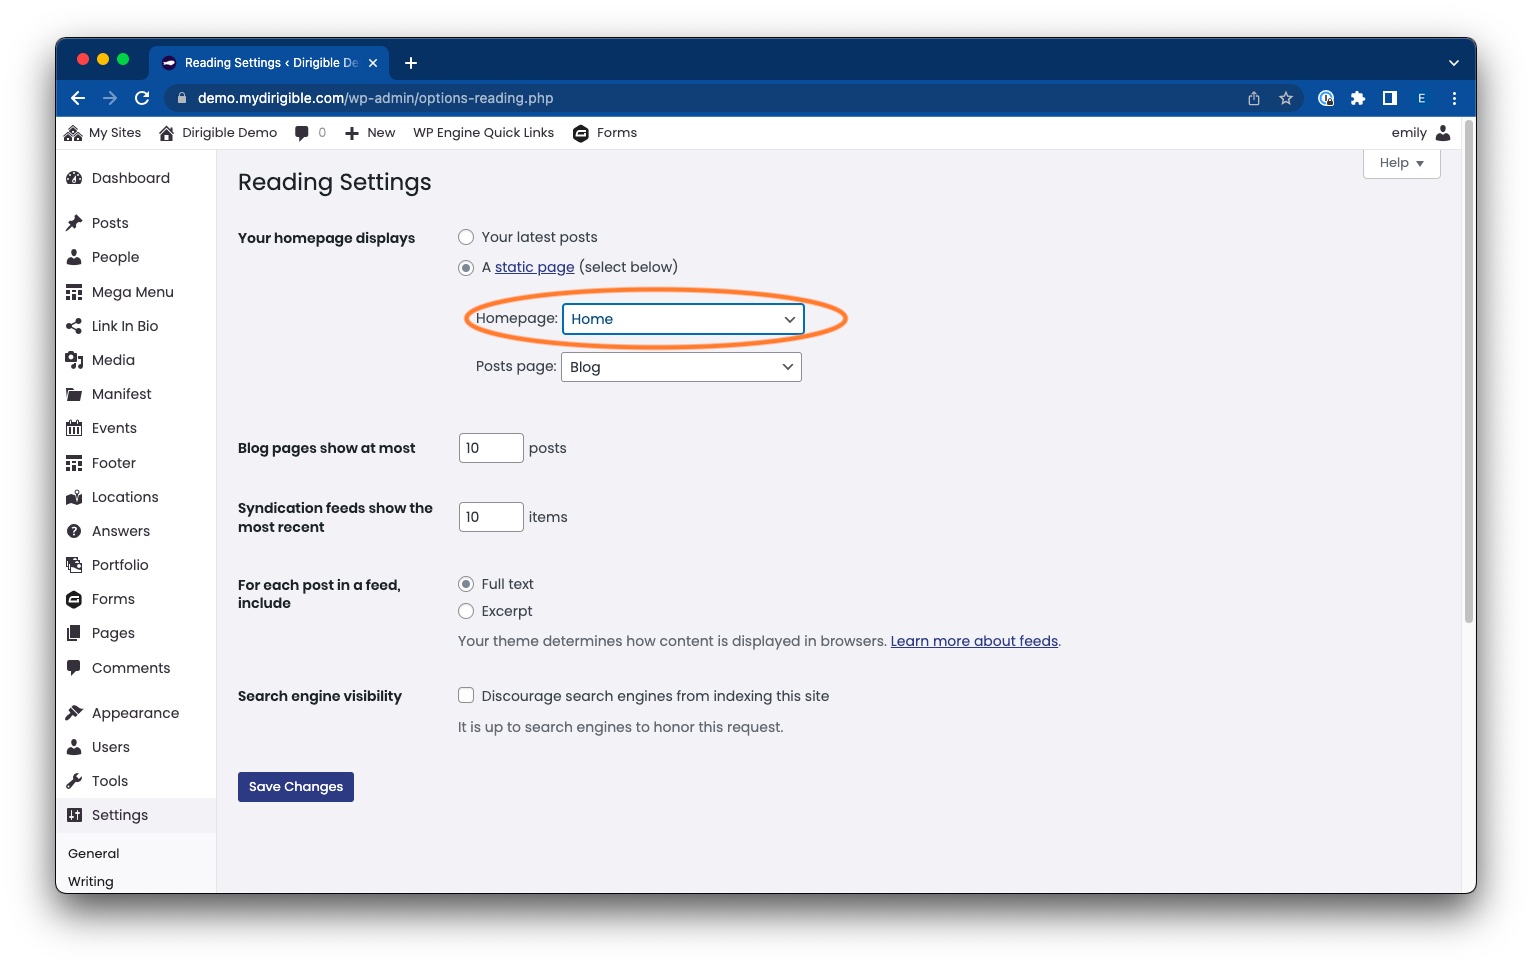
- In the Homepage drop down menu select one of your published pages to be your homepage.
- Lastly, click Save Changes.
Uhh, What is a Favicon and Why Do I Want One?
How to Update Your Site’s Favicon
Do you see that little orange circle with an airship in the top left corner of this tab?
That’s a favicon! They are the little icons of websites that appear on tabs, windows, links, and in your Bookmarks bar. Favicons are everywhere and they are a way of branding. It is also intended to make it easier for users to renavigate to your site when they have lots of tabs open–they can just look for your icon! It is good practice to set a favicon for your website and it is extremely easy to do in WordPress!
How Do I Set/Edit My Site’s Favicon?
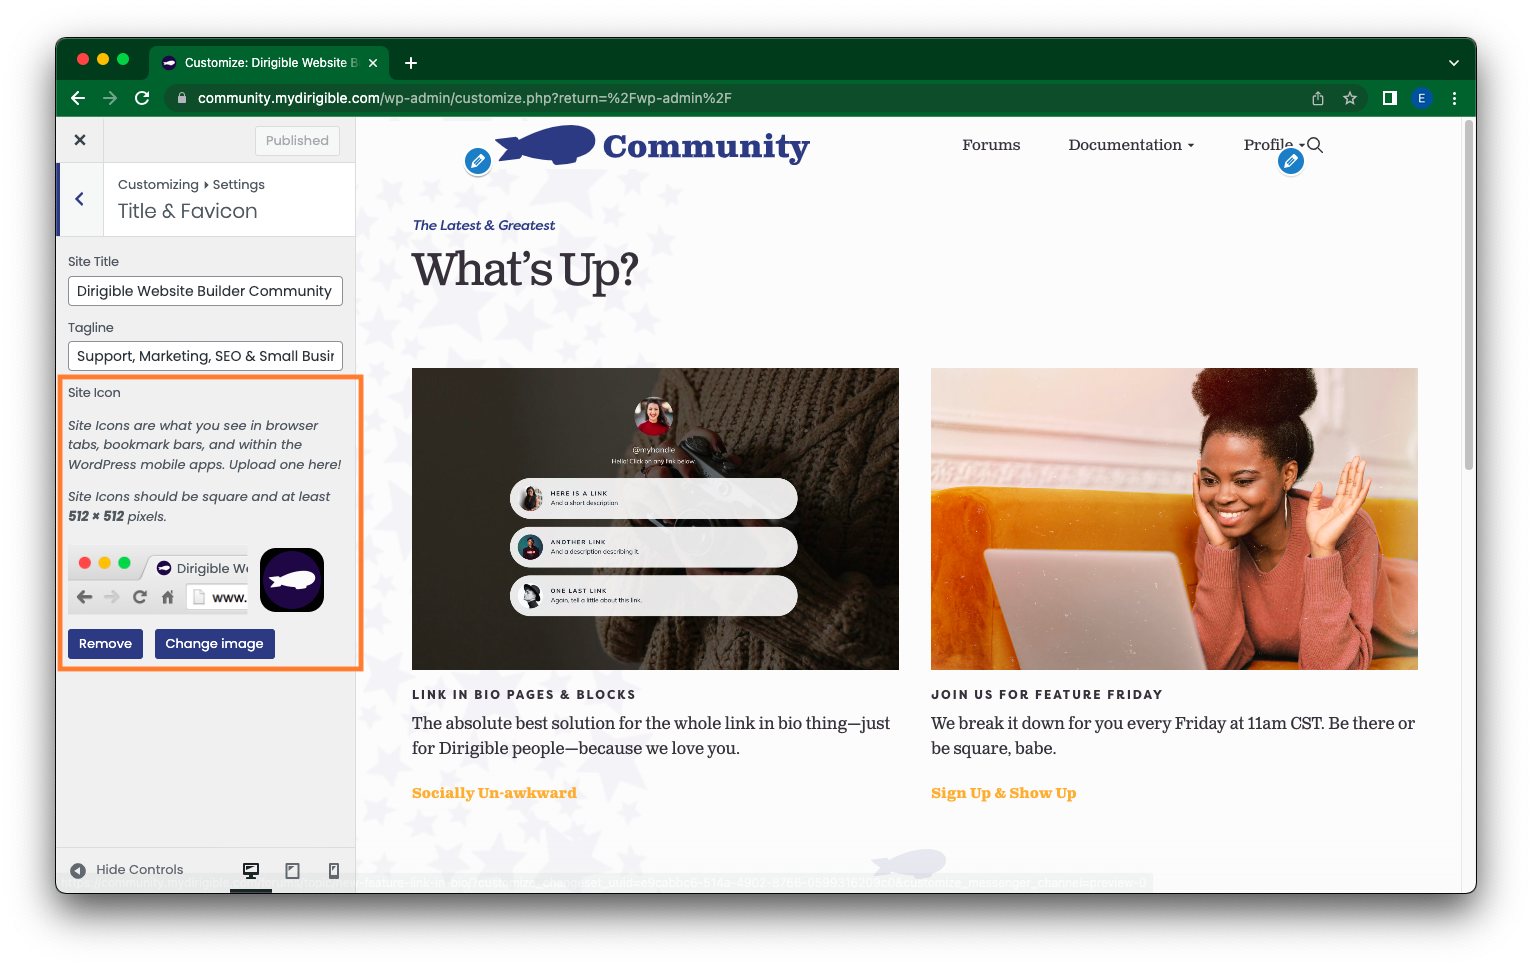
- In your Dashboard, on the left hand-side, scroll down and click on Appearances. Then select Customize.
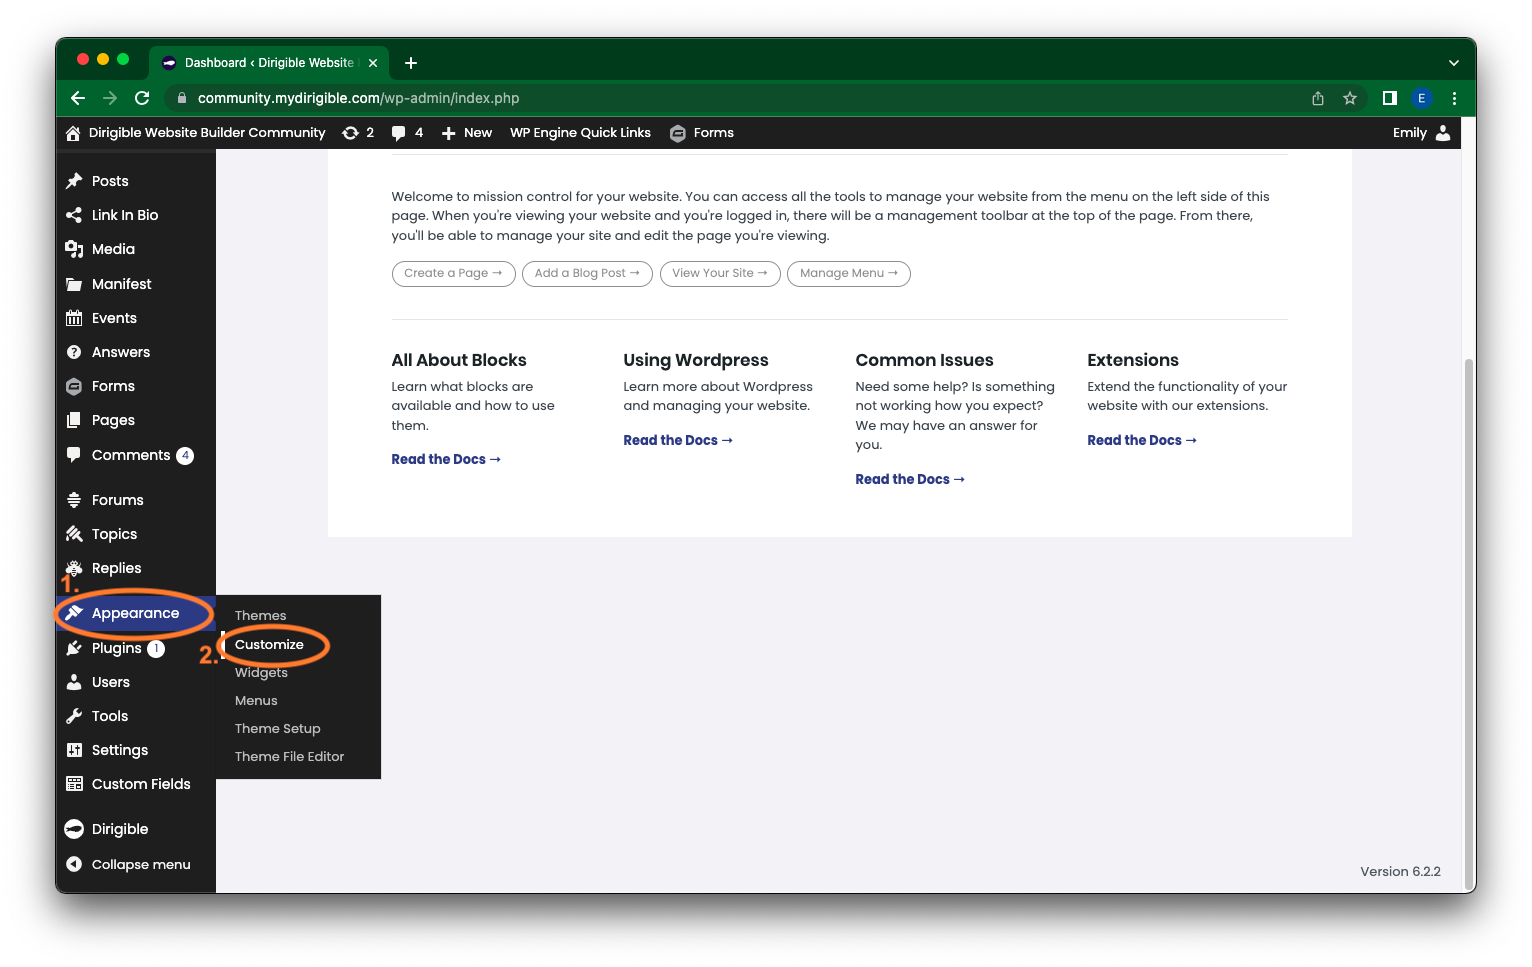
- In the side menu, select Settings.

- Then, again in the side menu, click on Title & Favicon.
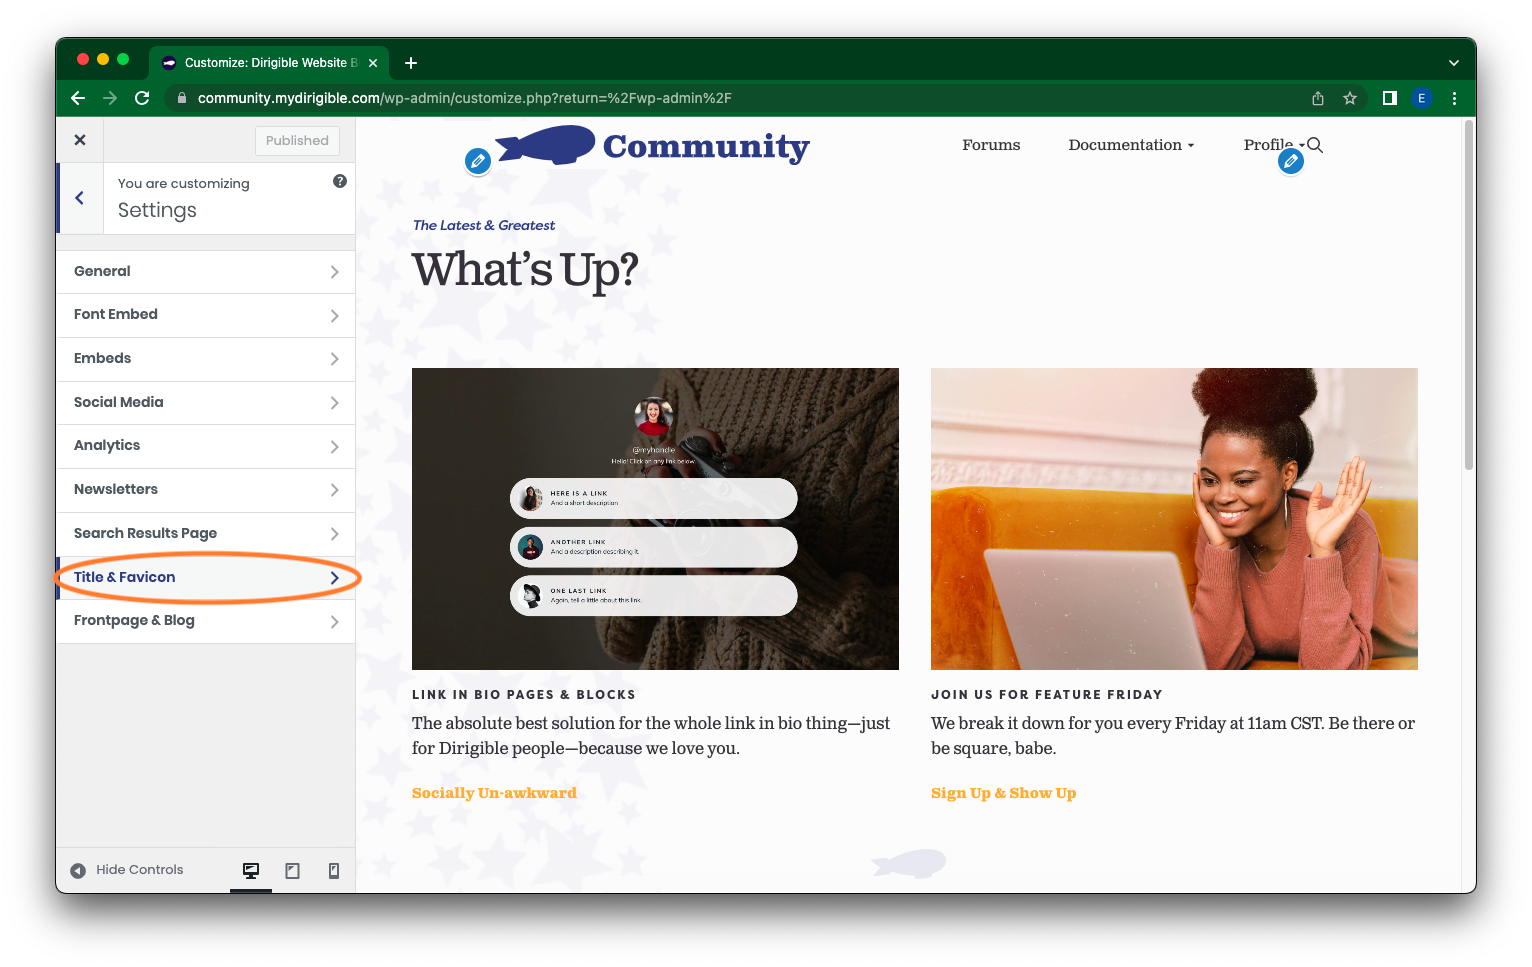
- The section you want to be looking at is Site Icon located in your Dashboard column at the bottom. Here you can either remove your preset favicon entirely if you wish or set up/change your favicon. Click on Change Image.
- You now have a couple options here for how to select your image. Looking in the top left, you can either select Upload files or Media Library.
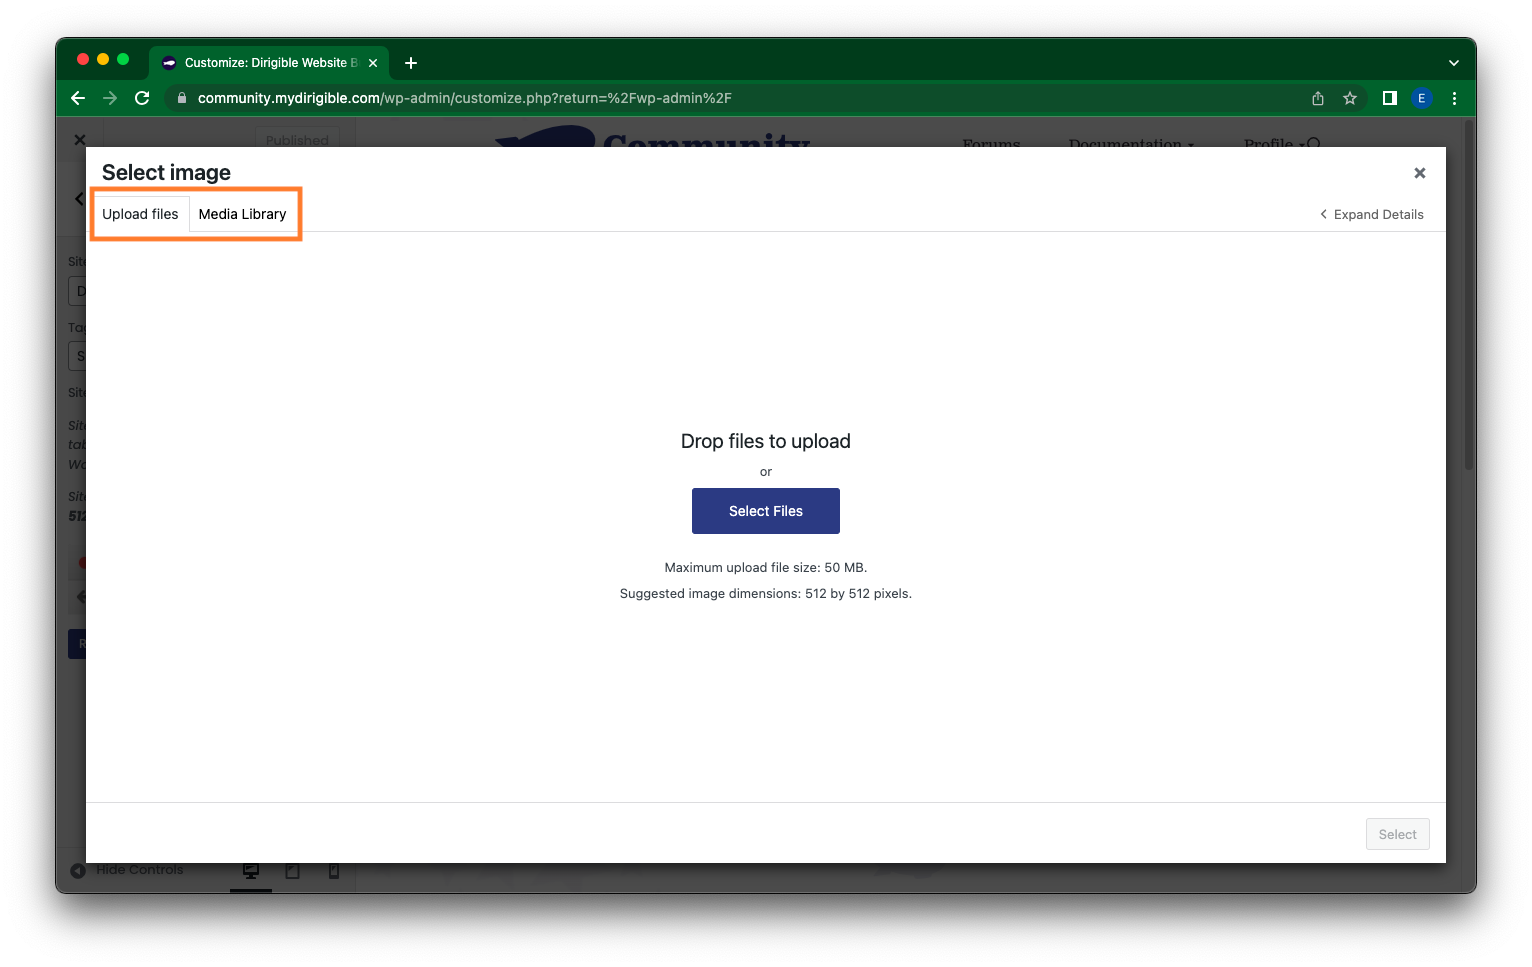
- If you are uploading a new file, you will want to be in the Upload files tab and either drag and drop your file or browse your computer by selecting the blue Select Files button in the middle of the page. Once uploaded, make sure to hit the Select button in the lower right corner.
- If you already have the file downloaded to WordPress, you want to be in the Media Library tab and click on the image you want to set for your favicon. Remember to save by hitting the Select button in the lower right corner!
Adding a favicon is really that easy! Your users will be grateful and your prevalent favicon will create brand recognition amongst your existing site visitors as well as potential visitors!
If you found this helpful and want to learn more about using your website and how to market your brand – sign up for our Website Building 101 course with Dirigible!
Update Your Payment Method with Ease
Need to make a change to your Dirigible subscription payment method?

Don’t stress—updating your payment method with Dirigible is easier than you might think! Stripe offers a user-friendly interface that allows you to make changes quickly and efficiently.
Here’s how:
- Log in to your Stripe account.
- Navigate to the billing section in your dashboard.
- Enter your new payment information and save your changes.
- Check your email for a confirmation message to ensure your update was successful.
As always, our team is just an email away (support@dirigiblestudio.com) should you encounter any issues during the update process.