Close Menu

Slideshow

Freeform content a carousel that adjusts height as the slide changes.

Usage

Somewhat similar to our Photo Block Slider, Slideshow lets you make a display that can be cycled through. However with Slideshow, your slides can be any block you want! Use this fun, yet potentially informative block to up your website game.

Parent Settings

The Slideshow block has parent block settings as well as child slide settings. There are additional child block settings for the blocks you select for your slides. Remember to access these settings, you must have the parent block selected. Since you are dealing with many block’s settings, be sure to utilize the breadcrumbs at the bottom of the page.

Adding a Slide

To add slides, make sure your Slideshow block is selected and click the + icon within the block. It looks similar to if you are adding another block to your post or page so be sure you are within the Slideshow block.

Within Slideshow, you have full access to any block you want, so feel free to get creative with it! Insert a Column or List or Paragraph block to really make the most of your slideshow.

Autoplay

Determine whether you want your slideshow to auto cycle through by toggling this field on and entering in an Autoplay Interval value in seconds. Otherwise, toggling off will allow your viewers to cycle through the slideshow at their own pace. This really depends on what type of content you are putting in the slides. If it is something that doesn’t require much engagement, we recommend turning on autoplay.

Block Width

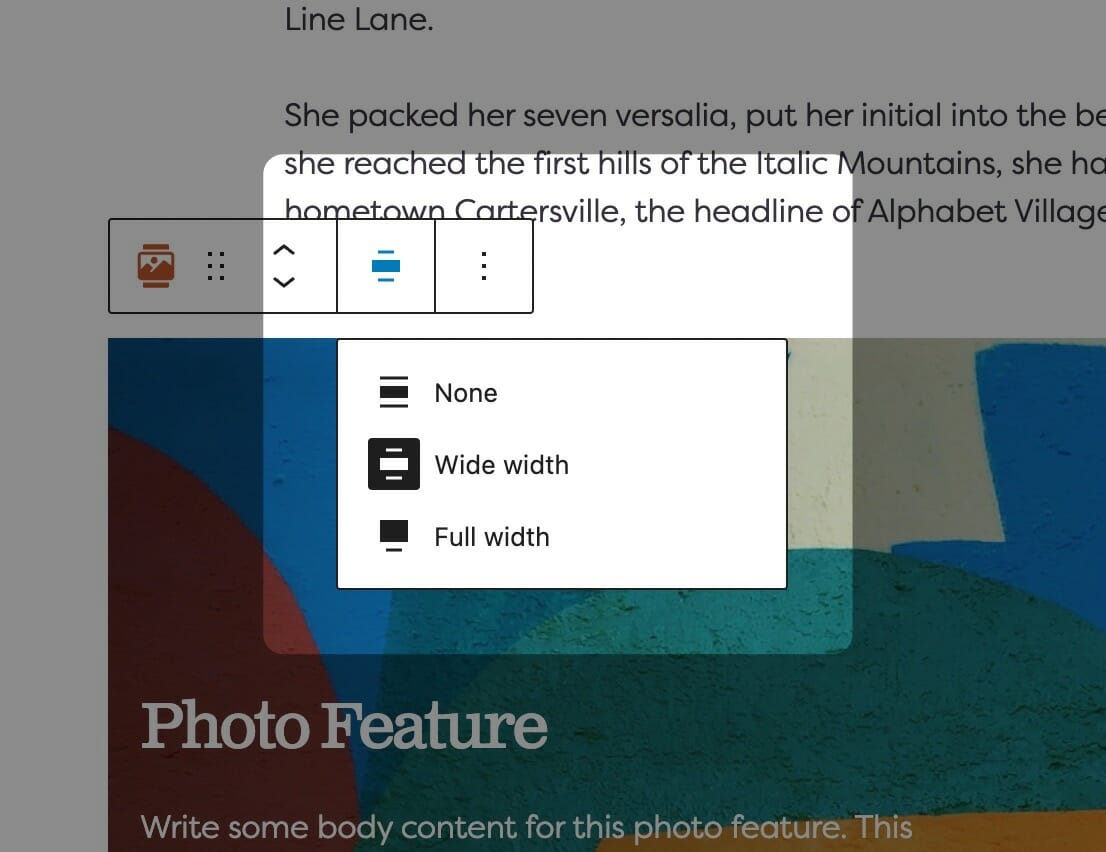
Blocks can be set to one of three widths in the editor: Default, Wide, or Full. Blocks will interact with adjacent blocks differently depending on their width.

Adjusting Block Width

The block width setting is found in your block context bar, which will show up above the current block that you have selected. A block that supports the block widths will show its current width icon in the context bar, and clicking it will allow you to change the width.

If you have the Top Toolbar setting selected, the block context bar will always show at the top of your page, not at the top of your block.

Default Width

The default width of your content is determined by the value set in your Customizer. You can find this setting under Styles » Widths » Content Width. This is the default width of most text-based content and most blog pages. We recommend keeping this set so that your content retains maximum readability, which most studies agree is around 50-60 characters per line.

Wide Width

Wide width content will take up 75% of the available width on the page or the default content width set on your site—whichever is larger. In effect, this makes content take up more of the available screen real estate. When used in conjunction with other wide width blocks, you can shape your webpages in many different ways.

Full Width

Full width content will always take up 100% of the available width on the page. When placed next to default or wide width content, margin will be applied to the full width block to give it some room to breath. When two full width blocks are placed next to each other, however, they will suction together and form a cohesive unit with no margin in between them.

Child Settings

Each slide has their own settings settings as seen in the image below. Each block that you select for your slides will additionally have their own child settings. We have documentation for most other blocks so search our site to find an explainer in the block you are looking for more information or guidance on!

Padding

The padding control changes the amount of space that’s given to the content contained within the block, adjusting how much the content is allowed to breathe within its container.

The padding control normally comes in predetermined step sizes, anywhere from None to XXL. The reason we use these predetermined step sizes is so your page can adapt intelligently depending upon which screen size your user is viewing your website on. For example, a LG padding setting will be smaller on mobile than it is on desktop.

There are occasions that this padding setting will appear as a range slider that allows your to choose a precise number for this setting. In these circumstances, your website will display the precise size you choose in this setting regardless of screen size.

Reverse Print

Toggling reverse print will flip the colors from your standard palette to white, which increases contrast and readability when text is placed on dark backgrounds.

You’ll find the reverse print toggle in the block sidebar. Enabling reverse print will affect the block its enabled on as well as everything inside of it. If the block contains Inner Blocks, reverse print will cascade to all descendants.

We recommend using reverse print whenever a block has a dark background and using white text would increase its contrast. While you can set text color on core blocks like Headings and Paragraphs, we strongly recommend using the block-level reverse print instead. This way, you’ll be able to quickly toggle all the content if you change the background color in the future. All Inner Blocks will respect the reverse print setting, even those without color settings themselves.

To read more about contrast requirements on the web, visit here.

Background Color

Choose any color from your palette to create a background.

Choosing a Background Color

You can choose a color from the block sidebar that will fill your block with a background color. The color options presented here will be colors from your site’s color palette, which you can edit in the Customizer. When using a dark background color, be sure to toggle the Reverse Print option to make sure your text remains legible.

Slideshow